PIVOT and dm_os_performance_counters

Dm_os_performance_counters is a great Data Management View that I use quite often.  You can find a ton of information that can help you identify performance bottlenecks in your system.  It can be used to view Page Life Expectancy, Free list stalls/sec, Lazy writes/sec, Batch Requests/sec, SQL Compilations/sec,  SQL Re-Compilations/sec, Cursor Requests/sec, Checkpoint pages/sec as well many other key data points.  All of which can play a role in the effective identification of performance bottlenecks.

First of all, let’s cover a bit of background on this DMV.  It has been around since SQL Server 2008 and will work in Azure SQL Database as well as Azure SQL Data Warehouse.  Although in the Azure SQL Data Warehouse it has a slightly different name, sys.dm_pdw_nodes_os_performance_counters.  The use of the DMV requires view server state permissions. There are a number of columns that are important, object_name and counter_name are just a couple.  There is a column named cntr_type column.  This is the column that will help us identify the type of each counter.

There are five counter types, although we will only discuss two of them here.  You can find more information on the other types here, link.  The first one has a counter type value of 27269576. This counter type is cumulative since the last time the SQL Server service was started.  An example of this type of counter is Batch Request/sec.

The other counter type have a value of 65792.  This counter type is the value as it stands right now.  An example of this is Page Life Expectancy, which changes constantly as normal activity takes place on the server.

This post focuses on the counter type that is cumulative.  The challenge that this counter type presents is that although it may be a value greater than 0, it is something that may not be happening at this point in time. This is what we need to determine, is this still happening or did it happen in the past.

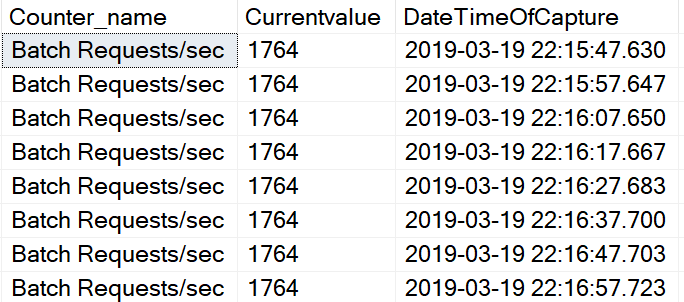
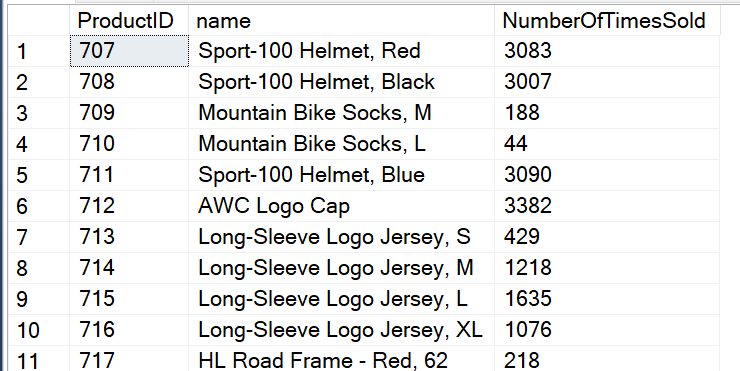
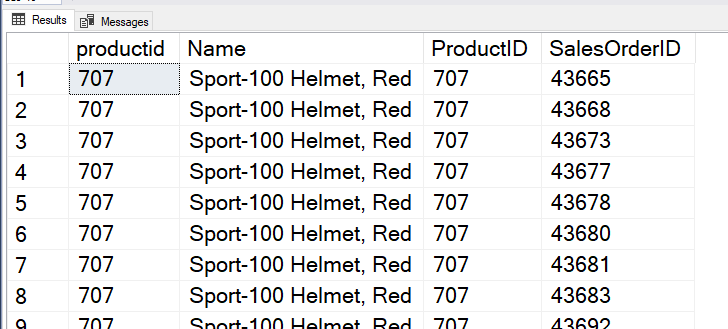
Free List Stalls/sec is an example of this counter type.  This counter is one of several that can help us determine if there is memory pressure on the server. If the current value is 30,000 and the service was last restarted 3 months ago, we don’t really know when these took place.  So what we want to do is determine if they are still happening.  This is where the PIVOT can help.  If you simply pull from the DMV you will get a single row for many of these types of counters.  Even if you use the WAITFOR to capture the value multiple times and place it into a table, it will look something like this.  Notice each row is 10 seconds apart.

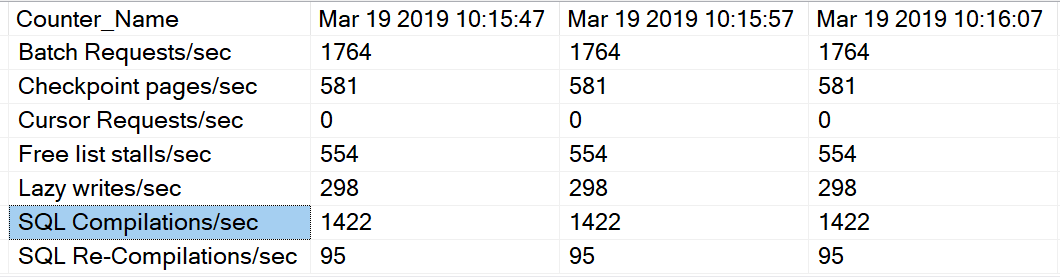
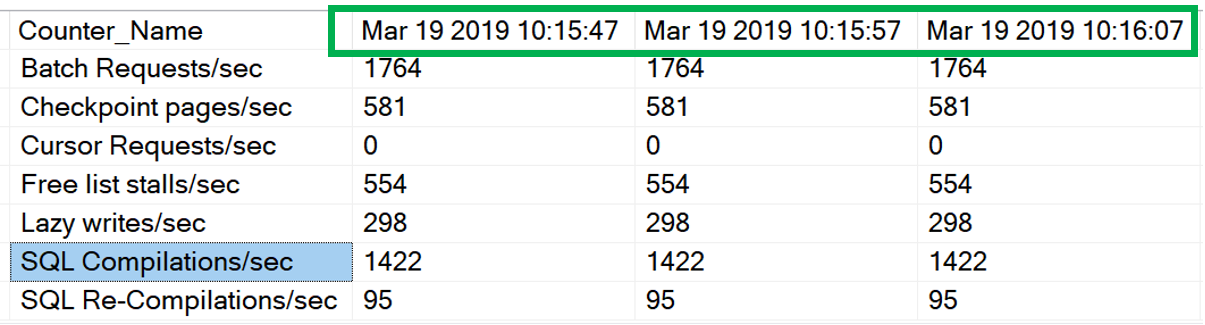
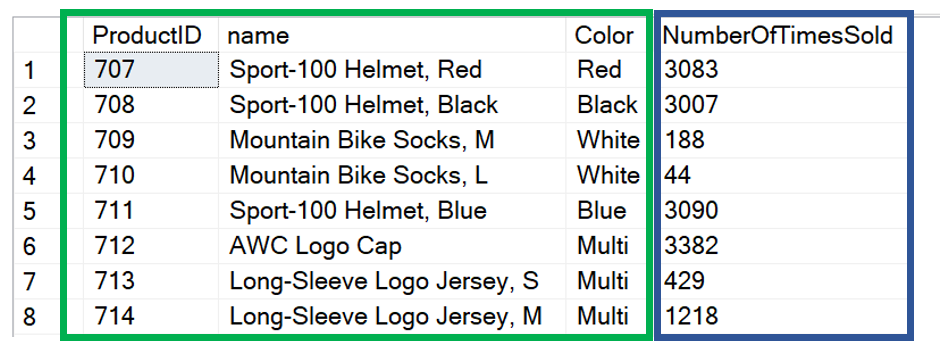
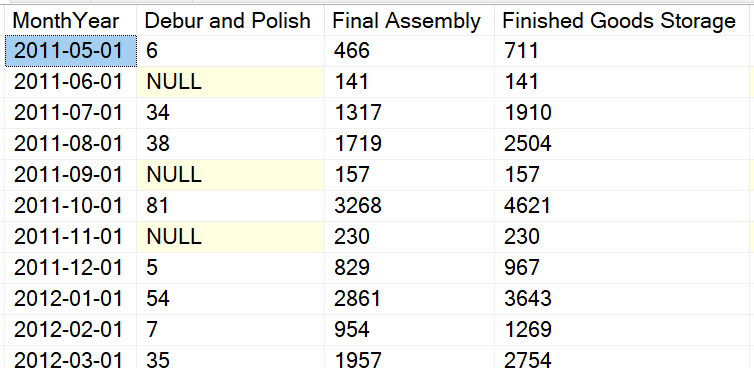
I think this presents a few challenges, the biggest being how can I easily tell if the event is still happening.  Another challenge is when you have two counters that should be looked at as a pair, like Batch Requests/sec  and SQL Compilations/sec.  I want to be able to easily look at the data and see the values as they change over a period of time. I want it to look something like this.  The counter names on the left and the times of capture along the top.  As you can see, in this example the capture of the data took place every 10 seconds.

This can be accomplished by using the PIVOT command. The first thing we do is to declare a counter variable and a table to store the values.

DECLARE @iCount AS SMALLINT
CREATE TABLE #CounterValues
( Counter_name VARCHAR(50)
, Currentvalue INT
, DateTimeOfCapture DATETIME)

Then set the counter variable to 1, although you can set this to 0 if you like.  This variable will server as our counter so the WHILE knows when to stop.

SET @iCount = 1

The next step is to write the code to capture the counter values and insert the data it the temporary table created above.  Because we need to capture the values over a period of time, the WAITFOR DELAY is used.  In this case the delay is 10 seconds, although you can change this to suit your needs. Of course, don’t forget to increment the counter variable. You will need to determine what counters you would like to capture.  Notice in the WHERE clause, we are looking for an instance_name of ” or ‘_total’.  This will allow the code to only capture one row for each counter.  The number 10 is the number of times we want to capture the counter values.  If you want to capture the data more frequently, simpley modify the number of seconds in the WAITFOR DELAY.  Here is link to my post in this topic, WAITFOR.

WHILE @iCount < 10
BEGIN

INSERT INTO #CounterValues
SELECT Counter_Name
, cntr_value
, GETDATE()
FROM sys.dm_os_performance_counters
WHERE counter_name IN
( ‘Free list stalls/sec’
, ‘Lazy writes/sec’
, ‘Batch Requests/sec’
, ‘SQL Compilations/sec’
, ‘SQL Re-Compilations/sec’
, ‘Cursor Requests/sec’
, ‘Checkpoint pages/sec’)
AND instance_name IN (,‘_total’)

WAITFOR DELAY ’00:00:10′

SET @icount = @icount + 1
END

Then we need to declare two variables, one to hold column names and the other to execute the dynamic SQL.

DECLARE @cols AS NVARCHAR(MAX)
DECLARE @query AS NVARCHAR(MAX);

Now we can into the meat of the PIVOT.  We want to capture the column names from the time of each cycle of data capture above.

SET @cols = STUFF((SELECT DISTINCT ‘,’ + QUOTENAME(
CONVERT(VARCHAR(40),LEFT(CONVERT(CHAR(40),DateTimeOfCapture, 109) , 20))) AS DateTimeOfCapture
FROM #CounterValues
ORDER BY DateTimeOfCapture ASC
FOR XML PATH(”), TYPE
).value(‘.’, ‘NVARCHAR(MAX)’)
,1,1,)

The above code will allow us to use the time of data capture as column headers as seen below.

If you print the @cols variable it will look something like this. You can see a series of dates with times separated with a comma. These values will now become the column names for our final result set.

[Mar 19 2019 11:17:00],[Mar 19 2019 11:17:10],[Mar 19 2019 11:17:20],[Mar 19 2019 11:17:30],[Mar 19 2019 11:17:40]

Now that we have our column names, let’s finishing up with the PIVOT.  Because the column names are created dynamically, we will need to use Dynamic SQL to complete it.

SET @query = ‘SELECT Counter_Name,’ + @cols + ‘ from
(
SELECT Counter_Name, currentvalue, LEFT(CONVERT(CHAR(40),DateTimeOfCapture, 109) , 20) AS TimeOfCapture
FROM #CounterValues
) x
PIVOT
(
SUM(Currentvalue)
FOR TimeOfCapture IN (‘ + @cols + ‘)
) p ‘

EXECUTE(@query)

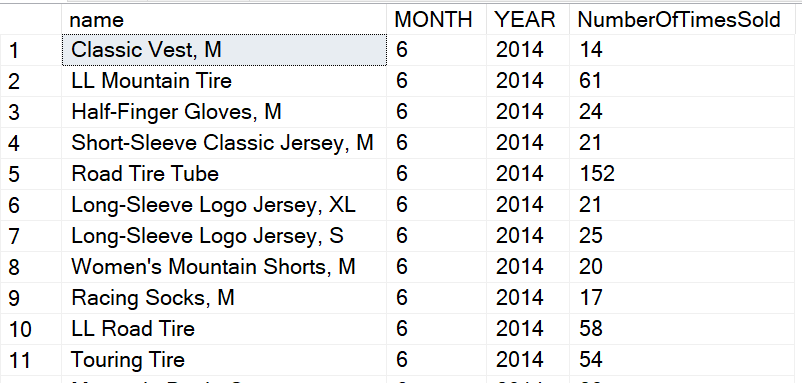
If you use these blocks of code together you will get what I think is the desired result. Notice the times across the top and the counter name on the left.

Here is a link to the complete code, PIVOTDMV.

Thank you for stopping by my blog and I hope you will find this useful!

sp_helptext

If you need to see the definition of an object you have several choices.  First, you could right click on the object and generate the script.  Another option you have is to use sp_helptext.  This system stored procedure can be used on any version of SQL Server since 2008, this includes Azure SQL Database and Azure SQL Data Warehouse.  This stored procedure can be used to obtain the definition of a number of objects, however it does not work on all object types.

According to the Microsoft documentation you can use this on the following object types:

        • User-defined rule
        • Default
        • Unencrypted Transact-SQL stored procedure
        • User-defined Transact-SQL function
        • Trigger
        • Computed column
        • CHECK constraint
        • View
        • System object such as a system stored procedure

The procedure has two parameters, @objname and @columnname.  The first parameter, @objname is the name of the object you are seeking to get the definition.  The second parameter, which is optional,  can be used to get the definition of a computed column.

When using the stored procedure you must have the rights to view definitions of objects.

We will start with the obvious, the first parameter, the name of the object.  There just a few rules regarding this parameter.  First of all, the object must exist in the current database.  If the object is not in the dbo schema, you will need to include the schema and include single quotes like below.

sp_helptextsales.SalesOrderDetail

If you include the schema in the object name and do not add the quotes you will get following error.

sp_helptext dbo.uspGetBillOfMaterials

Msg 102, Level 15, State 1, Line 3
Incorrect syntax near ‘.’.

If the object is in the dbo scheme it will look like this, single quotes not needed.  Although quotes are not required, it will also not fail if you include them.

sp_helptext uspGetBillOfMaterials

When you execute the above statement you will get these results.  Sometimes it might be nice to see it in the grid, however I find it better to send the results to text instead.  It is easier to copy to the clipboard.

When you send the results to text, SQL Server will add the word text at the top, this is actually the column name of the result set.


I really like to use sp_helptext when I have multiple objects that I need script. However, there is a bit of a catch.  If you try to run it without the GO keyword between you will receive this error.

The second parameter only works on calculated columns.  Below you will find the code.  Notice that the column name is not in quotes.  It will work either way, with or without quotes.

sp_helptext @objname = N’Sales.SalesOrderHeader‘, @columnname = salesordernumber ;

This is the results of the above statement:

(isnull(N’SO’+CONVERT([nvarchar](23),[SalesOrderID]),N’*** ERROR ***’))

If you attempt to run this against a column that is not a calculated column you will get this error:

Msg 15646, Level 16, State 1, Procedure sp_helptext, Line 75 [Batch Start Line 0]
Column ‘orderdate’ is not a computed column.

Just a few additional comments.  Sp_helptext will not work on encrypted objects.

This next topic may be in a future blog post, however, I did want to mention there as well.  There is another option. This code will return the definition of the uAddress trigger.

USE AdventureWorks2014;
GO
SELECT OBJECT_DEFINITION (OBJECT_ID(N‘Person.uAddress’)) AS ‘Trigger Definition’;
GO

When you run this, you will see the definition of the trigger.

Thank you for visiting my blog.


Trace Flag: Global vs Session

Trace flags can be used for many things.  They can be used to capture information about what is happening.  For example trace flags 1204 and 1222  can be used to capture information about deadlocks. Trace flags can be used to change the behavior of SQL Server for example, trace flag 3226 can be used to suppress successful backup messages in the error log.  You can even use trace flags to change the behavior of the TempDB, trace flags 1117 and 1118 can help keep the TempDB files close to the same size by changing how the data files grow.

There are many more trace flags that can be used.  Here is a link to a Microsoft document that describes each of the trace flags, click here.

In order to use trace flags they must be enabled first.

The first step would be to determine which flags are currently enabled.  This can be done with the DBCC TRACESTATUS statement.

If you run this statement to see what trace flags are enabled.

DBCC TRACESTATUS(-1);
GO

Notice the -1 in the parameter, the value tells SQL Server to return information on all enabled trace flags.  You will get one of two results. You will either get the list of trace flags that are enabled or you will get this statement.

DBCC execution completed. If DBCC printed error messages, contact your system administrator.

If you receive the above statement, it means that there are not any trace flags enabled at the moment. However, let’s say I have a number of trace flags enabled and I just want to check the status of one or more specific trace flags, you can use the code below.

DBCC TRACESTATUS (2528, 3205, 1204);
GO 

This statement accepts the trace flags you are looking for in a comma separated list.  In in the above statement you will have a set of three rows returned.  The results are below.  Notice there are 4 columns, the TraceFlag number, status, global and session.  The trace flag number is obvious as is the status.  In the status column it will either be a 1 or 0, enabled or disabled.

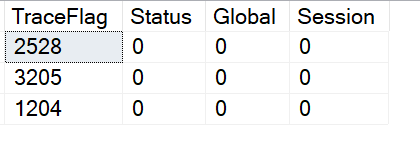
This brings us to the point of this post.  The third and forth column of the result set, Global and Session. These columns identify if the trace flag is turned on globally or just for the current session.

If you run this code the trace flag will be turned on for the session.

DBCC TRACEON(2528)

This can be confirmed by running this.

DBCC TRACESTATUS (2528, 3205, 1204);
GO

Notice that the value for the 2528 trace flag for Session is set to TRUE.

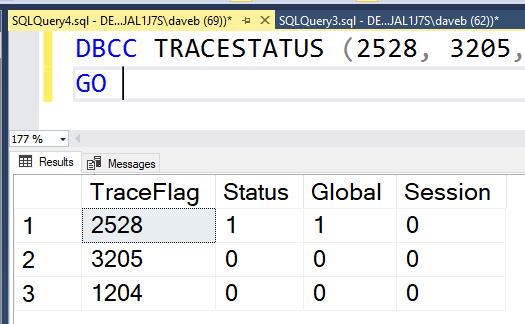
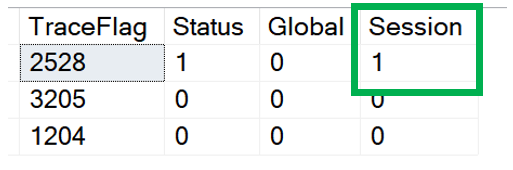
So what does it mean to when a trace flag is turned on just for a session?  It means that the trace flag is only active for the current session and is not visible from other sessions.  The image below show that 2528 is not active.  The trace flag was enable for SPID 62 and can not be seen from session 69.

In order to enable the trace flag globally, you will need to make one simple change to the DBCC statement.

DBCC TRACEON(2528, -1)

You simply have to add the -1 to the TRACEON statement as in the above statement.  When you run TRACESTATUS again, you will see that the flag under Global has changed to true.  This trace flag was enabled for SPID 62.

If I run TraceStatus in SPID 69, I see that the session is indeed enabled globally. Notice that trace flag 2528 is not enabled for SPID 69, remember we enabled that only for the session, in this case SPID 62.

You may have the question of, what happens when I restart the SQL Server service.  The answer is simple, the trace flags will no longer be enabled.  If you would like to have the trace flags enabled upon start up, you can add the -T command line startup option for SQLServr.exe.  One thing that is important here is for you to assure that the trace flags you would like to have enabled to be enabled again when the service is restarted.

Per Microsoft, this is a best practice, link to MS.  In this same document, Microsoft recommends that you not run TRACEON while users are connected to the system, otherwise you could see unpredictable behavior.

Now let’s say you want to disable the trace flags.  To do this you will need to use the TRACEOFF statement, like the one below.  Notice the -1 parameter is included when you want to turn the trace off globally.

DBCC TRACEOFF(2528, -1)

To turn off a trace flag for a session use this

DBCC TRACEOFF(2528)

You can also enable and disable multiple trace flags with the same statement. The desired trace flags will need to be listed and separated by a comma.

Here is an example of how to enable multiple trace flags at the same and as well as check the status.

DBCC TRACEON(2528, 3205, 1204, -1)

DBCC TRACESTATUS (2528, 3205, 1204 );
GO

Now comes the challenge, what trace flags should I enable.  There are many posts on different blogs that provide many great recommendations. In my opinion, before enabling a trace flag you should thoroughly understand what it does and if there is a potential for a negative impact on performance.

Thank you for stopping by my blog and hopefully you learned something.


Operand type clash?

From time to time you might come across this error.

Msg 206, Level 16, State 2, Line 13
Operand type clash: int is incompatible with date

But what causes it?  It is similar to a type mismatch error in the fact that there is a comparison of two data points that are of different data types they are not compatible. 

Let’s recreate this error.  The code below will create a temp table and then insert a row.  The final step will read from the table.  Notice that the HireDate column is a Date data type while the comparison in the WHERE clause is comparing the Hiredate column to in TINYINT data type.

–Create Table

CREATE TABLE #Test (
ID INT,
HireDate DATE,
)

–Insert a row

INSERT INTO #Test(ID,HireDate)
VALUES (102,6-6-2005)

–Read the data and recreate the error

SELECT  *
FROM #Test
WHERE HireDate = 14

As you may know, SQL Server will attempt to automatically convert the data to a similar data type using the data type precedence list.  From Microsoft, below is the order of the precedence.  For example, if SQL Server sees a comparison of a VARCHAR and an INT data type, SQL Server will attempt to convert the VARCHAR to an INT data type because INT is higher in the list.

          1. user-defined data types (highest)
          2. sql_variant
          3. xml
          4. datetimeoffset
          5. datetime2
          6. datetime
          7. smalldatetime
          8. date
          9. time
          10. float
          11. real
          12. decimal
          13. money
          14. smallmoney
          15. bigint
          16. int
          17. smallint
          18. tinyint
          19. bit
          20. ntext
          21. text
          22. image
          23. timestamp
          24. uniqueidentifier
          25. nvarchar (including nvarchar(max) )
          26. nchar
          27. varchar (including varchar(max) )
          28. char
          29. varbinary (including varbinary(max) )
          30. binary (lowest)

In our example, SQL Server is attempting to convert the TINYINT value of 14 to a DATE data type. Of course, this isn’t possible and the error will be thrown.

Now we know what can cause this error, what do we do to fix it?  The solution is to address the data type issue.  This can be done a number of ways, including using the CONVERT\CAST functions or even changing the data type in the tables.  

This error can not only happen in SELECT statements, it can will happen on other DML statements as well.

If you run this statement against the above temp table, you will get the same error.

— Insert a new row and receive the error

INSERT INTO #Test(ID,HireDate)
VALUES (102,13)

Hopefully this helps you out a bit and thanks for visiting my blog!


Anatomy of a SELECT Statement Part 5 – GROUP BY and HAVING

After a short break from this series, I was thinking it was time to add another post to the Anatomy of the SELECT statement series. This post will focus on the GROUP BY and the HAVING clauses.  These two statements can be used together, although when using the GROUP BY a HAVING is not required.  So far in the series we have covered the SELECT, FROM, JOINS clauses as well as the order of processing.  We have also covered the PIVOT, which follows the FROM clause.

The GROUP BY can be used to get an aggregation for a group. For example it can be used to get the number of times each product has been sold.  As with most of my other posts, all examples in this post will use the AdventureWorks2014 sample database.

SELECT p.ProductID, p.name, COUNT(p.name) AS ‘NumberOfTimesSold’
FROM Production.product p
INNER JOIN Sales.SalesOrderDetail s
ON p.ProductID = s.ProductID
GROUP BY p.ProductID, p.name

In the above statement, notice the use of an aggregate function.  This is really what the GROUP BY is about.  The GROUP BY and the use of the COUNT() aggregate function work together to get the results I am seeking, the number of times each product has been sold.

Requirements of the GROUP BY

As with all other statements and clauses in TSQL, there are requirements that must be followed.  Below are the basic requirements of the GROUP BY.

  • Cannot use a column from an indexed view
  • The column used in the aggregate function does not need to appear in the SELECT list
  • Cannot group on the following data types
    • XML
    • TEXT
    • NTEXT
    • IMAGE
  • Can group on XML if the column is using in a function that outputs an acceptable datatype
  • All columns must either be in the GROUP BY or in an aggregate function

Using the GROUP BY

Now that we have covered a few of the requirements. let’s see how we can use the GROUP BY.

Using the same code as in the example above, let’s dig a little deeper.  

SELECT p.ProductID
, p.name
, p.Color
, COUNT(s.ProductID) AS ‘NumberOfTimesSold’
FROM Production.product p
INNER JOIN Sales.SalesOrderDetail s
ON p.ProductID = s.ProductID
GROUP BY p.ProductID, p.name, p.color

As you can see, the GROUP BY will follow the FROM clause and any joins.  After the GROUP BY you will simply list the columns you would like to have each group be made of.  The order of the columns listed in the GROUP BY does not matter and will not change the results or the column order in the results set, that is determined by the SELECT list. You can list them in any order you like, although I prefer to list them in the same order as they appear in the SELECT list.  Again, that is just a preference and not a requirement of TSQL.

In the example, the groups will consist of the Productid, name and color columns.  If you look at the image below, the columns in the green box make up the group, while the column in the blue box represents the aggregation, in this case it is a COUNT.

When using the GROUP  BY, all columns in the SELECT must either be in the GROUP BY or using an aggregate function.  If this requirement is not met, you well see this error:

Msg 8120, Level 16, State 1, Line 2
Column ‘Production.product.Name’ is invalid in the select list because it is not contained in either an aggregate function or the GROUP BY clause.

To prevent this error, I like to do a simple test.  Look at each column and check to see if it is in the GROUP BY or using an aggregate.

SELECT p.ProductID  –Is in the Group by
, p.name   –Is in the Group by
, p.Color  –Is NOT in the Group by, will cause an error
, COUNT(s.ProductID) AS ‘NumberOfTimesSold’  –Is using an aggregate
FROM Production.product p
INNER JOIN Sales.SalesOrderDetail s
ON p.ProductID = s.ProductID
GROUP BY p.ProductID, p.name

Can Expressions be used in the GROUP BY?

Now let’s change what we are looking for.  Let’s now look for how many times each product was sold by year and month.  In order to do this, I can use an expression on the GROUP BY clause.

SELECT p.name
, MONTH(h.orderdate) AS ‘MONTH’
, YEAR(h.orderdate) AS ‘YEAR’
, COUNT(s.ProductID) AS ‘NumberOfTimesSold’
FROM Production.product p
INNER JOIN Sales.SalesOrderDetail s
ON p.ProductID = s.ProductID
INNER JOIN Sales.SalesOrderHeader h
ON s.SalesOrderID = h.SalesOrderID
GROUP BY p.name, MONTH(h.orderdate), YEAR(h.orderdate)
ORDER BY Year DESC, Month DESC

Notice in the GROUP BY the MONTH and YEAR functions are being used.  As you can see in the results below, the “Classic Vest, M” product was sold 14 times during the month of June 2014.

Final thoughts on GROUP BY

Using the GROUP BY really isn’t very complicated, you just need to do three things:

  1. Determine what columns you want to make up the groups
  2. Determine which aggregate function you would like to use
  3. Before running the statement, check all the columns in the SELECT list to make sure each column is either in the GROUP BY or using an aggregate function

Using the HAVING

Now that I have my groups and my aggregate totals, what if I want to apply a filter to the results, similar to the WHERE clause?  That is where the HAVING comes in.  You can think if this as a where clause for groups.  The HAVING clause appears after the GROUP BY and includes both the HAVING keyword and an expression.  In the case below, the expression is COUNT(s.ProductID) > 10.

SELECT p.name
, COUNT(s.ProductID) AS ‘NumberOfTimesSold’
FROM Production.product p
INNER JOIN Sales.SalesOrderDetail s
ON p.ProductID = s.ProductID
INNER JOIN Sales.SalesOrderHeader h
ON s.SalesOrderID = h.SalesOrderID
GROUP BY p.name
HAVING COUNT(s.ProductID) > 10

Using HAVING also requires the use of an aggregate function.  This aggregate really should be the same as what is in the SELECT list. If you do not include an aggregate and use something like this, HAVING s.rowguid > 10,  you will get the error below.

Msg 8121, Level 16, State 1, Line 11
Column ‘Sales.SalesOrderDetail.ProductID’ is invalid in the HAVING clause because it is not contained in either an aggregate function or the GROUP BY clause.

Conclusion

Using the GROUP BY and HAVING clauses are very commonly used and having a good understanding of them is essential for anyone who writes TSQL code.  Below you will find two links to documentation from Microsoft

GROUP BY

HAVING

Thanks for visiting my blog and I hope you learned something!

PIVOT…What is it and Where do the column names come from

Microsoft defines the PIVOT as:

“Rotates a table-valued expression by turning the unique values from one column in the expression into multiple columns in the output, and performs aggregations where they are required on any remaining column values that are wanted in the final output” – link here

If you have used Excel, you will find the results when using the PIVOT are very similar to a Pivot Table.  Below is a screenshot of a Pivot table from a video from Microsoft, link here. Notice the values across the top and on the left side.  The numbers in the middle are aggregations of the data.

If you look at the example below of a result set using the TSQL PIVOT , you will notice the same structure.  Values across the top and on the left side with aggregations in the middle.

Now that we have talked about what the PIVOT command does, lets go over some basics.

  • The PIVOT was first introduced into SQL Server with the release of SQL Server 2005
  • The PIVOT keyword is placed after the FROM clause
  • The resulting pivot table requires a table alias
  • “When aggregate functions are used with PIVOT, the presence of any null values in the value column are not considered when computing an aggregation.” – per Microsoft documentation

Elements of the PIVOT statement

Let’s go over the various parts of the PIVOT.  Using the image below, I will dissect each component of the PIVOT command.

Part A

This is simply the TSQL statement that will pull the data you would like to use in the PIVOT. My suggestion is to get this query to return what you are looking to pivot first, then add the necessary code for the PIVOT around it.

Part B

These are hard coded values that will determine the names of the columns in the final result set.  We will cover how to dynamically get the column names later in this post.

Part C

This is the column in the PIVOT table that will be aggregated.

Part D

This is the actual PIVOT table.   Notice that the column does not appear to the pivot table at the bottom.  Only the year and the aggregate column appear.  As stated earlier, this requires an alias. If you do not use an alias you will receive this error.

Msg 102, Level 15, State 1, Line 16
Incorrect syntax near ‘)’.

By looking at the image below, you can see the alias has been commented out.  The causes the above error, as well the hard coded column to be marked with an invalid column name error.

Part E

In this case, it is the first column.  It start with the Name column in the inner query and works its way to the outer query and eventually to the PIVOT table results.  Notice that the column alias flows through the entire process.  If you change the column alias in the inner query, you will also have to change it on the outer query as well. If you use an alias for the Name column in the inner query and you do not change the column name in the outer query you will see this error.

Msg 207, Level 16, State 1, Line 1
Invalid column name ‘Name’.

Part F

This is the aggregate column.  The column in the inner query does not have a aggregate function on it, but it can if your needs dictate that it does.

Part G

These are both the column names and the values that will be used to complete the grouping for the aggregation.  If you change one if them you will get an invalid column name error.

Here is the completed code.  I used the AdventureWorks2014 database.

SELECT Name, [2011], [2012], [2013]
FROM
( SELECT loc.name
, sde.OrderQty
, YEAR(she.OrderDate) AS Year
FROM Production.Location loc
INNER JOIN Production.ProductInventory pin
ON loc.LocationID = pin.LocationID
INNER JOIN Sales.SalesOrderDetail sde
ON pin.ProductID = sde.ProductID
INNER JOIN sales.SalesOrderHeader she
ON sde.SalesOrderID = she.SalesOrderID
) AS x
PIVOT
( SUM(OrderQty)
FOR Year IN ([2011], [2012], [2013]))
AS PivotTable

What do I do if I don’t want to hard code the values for the column names?

This a question I get a lot in my classes.  The answer is dynamic SQL.  Yes I know about all the potential issue with dynamic SQL, so you need to exercise caution when doing this.

The first thing we need is a couple of variables.

DECLARE @cols      AS NVARCHAR(MAX)
DECLARE @query  AS NVARCHAR(MAX);

The first variable is to hold what will be your column names, while the second variable will be used to execute the SQL.

Next we need to go get the values we want to use as our column names.  In order to do this we will use the keyword STUFF.  What is STUFF, it simply is used to insert a string in a string….in other words, stuff a string in a string.  Go here to get more detailed information about the STUFF keyword.

The STUFF keyword has four parameters.

  1. Character expression – this is the string we want replaced
  2. Starting point
  3. Length
  4. The string we are going to insert

We will also need to the QUOTENAME function, click here for more information.  This function simply adds delimiters. If we look at the code below and PRINT the variable we will see this:  [2011],[2012],[2013],[2014]

Below is the code we can use to get the column names.  If you want to use this, all you have to do is replace everything from the CONVERT to the ASC with your query.  Remember, it can only return one column.

SET @cols = STUFF((SELECT DISTINCT ‘,’ + QUOTENAME(
CONVERT(VARCHAR(4),YEAR(she.OrderDate))) AS Year
FROM Production.Location loc
INNER JOIN Production.ProductInventory pin
ON loc.LocationID = pin.LocationID
INNER JOIN Sales.SalesOrderDetail sde
ON pin.ProductID = sde.ProductID
INNER JOIN sales.SalesOrderHeader she
ON sde.SalesOrderID = she.SalesOrderID
ORDER BY YEAR ASC
FOR XML PATH(), TYPE
).VALUE(‘.’, ‘NVARCHAR(MAX)’)
,1,1,)

The next thing we need to do is set the variable for execution.

SET @query = ‘SELECT name AS LocationName, ‘ + @cols + ‘ from
            (
            SELECT loc.name
            FROM Production.Location loc
               INNER JOIN Production.ProductInventory pin
                   ON loc.LocationID = pin.LocationID
               INNER JOIN Sales.SalesOrderDetail sde
                   ON pin.ProductID = sde.ProductID
               INNER JOIN sales.SalesOrderHeader she
                   ON sde.SalesOrderID = she.SalesOrderID
           ) x
            pivot
            (
                  SUM(OrderQty)
FOR Year IN  (‘ + @cols + ‘)
            ) p ‘

Finally the last step, execute the query.

EXECUTE(@query)

You will find the entire code here: PivotDemo.

While researching this post I found a very nice post about another method to use to do this using Json.  It can be found on Red-Gate’s web site, this link is below.

Phil Factor from Red-Gate shows how to use Json to pivot: click here

Thank you for visiting my blog, hope you enjoyed and learned something!

Select Distinct and XML data

As you know, the DISTINCT key word can be used to eliminate duplicate rows from the result set of a query.  

For example:

If you run this query against the AdventureWorks2014 database you will get 19614 rows with many duplicates.

SELECT City
FROM [AdventureWorks2014].[Person].[Address]

As you can see in the above results set there are duplicates.  Albany appears  4 times. However, my goal is to simply see what cities the database has addresses in.

I can address this by using the DISTINCT keyword.  The code below show that you simply add it just after the SELECT keyword.  Here is a link for more information on DISTINCT.

SELECT DISTINCT City
FROM [AdventureWorks2014].[Person].[Address]
ORDER BY City

The result set below shows that Albany only appears one time, duplicates have been removed.

Well, what if the result set contains XML data?  Will the DISTINCT work the same way?  The answer is no.  

Since I was working on an example for my next performance class, I decided to use an example from that session.  In the query below the qp.* part of the column list will return a column named query_plan which is an XML data type.

SELECT DISTINCT pa.,cp.,qp.*
FROM
(SELECT plan_handle
FROM sys.dm_exec_cached_plans) cp
CROSS APPLY sys.dm_exec_query_plan (cp.plan_handle ) qp
CROSS APPLY sys.dm_exec_plan_attributes(cp.plan_handle) As pa
WHERE is_cache_key = 1 AND pa.attribute = ‘set_options’

However, when I add the DISTINCT keyword I get the error below.

So what do I do about.  You can simply use the CONVERT function to convert that datatype from XML to VARCHAR(MAX) like below.

SELECT Distinct qp.dbid
, qp.encrypted
, CONVERT(VARCHAR(MAX),qp.query_plan)
FROM
(SELECT plan_handle
FROM sys.dm_exec_cached_plans) cp
CROSS APPLY sys.dm_exec_query_plan (cp.plan_handle ) qp
CROSS APPLY sys.dm_exec_plan_attributes(cp.plan_handle) As pa
WHERE is_cache_key = 1 AND pa.attribute = ‘set_options’


Just a disclaimer, I didn’t analyze this for performance because the class is about an unrelated topic. If you plan on using this in production code, please assess the impact on performance.

I will put this into the “You learn something new everyday” category!   As always, it is always fun to learn and I hope you did as well.  Thank you for visiting my blog.

Lessons Learned From Three Months of Blogging

As the three month anniversary of my first blog post approaches, I thought I would share my thoughts on what I have learned so far.

Here is a list of what I have learned.

  • Have someone read your post before publishing
  • Blog about what is important or of interest to you
  • It is a great way to learn about SQL Server
  • Double check or even triple check your facts and code
  • Blogging isn’t a competition
  • Blogging can be easy or difficult
  • Be yourself
  • Have fun

Have someone read your post before publishing

I have found that this is a great idea.  There have been several times in which I have read my post the next day and found something in my post the I felt needed to be fixed.

These items include a number of areas including the following.

  1. Typos – this sadly happened far more than I would like to admit and included misspelled words and grammatical errors.
  2. Something missing – this is when I mention something in the post that I felt required some prerequisite knowledge that I didn’t mention earlier in the post. Sometimes, this also included an important detail that I simply forgot to include in the post.
  3. Out of order – This happened several times and it happened when I inadvertently placed something in the post earlier than it should have been.  This usually happened when I moved a part of the post to a new location using copy and paste.
  4. Sounded funny – There are times when I wrote something and it sounded great in my head but when I read it after I published it, it just sounded funny or awkward

These are all things that can be found by having someone else read your post.  That person does really need to know SQL Server to be able to help in many of these areas.  When something did slip through and I found it the next day,  I just hoped that I would be able to fix it before anyone read it.

Blog about what is important or of interest to you

When I first decided to start my blog, I talked to several experienced bloggers about what I should blog about.  My first thought was to blog only about topics that really haven’t been blogged about before.  I felt that with so many great bloggers out there, I didn’t think I could do it better.  However, I had several people tell me that I was looking at it wrong.  They suggested that I should pick a topic that is of interest to me and blog about that.  Even though there are many great SQL Server blogs out there, they told me that I would present a topic in a way that no one else has and someone just might connect with the way I say it.  This doesn’t mean that I would say anything better than anyone else, just in a different way.  If even one person has benefited by what I have written, it was worth the effort.  My goal is to help people become better at working with SQL Server.

It is a great way to Learn about SQL Server

Even though I have been teaching SQL Server for almost 20 years, there is always something to learn.  When I started my blog, I decided to blog about SQL Server basics to work on my blogging skills.  However, I found that I learned a lot more than just how to blog.  As I wrote my first blog post on the order of processing of the commands in a SELECT statement, I quickly realized that it is a great idea to go back to the basics sometimes to refresh your memory. Of course when blogging about something new, you will find that there is so much to learn.  Every blog doesn’t need to be very long or cover a complex topic.  Every day there are now SQL Server professionals who want to get better and learn more.

Double or triple check your facts and sample code

For years I found myself frustrated from time to time because of incorrect information or sample code that didn’t work.  This obviously requires knowledge of SQL Server to verify that your post is technically accurate.  Before releasing your post, my suggestion is to confirm the facts and run through your sample code to make sure it works as intended.

Blogging is not a Competition

The SQL Server community is a great community that is really about sharing and helping fellow data professionals.  If you attended PASS Summit, a SQL Saturday or a local user group you have seen this first hand.  The idea of sharing extends to blogging as well.  I believe that most, if not all of the blogs that exist are there to help others in the community.  Luckily there are many great blogs that I have used on a regular basis in my own career.  My goal isn’t to compete with any one, it is merely to put information out there and hopefully help as many people as I can.  As I said earlier, if I can help just one person, it is worth the time and effort.

Blogging can be easy or difficult

The beauty of having my own blog is that I get to decide if my blog posts are easy or challenging.  Some days, I feel like posting something that is more basic and others days I want to go down the more challenging route.  It is my choice.  What I have found for me is that I like to alternate between basic and more challenging.  This allows me to post a bit more frequently. Since there are always new people in the SQL Server community, there is always a need for the most basic topics.  You just need to decide what is best for you to blog about.  Keep in mind, there are always new people entering the SQL Server world and they could benefit from even the most basic blog posts.

Be Yourself

I feel that this is really important.  I am asked quite frequently for advice on teaching.  The first thing is always say is to be yourself.  That advice extends to blogs as well. Your blog should represent who you are.  If you are a bit more on the serious side, then let you blog show that.  However, if you consider yourself to be somewhat of a comedian, then let your blog show that as well.

Have Fun!!

I have found that I really do enjoy blogging.  The thought of helping is what makes it fun.  I have been lucky enough to have had the opportunity to teach SQL Server for almost two decades and blogging is just another method of teaching!!  I really look forward to what learning opportunities future posts will offer!!!

How to Start a Blog

Hopefully I have given some good advice on what to do once you have your blog up and running.  However, you may be asking yourself how do I start a blog.  Rather than reinvent the wheel, here is a blog post by Brent Ozar that gives some really good advice on how to start a blog. It is a number of years old, but I think still applies today.  How to Start a Blog

Some of my Favorite Blogs

These are just a few that I have used over the years.  The one that I almost always find myself at is Pinal Dave’s blog.  His was one of the blogs I consistently used when I first started my career and still use to this day.  If it weren’t for the many blogs that are out there, my career would not be where it is, for this I am grateful to the many folks that spend time sharing with us!!

Although I have learned a lot about how to blog, I still have so much more to learn!


UNION vs UNION ALL

Before we get into which is better to use, let’s talk about some UNION basics.  First of all, both UNION and UNION ALL are set based operations and the purpose of both of these statements is to combine two distinctly different result sets into a single set.  Let’s say I wanted to send a invitation to both employees and customers for an event, UNION or UNION ALL would work perfectly to allow me to get the list I am looking for.

Requirements

The requirements for both UNION and UNION ALL are pretty simple.  Both queries must have the same number of columns and the columns must have similar data types.

Below is an example of a UNION query using the AdventureWorks2014 database.

SELECT Name
FROM Purchasing.Vendor
UNION
SELECT Firstname + ‘ ‘ + LastName
FROM person.person

Even though the second query is using two columns from the Person.Person table, they are being concatenated into a single column.

So what happens if the number of columns do not match?  You will get this error.

Msg 205, Level 16, State 1, Line 1
All queries combined using a UNION, INTERSECT or EXCEPT operator must have an equal number of expressions in their target lists.

This is a pretty easy error to fix, simply make sure the number of columns match.

Now on to the second requirement, the columns must be similar data types.  Notice that I didn’t say exact same data types.  If the data types are different, SQL server will use the data type precedence and do a convert to the same data types.  If you go here, you can see the data type precedence.  If you look at the image below, you will see that the BusinessEntityID is INT while the LastName is NVARCHAR.  According to the precedence list, INT is higher up the list than NVARCHAR so SQL Server will attempt to convert the LastName column data to INT resulting in this error.

Msg 245, Level 16, State 1, Line 8
Conversion failed when converting the nvarchar value ‘Abbas’ to data type int.

If you get this error, you will need to decide if you want to use the CONVERT or CAST functions to convert the column with the higher data type to the lower data type.  Obviously, the two columns mentioned is something you probably wouldn’t see in the real world, but I wanted to use it for demonstration purposes.

UNION vs UNION ALL

The differences between these two is pretty simple, when using just the UNION keyword, duplicates records will be eliminated while the UNION ALL will include any duplicates.

If you execute this statement against the AdventureWorks2014 database you will see that it will return 20,077 rows and will include duplicates.  If you run the same two queries with UNION instead of UNION ALL you will only get 19,622 rows.  Andrew Cencini will appear two times in the first query and only one time in the second.

Includes duplicates:

SELECT Name
FROM Purchasing.Vendor
UNION ALL
SELECT Firstname + ‘ ‘ + LastName
FROM person.person

Does not include duplicates:

SELECT Name
FROM Purchasing.Vendor
UNION
SELECT Firstname + ‘ ‘ + LastName
FROM person.person

How can I tell what query each row is coming from?   In the query below you will see the text in pink, this is simply a string with a column alias.  In this case the string is the name of the table the row comes from with an alias of Source.

SELECT Name, ‘Vendor’ AS ‘Source’
FROM Purchasing.Vendor
UNION ALL
SELECT Firstname + ‘ ‘ + LastName, ‘Person’ AS ‘Person’
FROM person.person

When doing this, the actual name of the column will come from the first query.  In the query above there are two aliases, Source in the first query and Person in the second.  The below image shows where the column name will come from.  Also notice the values in the column identify the source table for that row.

ORDER BY

Of course in order to guarantee that the result set is to use the ORDER BY keywords.  When using UNION or UNION ALL, the ORDER BY must be after the last query.  If you try to use it in an earlier query, you will get this error.

Msg 156, Level 15, State 1, Line 4
Incorrect syntax near the keyword ‘UNION’.

What about performance?

Generally the UNION ALL will be faster than the UNION.  Here are a few links to some great posts that give more information about the impact on performance when using these statements.

Pinal Dave

SQLPerformance.com

Thanks for visiting my blog and please contact me if you have any questions.

Anatomy of a SELECT statement – JOINS – Part 4

If your database is normalized, data points will only appear in the database one time.  For example, a customer name will only appear in one table,  customer address will appear in only one table and employee names will only appear in one table. This is a nice Wikipedia article on Normalization Well, what do you do if you have a request to create a report on sales that has a requirement of containing both the sales person name and the customer name.  Since the sales person name is in one table and the customer name is in another table, you will need to use the JOIN keyword. Given that, the purpose of a join is when there are columns in different tables that you want in the same result set.

There are a number of join types that can be used in SQL Server. In this post we will cover the logical join, what you using in your code.

Logical Join Types

INNER
OUTER
CROSS
FULL

Behind the scenes the query engine will use physical joins.  There are four of these, Nested Loop, Hash Match, Merge and starting in SQL Server 2017, Adaptive joins.  Although it is important to know these when working on query optimization, these will be covered in a future post.

Logical Join Requirements

Before getting into the types of joins, we should review the requirements of joins.

  • Column names do not need to match
  • Data types must be compatible
  • SELECT list does not need to include columns from every table
  • Although not an absolute requirement, it is highly recommended that you use table aliases when joining tables

Keep in mind, if the data types are not the same, the data will have to be converted.  This can be done explicitly using CAST or CONVERT, or it will be done with an implicit convert.

What columns To Join On

Typically the join will be on the Primary Key column in one table and a foreign key column in another.  However, there are times in which this will not be the case.

Table Alias

When using joins, it is important to give your tables an alias.  When use tables aliases, I like to have them be somewhat descriptive, like e for employee or s for sales. I also like to keep them the same length when ever possible and keep the to three or less characters.  These are just my preference and in no way is a requirement.

If you don’t use any aliases and the columns are not referenced properly in the SELECT statement and the column name you want to use exists on one or more tables in the FROM clause you will get an error.

In the statement below, you will see that the ProductID column does NOT use the alias as expected. Also notice the error below it, “Ambiguous column name ProductID”. This simply means that the column name exists in more than one table and SQL Server does not know which table to get the column from.


INNER Join

An INNER join would be used when you want to return data that has matching values in both tables in the join.

For example, you want to see all the products that have been sold. In order for a query to pull this data, there needs to be a matching value in both tables.  Using the AdventureWorks2014 database, the Product information is in the Production.Products table while the products sold is in the Sales.SalesOrderDetail table.  If you look at the image below, you will see that the two columns that we need to join on are both named ProductID.  However, as I stated before, that is not a requirement, but something you will see quite often.  The data types for both of these columns are also the same data type, INT.  However, that is also not a requirement, they just need to be similar data types.


To meet the requirements of the request of seeing all the products that have been sold, the ProductID must exist in both tables.  If product ID number 1 was sold at least one time, you will see it in the ProductID column in the SalesOrderDetail table.  The image below visualizes this.  The green circle is the Product table while the orange circle represents the SalesOrderDetail table.  The points where the two circles cross represents the values that can be found in both tables.


Using the code below, we can query the AdventureWorks2014 database to find all the products that have been sold at least one time.  What makes this work is that a ProductID will be returned ONLY if it appears in at least one order.

SELECT p.productid
, p.Name
, s.ProductID
, s.SalesOrderID
FROM production.product p
INNER JOIN [Sales].[SalesOrderDetail] s
ON p.ProductID = s.ProductID
ORDER BY p.ProductID

When you run the above query, will the get the results below.  Notice that the result set is ordered by ProductID in ascending order.  You will also notice that the ProductID 1 does not appear, despite existing in the Production.Product table.  This is because ProductID has not been sold.

This is confirmed by using the two queries below, one for the Product table and the other for the SalesOrderDetail table. Since this is an INNER JOIN, it is expected that productid number 1 would not be returned in the above result set.

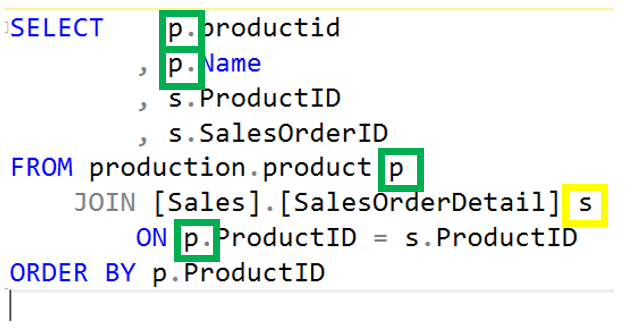
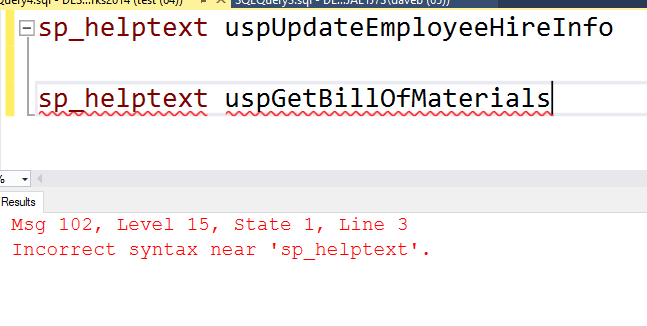
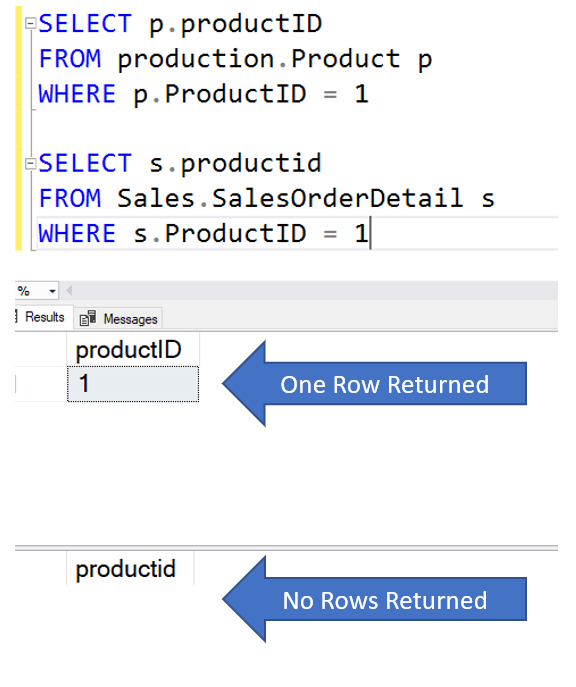
Another small note about the INNER JOIN is that it is a the default join type.  In the statement below, you will notice that the INNER key word is no longer present, yet returns the exact same results set as above.

SELECT      p.productid
, p.Name
, s.ProductID
FROM production.product p
JOIN [Sales].[SalesOrderDetail] s
ON p.ProductID = s.ProductID
ORDER BY p.ProductID

OUTER JOIN

Lets change the requirements just a bit.  Instead of wanting to see all the products that have sold, we now want to know what products have NOT sold.  The OUTER join to the rescue!

An OUTER join will return all rows from the table on one side of the join and only matching values from the other table.

Starting with the LEFT OUTER JOIN, this join returns all rows from the table on the left and rows with a matching value on the left. We will use LEFT OUTER JOIN in this blog, however the OUTER key is technical optional, I just prefer to always use it.

SELECT p.productid
, p.Name
, s.ProductID
FROM production.product p
LEFT OUTER JOIN [Sales].[SalesOrderDetail] s
ON p.ProductID = s.ProductID

Below you will find the results of the above statement.  Notice that there are a number of rows that have NULL in the ProductID column from the SalesOrderDetail table.  This is what you will see when using an outer join and there is not a matching value in the table.  In this case, ProductID 530 does not have a matching value in the SalesOrderDetail table.


Of course if we switch this from a LEFT OUTER JOIN to a RIGHT OUTER JOIN SQL Server will now pull all the rows from the SalesOrderDetail table and the matching values from the Product table.

The code below is an example of a RIGHT OUTER JOIN.  All I did was change the word LEFT to RIGHT.  Now it will pull all the records from the SalesOrderDetail table and the matching values in the Product table.  One thing you will notice when you run this is that there not any NULL values in the p.productid column.  The reason for this is that referential integrity will not allow for a product that doesn’t exist in the Production.Product table to be entered into the table.

SELECT p.productid
, p.Name
, s.ProductID
FROM production.product p
RIGHT OUTER JOIN [Sales].[SalesOrderDetail] s
ON p.ProductID = s.ProductID

How are the LEFT and RIGHT tables determined

If you look at the two statements below, you will notice that the only difference is the last line.  In the first statement, the product table is listed first after the ON keyword, while in the second statement the SalesOrderDetail table is listed first.  Despite this change, both results had the exact same number of rows, 121,555.

SELECT p.productid
, p.Name
, s.ProductID
FROM production.product p
LEFT OUTER JOIN [Sales].[SalesOrderDetail] s
ON p.ProductID = s.ProductID

SELECT p.productid
, p.Name
, s.ProductID
FROM production.product p
LEFT OUTER JOIN [Sales].[SalesOrderDetail] s
ON s.ProductID = p.ProductID

However, if you switch the table order in the FROM clause, like in the statement below, you will see a big difference in the result set.

SELECT p.productid
, p.Name
, s.ProductID
FROM [Sales].[SalesOrderDetail] s
LEFT OUTER JOIN production.product p
ON p.ProductID = s.ProductID

This statement returns 121,317 rows.  This is every row from the SalesOrderDetail table and matching values in the Product table.  With some simple math, we can confirm this.  If you take the 121,555 and subtract the 212,317 you will get 238.  Using the code below, we will see that there are exactly 238 products that have not been sold. 

Now let’s get to the original question, what products have not been sold. In the example below we can simply add a WHERE clause and look for a any column from the right side table that is null.  The reason right side table, it because this is a left join.

SELECT p.productid
, p.Name
, s.ProductID
FROM production.product p
LEFT OUTER JOIN [Sales].[SalesOrderDetail] s
ON s.ProductID = p.ProductID
WHERE s.ProductID is null

When you run this you will see that there are 238 products that have not been sold.

Full Join

The code for this example can be found here: FullOuterJoin.

A full join is kind of a combination of the inner and both outer joins. Below you can see the two tables we will use for the example.

SELECT a.id
, a.name
, b.id
, b.name
FROM TableA a
FULL OUTER JOIN TableB b
ON A.id = b.id

If you run the above code you will see that it returns all rows that have matching values in each table, all the rows that are in TableA and not in TableB as well as the rows in Tableb that are not in TableA.


CROSS JOIN

A CROSS join is also known as a Cartesian product.  This type of join returns every possible combinations.

SELECT a.id
, b.id
FROM TableA a
CROSS JOIN TableB b

Below are the results.  The first ID column is from TableA while the second ID column is from TableB.  Notice that the results show each value from TableA and each value from TableB.  That is why you see 5 ones in the second column, there are 5 values in TableA.

Joining More than One Table

There are many times where you will need to join more than one table.  In this case we want to know the dates of each time a product was sold. In this case, we need to add the SalesOrderHeader table to our query. Although, there are three tables in the query, a join can only be between two table.

SELECT p.productid
, p.Name
, s.ProductID
, h.OrderDate
FROM [Sales].[SalesOrderDetail] s
INNER JOIN production.product p
ON p.ProductID = s.ProductID
INNER JOIN sales.SalesOrderHeader h
ON s.SalesOrderID = h.SalesOrderID


In a future post I will discuss the physical joins SQL Server will use to implement these logical joins.

Thank you for visiting my blog!!