Azure SQL DB and @@version

Many of us are used to using @@version to get the version of SQL Server we are using.  This also works when you are utilizing an Azure SQL database, although the results are slightly different. However, before getting to @@version, I would like to go over a few other methods to obtain version information.

How to Get Version

There are many reasons why it is important to know the version of a SQL Server.  The reasons include everything from licensing to upgrades.  In this section, I will cover a few of the common methods used to get the version of SQL Server.

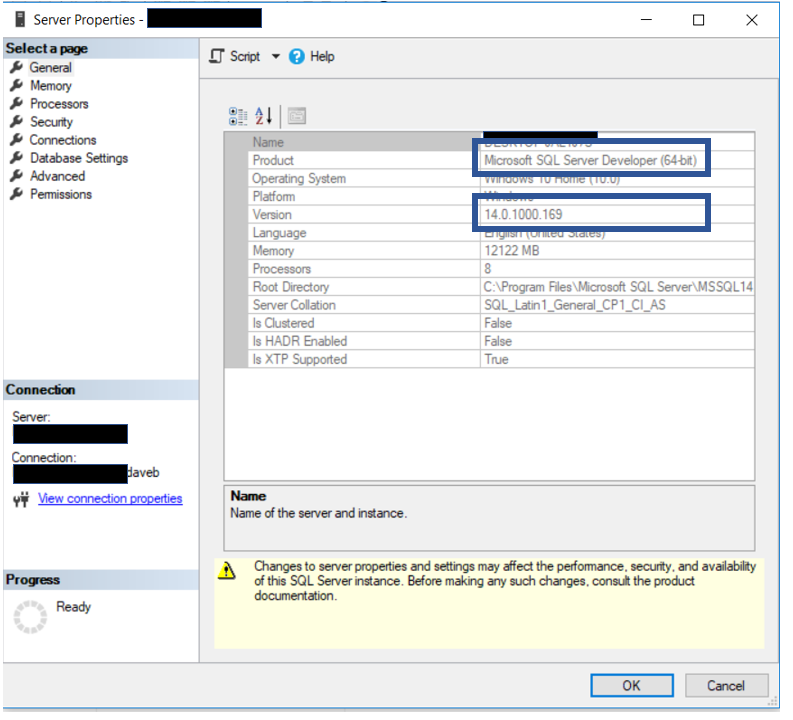
With an on-prem instance of SQL Server one method that can be used to get the version is to right click on the server in SQL Server Management Studio.  Once you do, you can click on the properties menu item and the window below will appear.  As you can see, in the boxes you are able to see both the version and edition of the SQL Server.
However, when you attempt to do this in an instance of Azure SQL database, the properties menu item is not available.  Below is what you will see when you right click on the instance of an Azure SQL database in SQL Server Management Studio.

Another method to get the version of SQL Server is to utilize the SERVERPROPERTY function.  The SERVERPROPERTY function can be used to view server level properties, in this case the product version.

SELECT SERVERPROPERTY(‘ProductVersion’);

When you execute the above statement you will then see the version. It will look like the number below.  The number represents the version, in this case, SQL Server 2017.

14.0.1000.169

As mentioned above, the ServerProperty function can be used to return a number of bits of information about the server.  Here is a link for more detailed information, click here.

The final method I would like to talk about is using @@version.  This is a global variable in SQL Server that will return not only the version of SQL Server, but also the OS version.

When reading from this global variable, you include it in a SELECT statement as illustrated below.

SELECT @@Version

The results will vary from an on-prem instance of SQL Server to an Azure SQL Database.

This is what you will see for an on-prem instance.

Here is the complete text of the results.

“Microsoft SQL Server 2017 (RTM) – 14.0.1000.169 (X64) Aug 22 2017 17:04:49 Copyright (C) 2017 Microsoft Corporation Developer Edition (64-bit) on Windows 10 Home 10.0 <X64> (Build 17134: ) “

As you can see it returns some good information.  Including the version of SQL Server, the service pack status, 32-bit or 64-bit and the OS version.

However, the results change quite a bit when this is ran against and Azure SQL database.

The complete text is just as you see it above.  Notice the lack of OS version.

What is next?

Now that we have covered a number of ways to get the version information, let’s take a look at some of the differences from an on-prem instance to an Azure SQL database.

When looking at the results, it is easy to identify an instance as an Azure instance in just in the first few words, it clearly states that it is an Azure instance, it is indeed in Azure.

If you look at the results below you will see that I used both @@version and ServerProperty to get the information I am looking for.  You will also notice that I included a simple query using the sys.databases object. This will return the compatibility level for each database, which as you will see is going to be important.
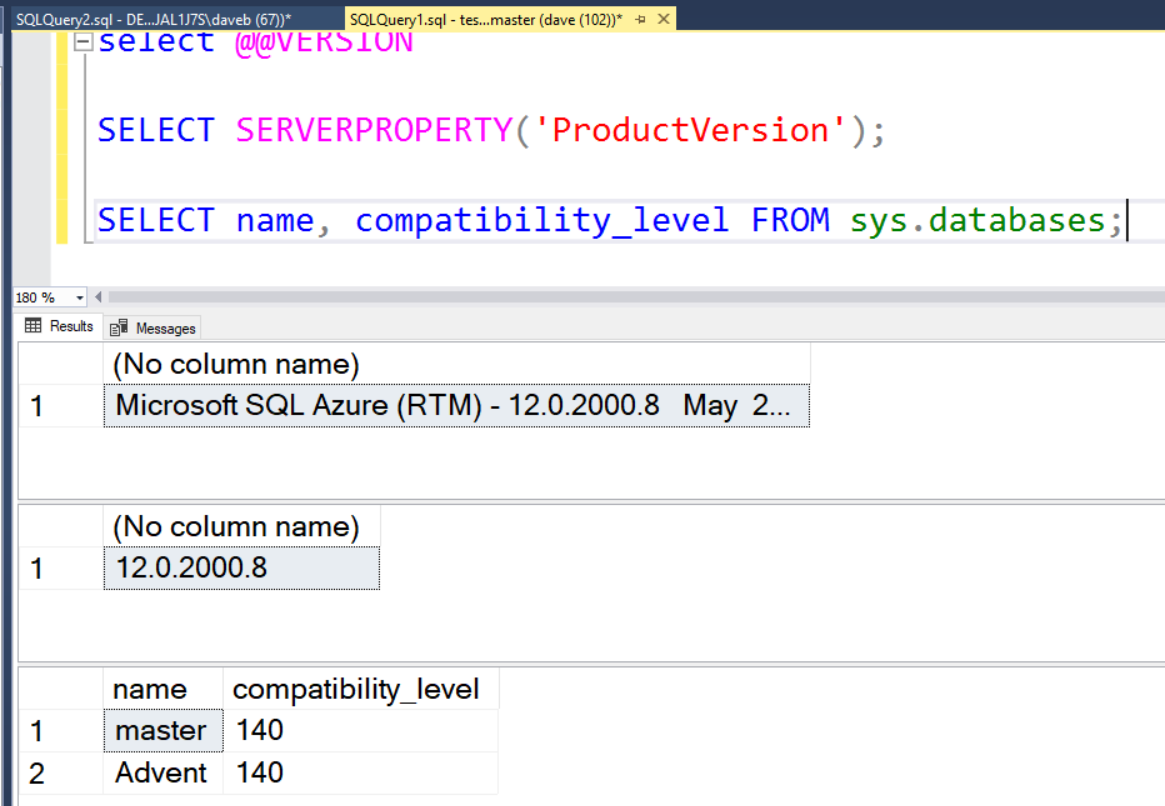
Looking above you will see that it is an Azure instance, has a product version of 12.0.2000.8 and both databases have a compatibility level of 140. The compatibility level of 140 is SQL Server 2017.

What….12.0?  Isn’t that SQL Server 2014?  If you said yes, you are correct. Is it really possible that Azure SQL Database is SQL Server 2014? The answer is no.  That number is different that an on-prem instance of SQL Server.  According to what I have ready, version 12.0 is the most current version. Given both the Azure instance and the SQL Server 2014 both of a product version of 12.0, it now comes down to the compatibility level for the databases for Azure.

As you can see both databases of a compatibility level of 140, which is SQL Server 2017, not 2014. Since I didn’t change this when I created the databases, this tells me that the instance of Azure SQL Database was on SQL Server 2017 when I created the database.  As with an on-prem instance of SQL Server, the compatibility level for an Azure SQL database can be changed. When I created a new Azure SQL Database, the compatibility level was 140, which is SQL Server 2017.

To change the compatibility level of a database you have to run an Alter Database command.

ALTER DATABASE Advent
SET COMPATIBILITY_LEVEL = 160

When I ran the above code, I got an error.

Msg 15048, Level 16, State 1, Line 1
Valid values of the database compatibility level are 100, 110, 120, 130, 140 or 150.

Notice it states that 150 is an option, while 160 is not.  Compatibility level of 150 is SQL Server 2019, the latest version.  It looks like the available options go back quite a bit, version 100, which is SQL Server 2008.

Since in Azure SQL Database, the version of the database is key when investigating versions, below you will find the code to retrieve the versions of all databases.

SELECT name, compatibility_level FROM sys.databases;

All the above code, works on both an Azure SQL database and an on-prem SQL Server.
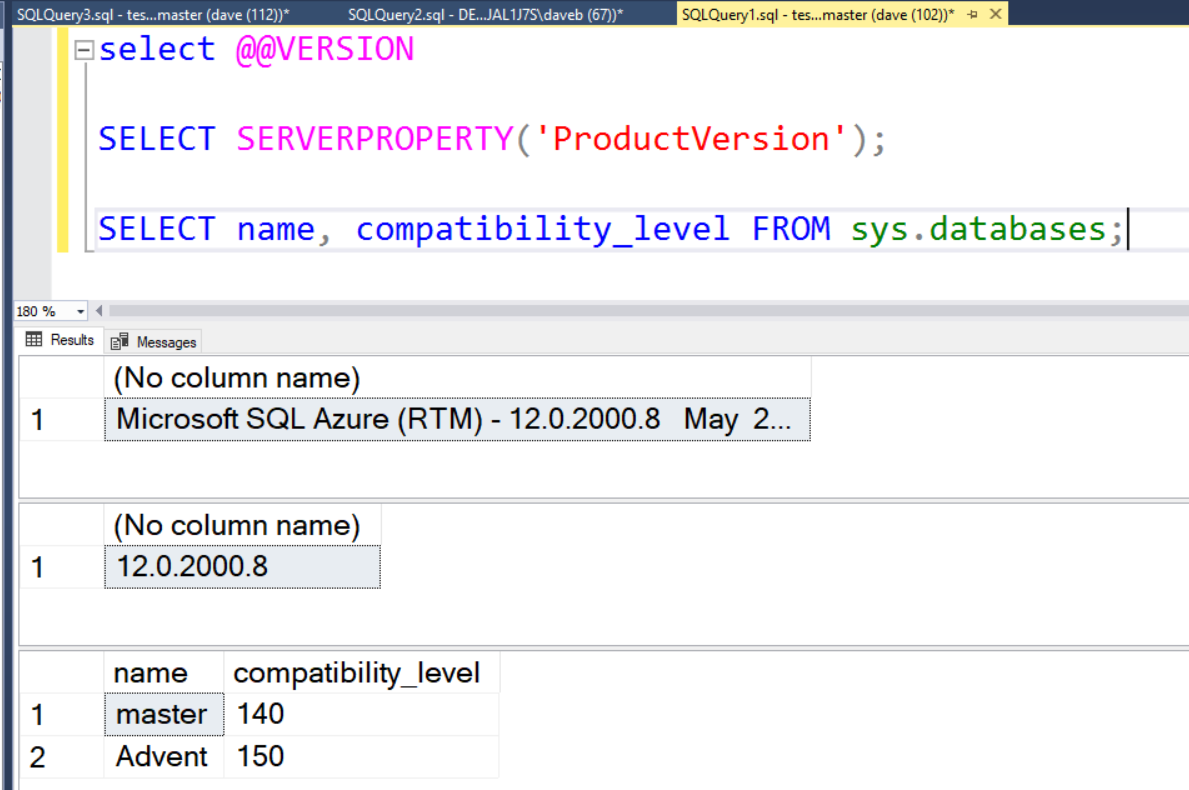
Notice that the Advent database has a compatibility level of 150, SQL Server 2019.  When investigating version information, it important to also review the compatibility level of the database you are looking at as well as the server version.

Thanks for stopping by, I hope you learned something.
Azure Metrics Reporting

A few days ago, I did a post on DTUs of an Azure SQL Database.  In the post, I mentioned a report that you can use to see how many DTUs your subscription has used.  This is an important number to know and measure over time so you don’t get slapped with an unexpectedly high bill or have performance issues because you have exceeded your DTU limit.

Azure has quiet a bit of reporting that can me used to get the current state of your Azure subscription. Although many of the metrics are targeted more for subscription rather than database performance counters, there are few DB related such as Deadlocks. Below is a small list of the items that can be viewed, of course there are more than included in the list:

      • Azure SQL Database
        • Data space allocated
        • Data space used
        • Deadlocks
        • In-Memory OTLP usage
        • DTU used
          • What is a DTU?  Stands for Database Transaction Unit. Here is a nice article by Andy Mallon the does a nice job explaining what it is. Click Here
      • Storage Accounts
        • Used Capacity
        • Egress
        • Ingress
        • Availability

How do I Get to the reporting tool?

Getting to the reporting tool is just a matter completing a few clicks. Of course with most products there are several ways to get to a specific place.

On the left side of the Azure Portal, click “All Resources”.  You could also click on Resource Groups if you like.

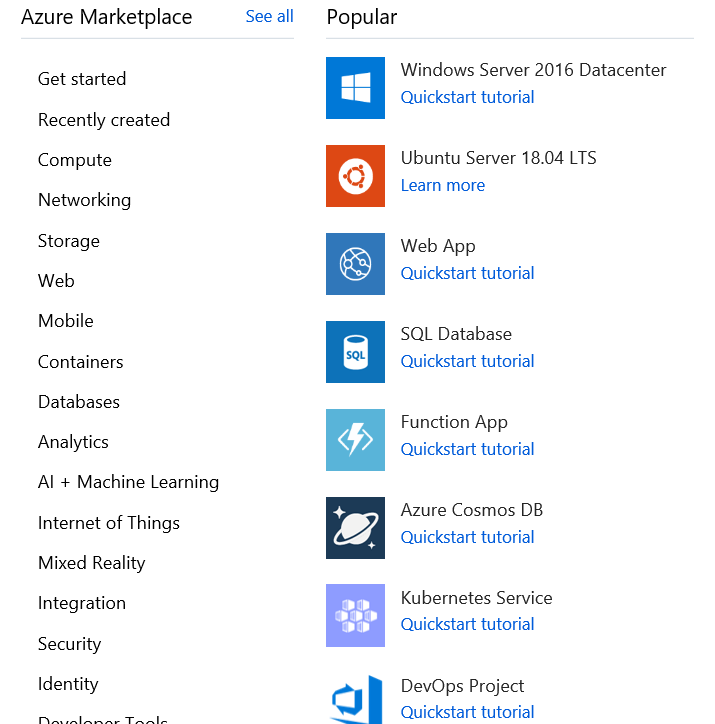
Just a little side note on how to add a resource. As expected there are many resources in the Azure world.  Here are just a few: Azure SQL Database, Azure VM, Storage accounts, resource groups, Cosmos DB as well as many other items.  Not all resources are from Microsoft.  There are a number of resources that are made available in Azure.  After you click the “Add” button, you will be taken to a page that looks something similar to what is below.

Above is a screenshot of some of the available resources.  The list on the left is just the list of resource categories.  On the right are some of the resources in the chosen category.  You can either pick a category or click the “See All” link towards the top.

Once you click the “All Resources” link you will be taken to something that looks like this.

The above image lists a number of important items.  Obviously the resource name is included and the Resource Group that resource is part of.  You can also see the resource type and the Location.  The location is really important, especially when it comes to cost.  Since this blog post is about Metrics reporting, it is important to note that not all the resource types have this type of reporting.  Above you will see that I have three resources, a storage account, a SQL Sever and an Azure SQL database.  Of these three, the SQL Server is the only one that doesn’t have this metrics reporting functionality.

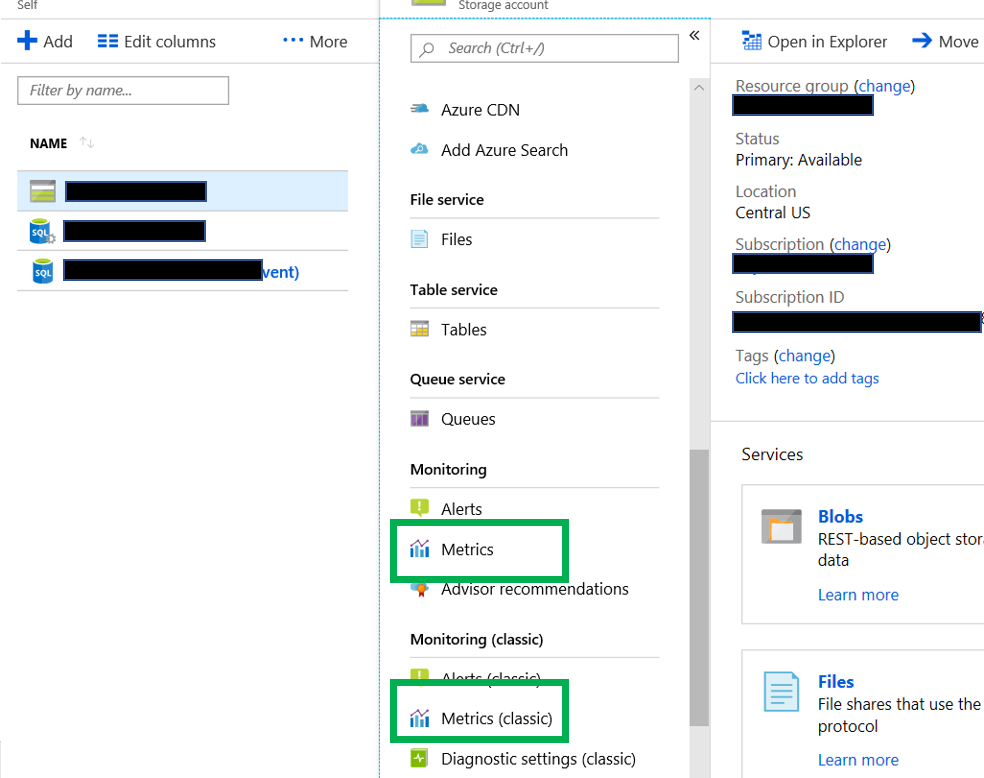
Once you click the resource you would like to get the reports for, you will be taken to a page similar to this.

By chosing a resource on the left, the panel on the right will update with the information for that resource.  In the above situation, I chose the storage account.  Notice two green boxes, both of these will take you to a reporting tool. You want to click the one on the top. The bottom one, Metrics(Classic) is going to be retired on June 30, 2019.  This is according to Microsoft.

Creating the Chart

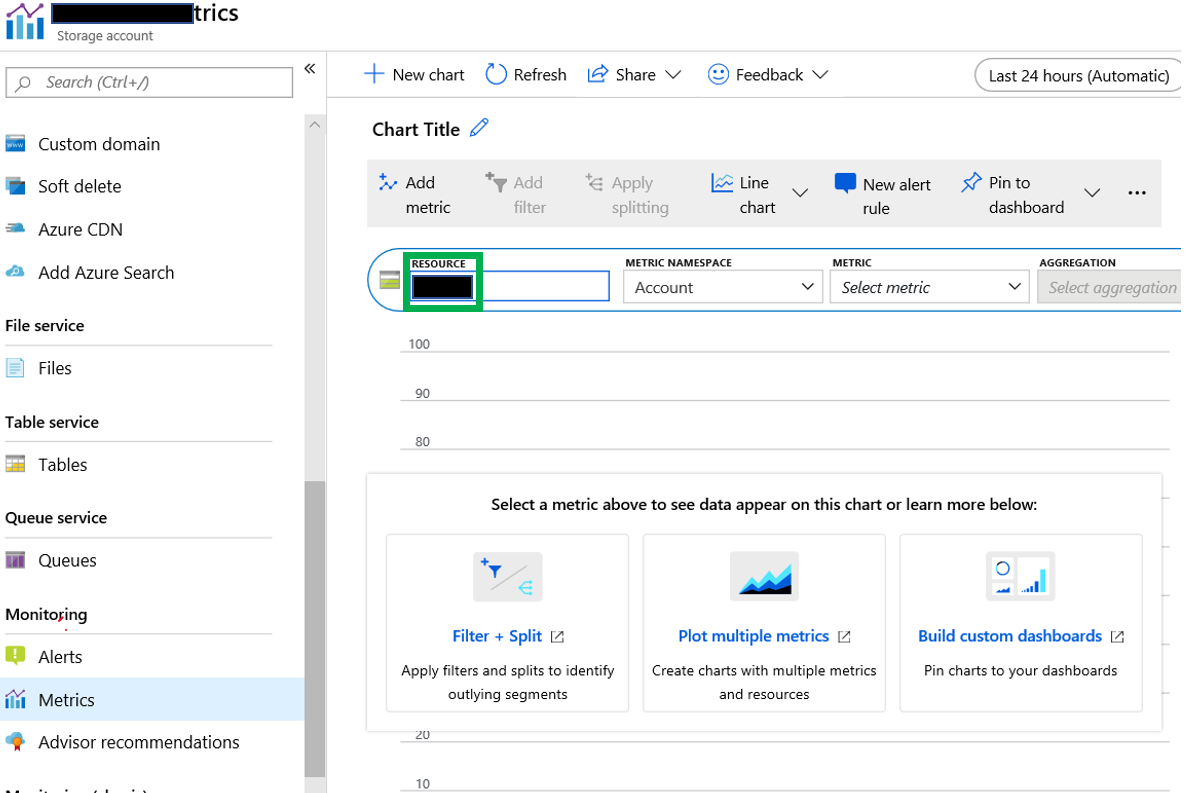
Now you simple click on the Metrics link and you will be taken to a page that looks similar to what is below.

Now confirm that you are on the proper resource by viewing the resource identified in the box highlighted in the green box.  If you are not on the proper resource, simply click the resource that is there and you will have the option to change to the proper resource.

Staying in the same box as the resource, you will see a few other items.

Metric Namespace:  This is the group of metrics that you are looking for.  The items in the drop down box changes depending on the type of resource selected. Since I am working with a storage account, you see the account option.  If you don’t see this for some reason, click the “Add Metric” link that can be found just under the Chart Tile.
Metric: This is the counter that we are looking to review.

Aggregation:  This is what it says it is.  There are usually three options, Avg, Min and Max.  However, some only have Avg as the only choice.

Once you have chosen all the desired options, you will see this.

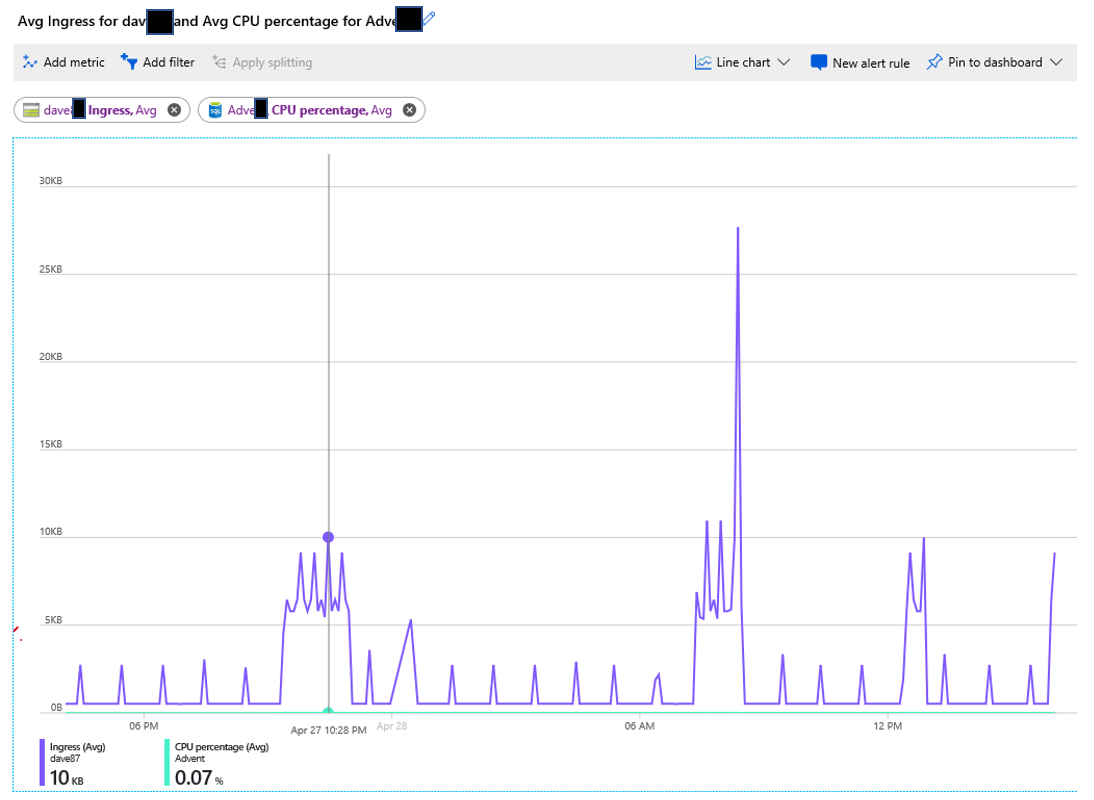
As you can see, this chart contains more than one metric.  This is easy to add, just click the “Add Metric” link in the upper left hand corner. When you do, you will be given the same options as before.  The additional metrics do not have to be from the same resource, as you can see.  The metric on the left is from the storage account, while the one on the right is from the Azure SQL Database.

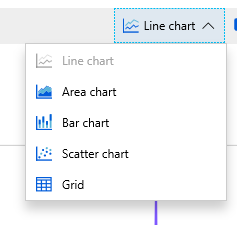
Although this example is a line chart, you can change the chart type easily.  Just click the arrow to the right of where it says “Line chart” in the upper right corner.Just like in Excel, there are a number of options for chart types, just not as many options.  Only 5 options here.  Just like in any other reporting tool, not all charts work well with all data sets.
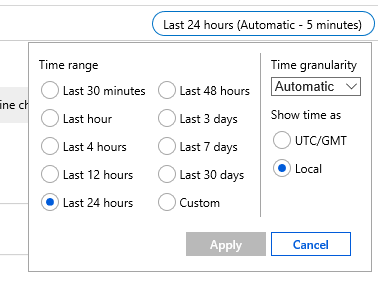
Also in the upper right corner you can change to time range of the chart.

If you click the time, the options window for the chart will open up. As you can see there are a number of options, including the time range, the Time granularity(time interval) and the time(GMT or local time).

The options for Time granularity are in intervals that would be expected.  The options are listed below.

      • 1 minute
      • 5 minute
      • 15 minutes
      • 30 minutes
      • 1 hour
      • 6 hours
      • 12 hours
      • 1 day
      • 1 week
      • 1 month

You also have another option, Automatic.  The interval for automatic is dependent on the Time Range chosen. Below are the time ranges with the automatic interval.

      • Last 30 min – 1 minute
      • Last hour – 1 minute
      • Last 4 hours – 1 minute
      • Last 12 hours – 5 minutes
      • Last 24 hours – 5 minutes
      • Last 48 hours – 15 minutes
      • Last 3 days – 15 minutes
      • Last 7 days – 15 minutes
      • Last 30 days – 30 minutes

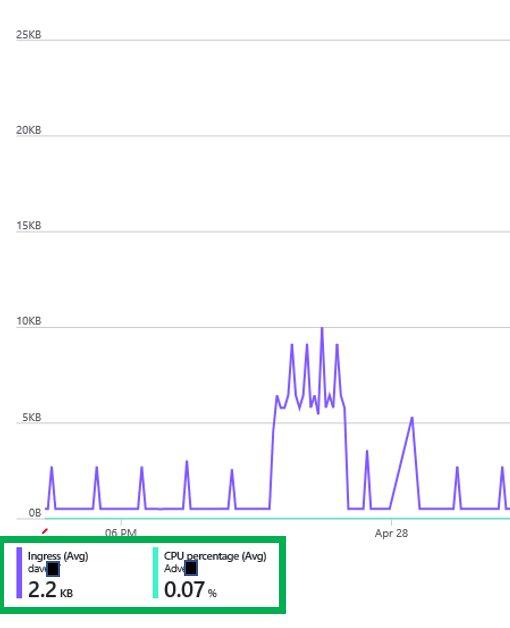
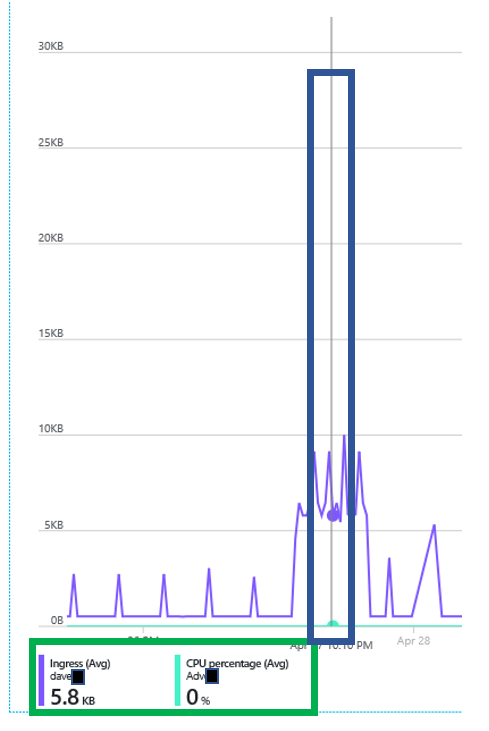
Another area that could be very helpful is in the lower left corner.  There will be one number for each metric that has been added to the chart.

In the green box above there are a number of data points.  It contains the resource name of the color of the line in the chart.  It also contains the name of the metric, aggregation used as well at the value.  In this case the number represents the aggregation listed for the data range of the chart.  If you float your cursor over the chart and vertical line like below will appear.  When you do this, you can move it to any time on the chart and the numbers in the lower left corner will no longer represent an aggregate, but the numbers of the point in time on the chart.

Now that I have created my chart, but the numbers on the Y axis don’t meet my needs.  This can easily be changed.  In the upper right hand corner you will see three dots.  If you click it a menu opens up and you can the click “Chart settings”.

Once you click the menu item, the settings window opens.  Here you can change only Y value.  Remember the X values are determined by the date range mentioned earlier.
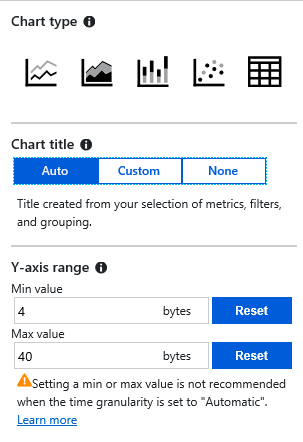
In addition to the Y value, you can also change the Chart Title and chart type.  Notice that the unit of measure is bytes, but many of the metrics are in MB.  If you change to a time granularity to something other than automatic, the warning goes away.

Notice the warning:

“Setting a min or max value is not recommended when the time granularity is set to Automatic”

Pin to Dashboard

Once you are in the Azure portal, you can have one or more dashboards.  Once  you have your chart looking they way you want it to look, you can then pin it to your dashboard.  Once you do that it, will now appear as below.  In this case I have two charts pinned.


To pin your chart to the current dashboard, click the “Pin to dashboard” button in the upper right corner.

When you do, you will have an option to pin to current dashboard.  However, when it is pinned, your dashboard may not look as you like it.  If this is the case, you can click the “Edit” option on the dashboard.

Once in edit mode, you can move the charts as you see fit.

One nice feature of pinned charts is that the vertical line that appears when you float your cursor over the chart still works.  There is one additional feature that is very nice if you have more than one chart.


When you have more than one chart, the line appears on all charts that are pinned to your dashboard.

Hopefully this will help you with creating charts in the Azure portal.  Thanks for stopping by my blog and I hope you learned something.


Azure SQL Database and DTU

As you know, when you are using an Azure SQL Database you can use SQL Server Management Studio on your computer to execute queries.  You also have an option to use the Azure Query Editor. Here is my post on the query editor.

As I was writing the post I wondered more and more about whether or not there might be a difference in how data usage is billed.  My thought was that since I am going from an Azure SQL database source to another Azure tool, Query Editor, could this potentially reduce my costs.

There are a number of Azure resources that have Egress as a metric that can be used to measure the amount of data that is being pulled from the Azure data center.  These resources include the Azure Storage Account. However, an Azure SQL Database does not need to use a storage account.

Before we move on, let’s define what egress is.

Here is a definition of Egress from Microsoft:

“….data going out of Azure data centers” – Microsoft

I think the most important point the two definitions are trying to make is that egress is data going out of a data center, including if it is going from a data center in one region to a data center in another region.  According to Microsoft, if there is a data pull and the database and the querying tool are both in the same region, you will not be billed.  However, you will need to confirm this.

I am not planning on getting into the pricing models for Azure in this post, however you can get that from Microsoft.  https://azure.microsoft.com

Although some resources have Egress to measure data, an Azure SQL Database does not.  It does however have another option, DTU.  DTU stands for Database Transaction Unit and it is a unit of measure that is used, in part, to calculate your bill and to help you chose the proper pricing tier for your database.

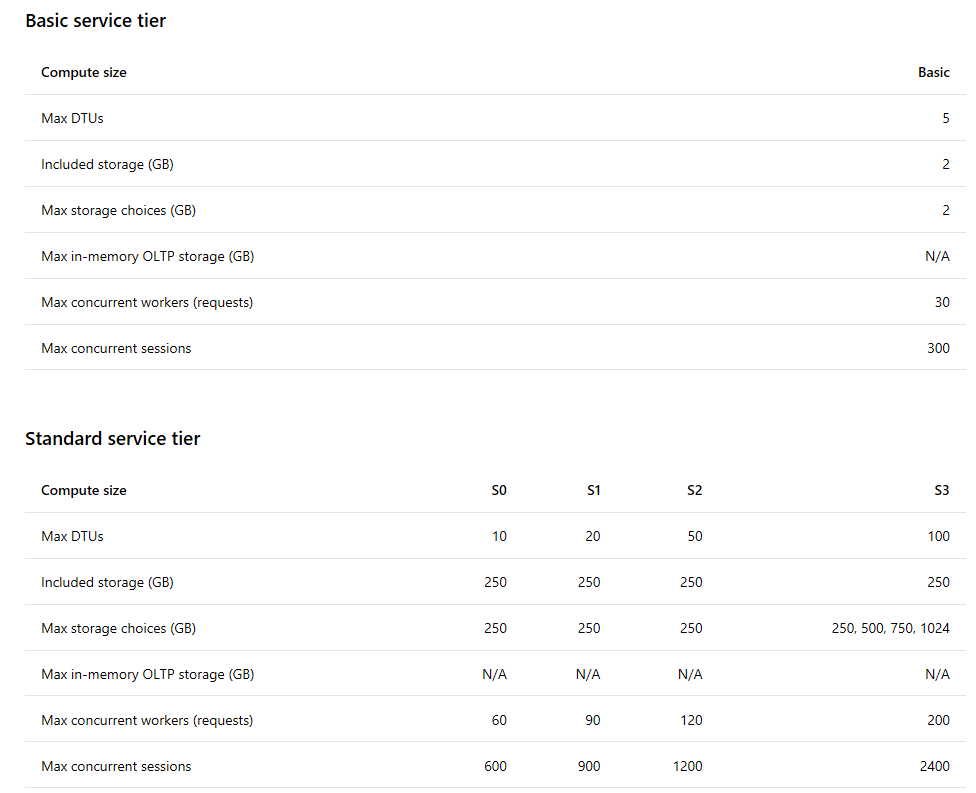
A DTU is a “blended measure of CPU, memory, and data I/O and transaction log I/O”, per Microsoft.  The DTU is a measurement for the Azure SQL database only, not for your entire Azure environment or any other database.  An important thing to keep in mind is that when your workload exceeds the DTU maximum for your pricing tier, Azure will then throttle your workload.  My subscription currently has a max DTU of 10. As long as my workload stays below that I should be fine.  Because of the potential of being throttled, it is important to monitor your work load.   This is a nice article on the DTU by Andy Mallon.

If you are not sure what your workload might be in Azure, there are a number of DTU calculators available that can help.  Here is a link to one, DTU Calculator.

As for the how many DTUs you can have, that will depend on the tier that you have chosen.  Below is a sample of a chart from Microsoft that outline the limits of two of the tiers.  Notice that there are a number of options for Max DTUs. Source of the chart is here. As you can see, the Max DTUs goes from 5 to 100.  It even goes higher if you have are using the Premium tier.

Per Microsoft, you have up to the Max DTU for your tier before you will be charged.

The DTU price for a single database includes a certain amount of storage at no additional cost. —Microsoft

Of course this might change at any moment, so I have to make a disclaimer.  Always consult your MS rep or Licensing expert to get the exact pricing and rules.

As I stated earlier, it is important to monitor your work load to see if you are at a position in which you might be throttled.  Azure is a pretty good set of monitoring reports that you can create.  You can use the metrics reports to accomplish this.  Here is a link to my post on how to create a metrics report.

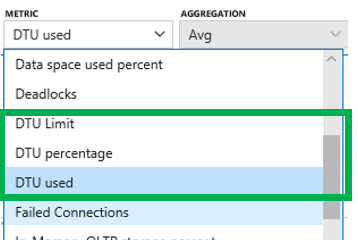
So what should you monitor?  Well since we are talking about an Azure SQL database, you have three options for measure DTUs.


DTU Limit – this is what you think it might be, the limit for your tier.

DTU Percentage – this is just that, the percentage of the DTU max that is being used.

DTU Used – this is the current DTUs that are being your by your workload for the database.

This post is less about DTU calculation and pricing tiers and more about does it make a difference if I use SSMS or the Azure Query Editor on the use of DTUs.

From the tests that I have completed that answer is no.  Using Azure Query Editor showed little or no improvement in the use to DTUs.

Before we get into the results of the test, let’s cover a few basics of what I did.  I used the AdventureworksLT sample database that you can get from the Azure portal when creating a new sample database.

This is the query I ran this query using both tools.

SELECT TOP 100000 *
FROM saleslt.salesorderdetail a
CROSS JOIN saleslt.salesorderdetail b

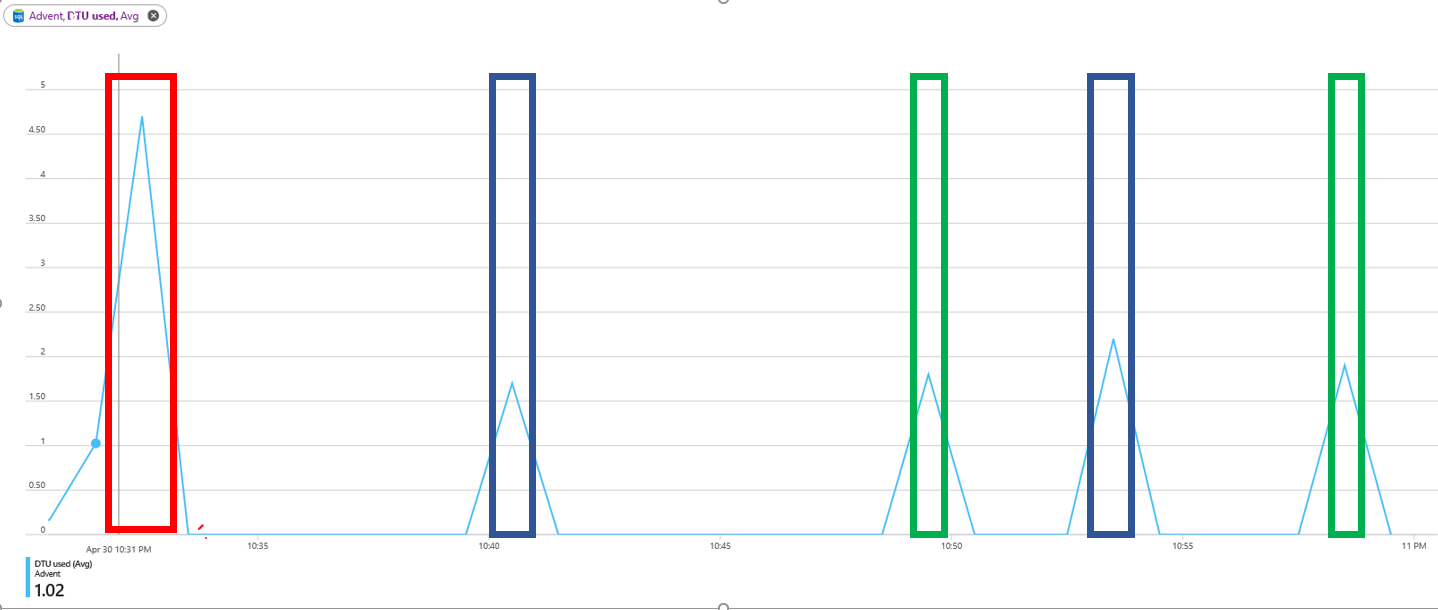
In the chart below the green boxes represent the test using SQL Server Management Studio, while the blue boxes are the executions in the Azure Query Editor.  Notice that there is very little difference in the DTU usage.

Although there really isn’t much difference in DTU consumption, I did notice something I didn’t really didn’t expect.

When I ran the query in SSMS is usually took less the 3 seconds to run.  However, when I ran the same query using the Query Editor, it usually took 45 to 60 seconds.  That is a huge difference.  Also note that in the above chart, the Max DTU never reached 10, which is my limit.  Because if this, I know that I was not throttled by Azure.

You might be wondering with the red box is.  This is the test when I ran this query.

SELECT *
FROM saleslt.salesorderdetail a
CROSS JOIN saleslt.salesorderdetail b

The only difference it that it doesn’t have the TOP keyword.  What is interesting about this is that when I ran the query in SSMS, it took about 45 seconds.  However, when I ran in the Query Editor, it was pushing 5 minutes before I cancelled it.

How can I get information about the MAX DTU for the Azure SQL Database?  There are a few DMVs that you can use.  The first on is the dm_db_resource_stats.  This can be used to the Max DTU, as well a number of other bits of useful information.

If you run this query in your Azure SQL Database you can get the information.  The column you want to look for to get the Max DTU limit is DTU_limit.  Here is a link to get more information on this DMV.

SELECT * FROM sys.dm_db_resource_stats;

However, if you try to run it in the Master database, you will get this error:

Msg 262, Level 14, State 1, Line 1
VIEW DATABASE STATE permission denied in database ‘master’.
Msg 297, Level 16, State 1, Line 1
The user does not have permission to perform this action.

You can also use he sys.resource_stats dmv to get the DTU limit.  This DMV has the same column name as above, dtu_limit.  This DMV must run in the Master database.  Here is a link to get more information on this DMV.

SELECT * FROM sys.resource_stats

If you try to run it in another database, you will get this error.

Msg 208, Level 16, State 1, Line 3
Invalid object name ‘sys.resource_stats’

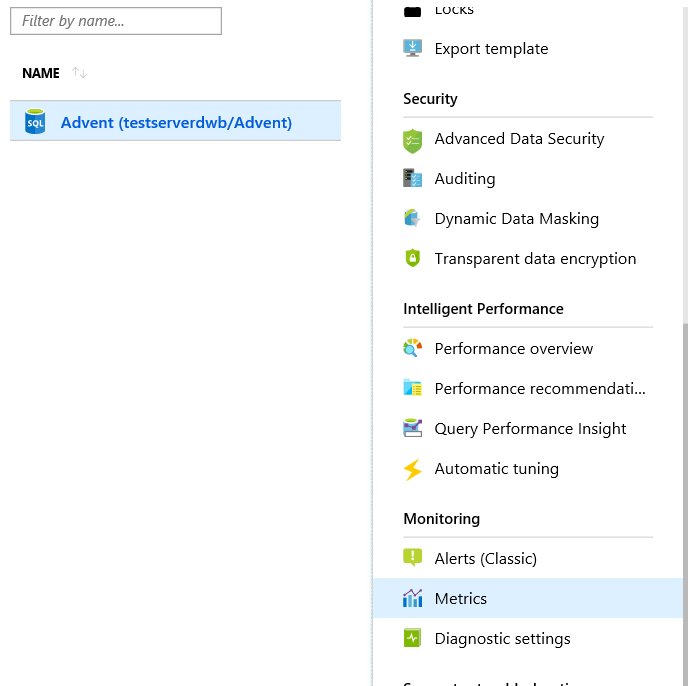
How do I get to the metrics report. This is pretty straight forward.  Navigate to your Azure SQL Database in the portal.


As you can see, in the menu on the side you will see the Metrics items.  If you click it, You will then be taken to an Azure Reporting tool.

You will then create your report.  This my post on the Metrics Report.

Thank you for stopping by and I hope you learned something.

Azure SQL DB Query Editor

We have all been using SQL Server Management Studio to query and manipulate data, even for an Azure SQL database.  There is also an option to do this same thing built into the SQL Azure database interface in the Azure portal.  Although there have been a number of posts related to this topic dating back a few years, this feature is still marked as “preview” in the Azure portal.

How to get to the Query Editor

Once you are in the SQL Database list in the portal, find the database you would like to work with and click it.

When you do, you will be taken to the administration page for the database.  On the left side you will see the “Query editor” link.  You will also notice that this is a feature that is still considered to be in preview.
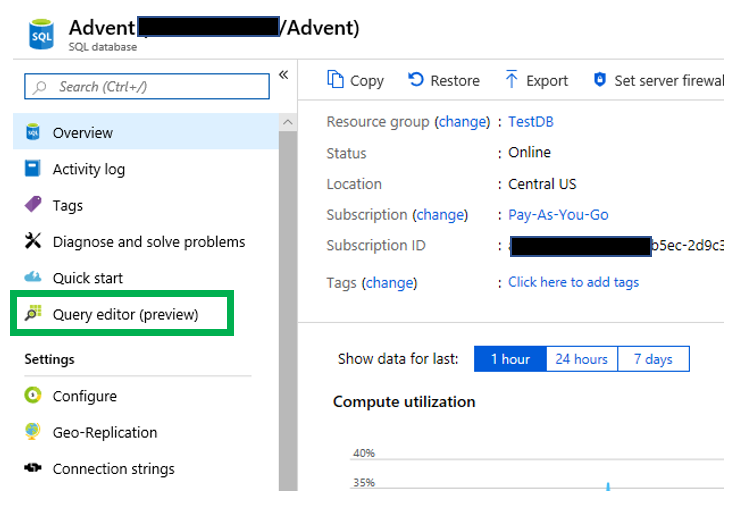
When I did a Google search on the Query editor in the Azure portal, I found posts from as far back as 2017.  Despite that, I still wanted to complete a blog post on it.  Once you click it, you will be taken to a login page similar to below.

Notice on the right side there is the ability to utilize the Active Directory single sign on functionality, which I do not have.  On the left you will enter the appropriate credentials to login to the database.
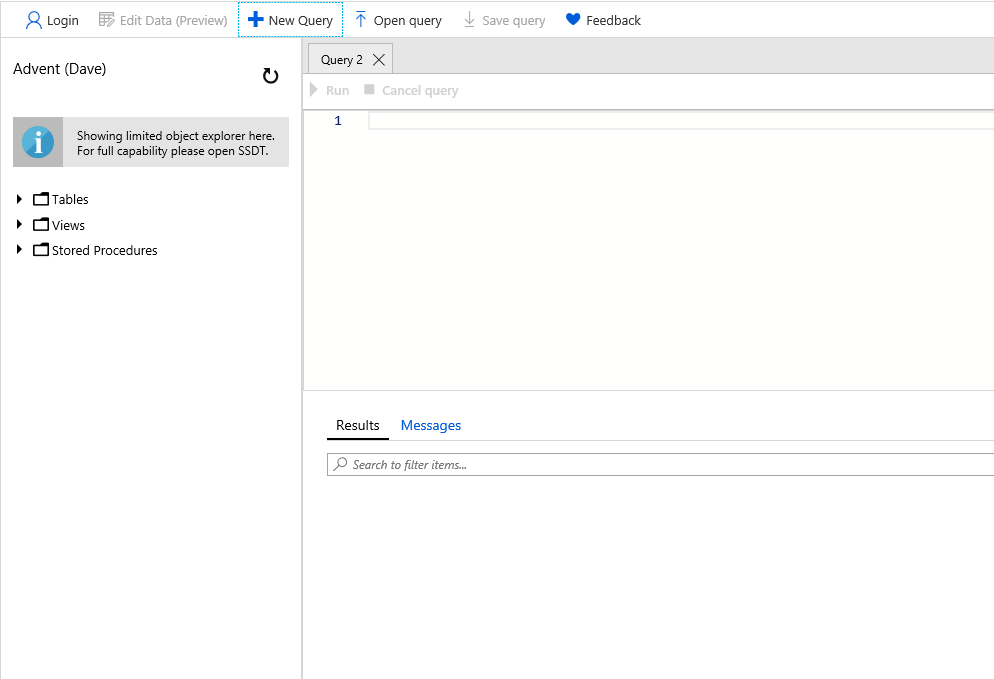
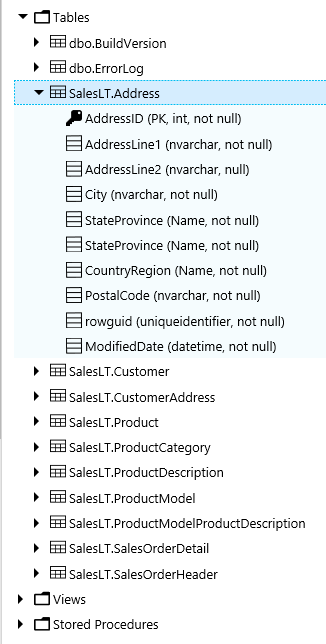
Once at the Query Editor

Once you are in the Query editor, you will notice many of the same features as SSMS.

These features include the following

      • Tabs for new queries
      • Open query
      • Results pane
      • Messages pain
      • A condensed object explorer
      • as well as many other features of SSMS

Below you will find a screenshot of the Query editor interface.

Menu Bar

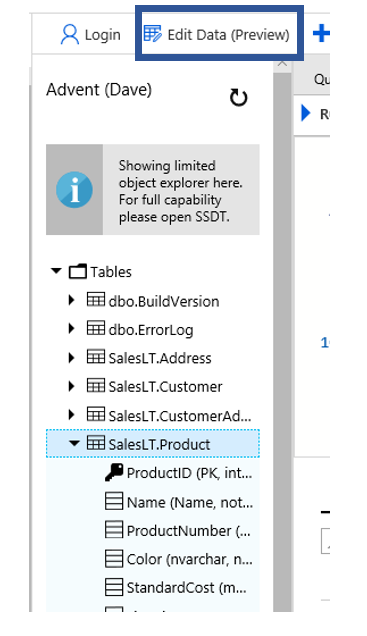
Starting with the menu bar across the top, you will find the expected buttons.  In addition to the Open query, new query and save query buttons, there is also an Edit Data(Preview) button.  This does as you expect it might, allows you to edit the data.  Just like the Query editor, this is also a preview feature. There is also a Login button if you wish to use a different user.

Object Explorer


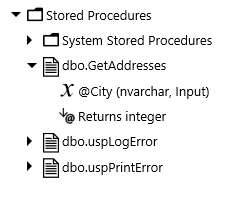
The Object explorer is very similar as that in SSMS, however there are some very glaring differences, mostly that there are fewer object types displays in Query editor.  As you can see you can browse tables, views and stored procedures.  As for the tables, you can see the column names and data types as well. For stored procedures, you are able to see the parameters just as the image below indicates.

In SSMS a user can right click on a stored procedure and execute it.  In the Azure query editor, when you right click on an object you get nothing.  The context menu does not appear, therefore not allowing you to execute the procedure.  Of course you can still use T-SQL to execute a stored procedure.

Query Window

In many aspects the query window is very similar to that of SSMS.  There are tabs across the top, the T-SQL pane, a results pane and a messages pane.

Starting with the T-SQL pane, there is color coding of the SQL, however it is slightly different than that of SSMS.  First big difference is that there is not an option to change the size or color of the font.

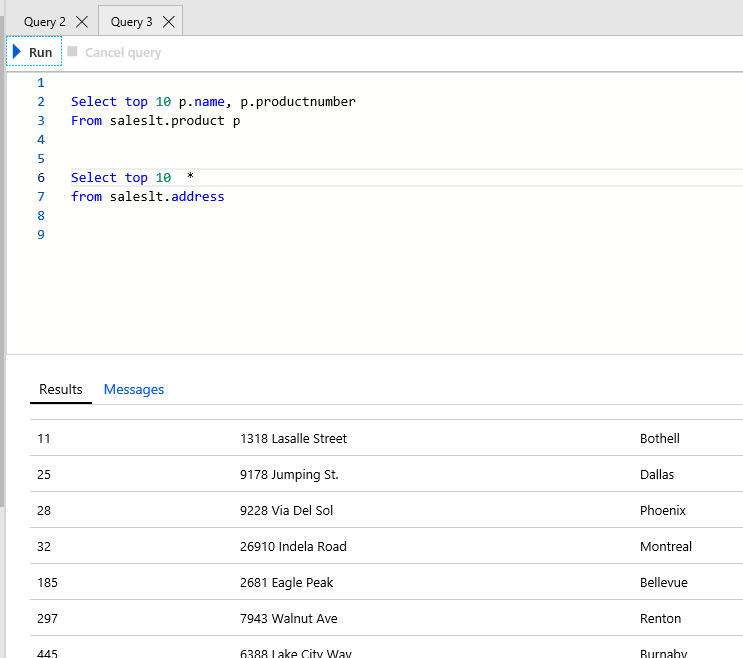
If SSMS if you execute two SELECT statements, like the ones below, the results are much different in Azure Query editor when compared to the same two queries in SSMS.

SELECT TOP 10 p.name
, p.productnumber
FROM saleslt.product p

SELECT TOP 10 *
FROM saleslt.address

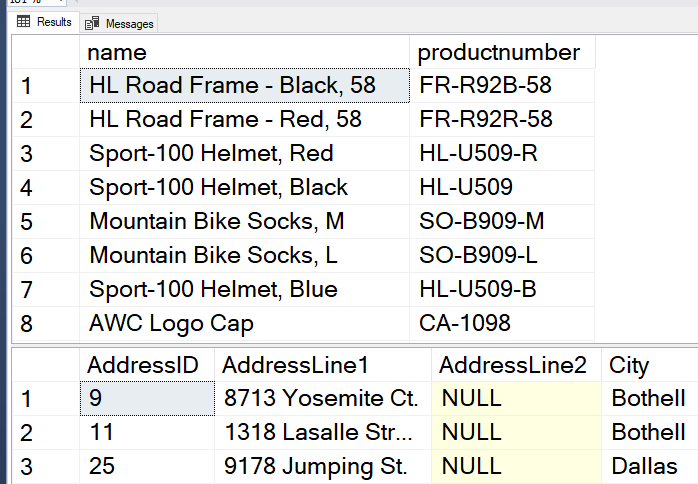
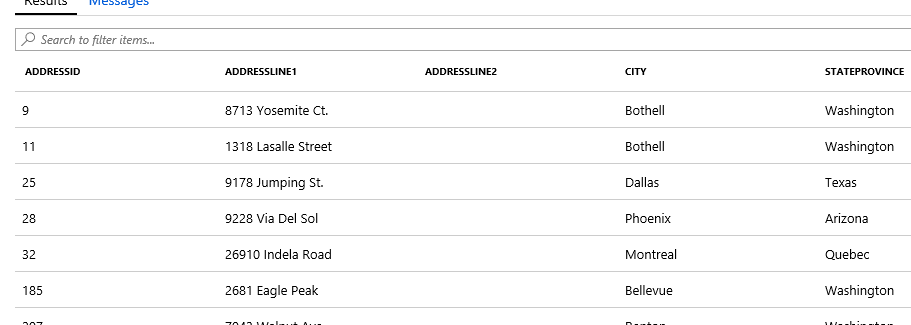
Here are the results when you run the code in SSMS.  Notice that there are two data sets

Now look what happens when I run the same queries as the Query editor, I only get one data set vs the two when executed in SSMS.

In SSMS, if you right click on a table you will see an option to Edit X number of rows.  That options is very similar in Azure Query Editor. The way this is done in the portal is to click on a table and then click the “Edit Data (Preview)” button just to the right of the Login button.

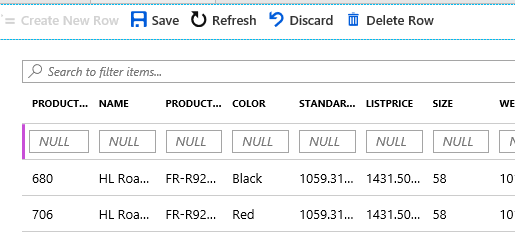
This will in turn, return the data in a grid that allows for editing data. You can just double click in a cell in the results set.  This will change the cell to an editable version.  The edit menu has just 5 buttons on it.

The are:

        • Create New Row
        • Save
        • Refresh
        • Discard
        • Delete row

When you click the new row button, the new row will appear in a different location that if you attempted to enter a new record use the grid results set in SSMS.  The big difference here is that the new row will appear at the top of the grid.

One option that is important to me is the ability to change the font size.  I have NOT found out how to do this in Azure Query editor.

When you execute a statement and an error is returned.  In SSMS this error is red, but default. In the Query editor it is black.

Once you have your query as you like, all you have to do it click the Run button
Limitations

There are a number of limitations in the Query editor at this time.  Since it is in preview, my hope is the Microsoft will address some of these deficiencies as the Query editor moves closer to having the preview label removed.

      • Does not allow for the viewing of object definitions
      • Limited objects in object explorer
      • Tabs in the query window does not have the SPiD on it
      • If more than one SELECT statement is executed in a batch, you will only see the results of the last one
      • Cannot right click on a stored procedure to execute it
      • No options such as display Actual Execution Plan
      • Cannot drag and drop object names into the query

Despite all of the limitations, I still like it.  Once you get used to the limitations it really isn’t that difficult to use.  Since the name of the tool is Query Editor, it does make sense that it doesn’t have all the same functionality as SQL Server Management Studio. However, it would be nice to have some the items that are currently not included.

Thanks for stopping by and I hope you learned something small.

How to Move an Existing Database to Azure SQL DB

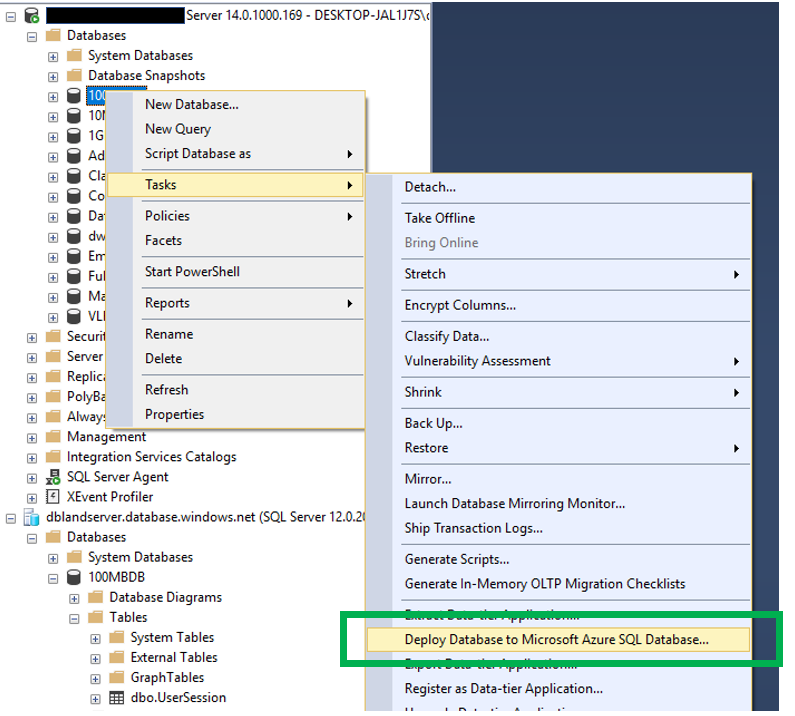
When moving the enterprise to a cloud based solution such as Azure SQL Database, we will need to find a way to migrate existing database to the cloud.  I already completed a post on how to create an Azure SQL database.  This post will focus more on how to migrate an existing on-prem databases to an Azure SQL Database.  There a several options that you can use, use the “Deploy Database to Microsoft Azure Database…” option in SQL Server Management Studio, Data Migration Assistant tool or use the Azure Database Migration Service.  During this post I will cover all three options.

Deploy Database to Microsoft Azure Database…

After opening SSMS, move to the database you wish to move to Azure SQL Database and right click on it.  When you do, you will see this:

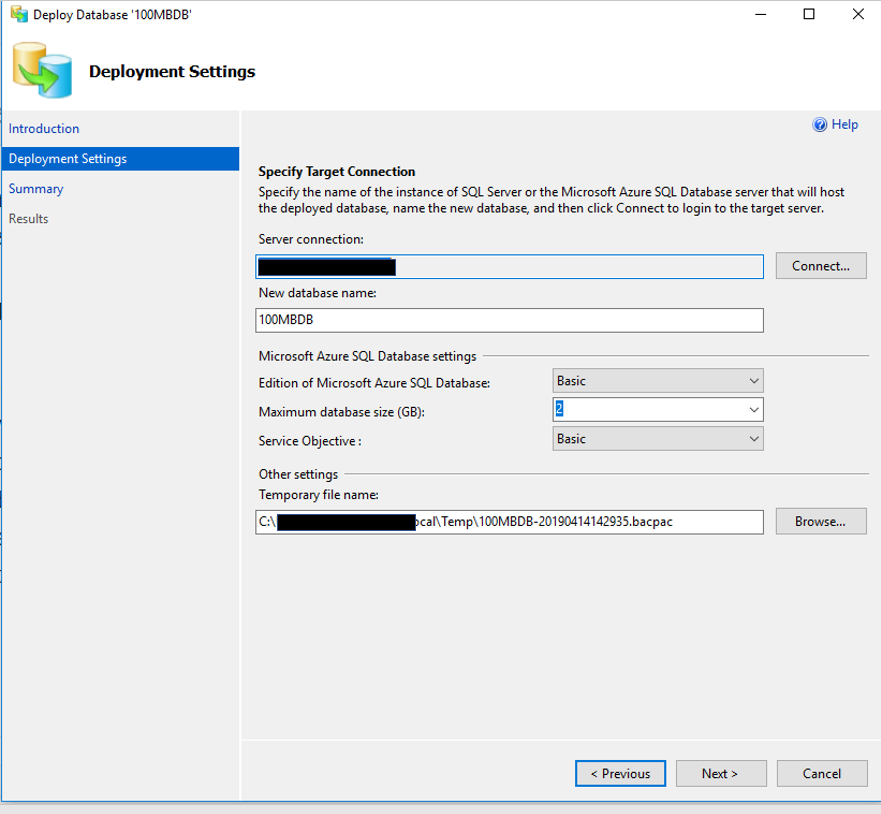
After clicking the first next in the wizard,  you will then be asked to provide some detailed information about what you are attempting to migrate to Azure SQL Database.

This information includes the following:

  • Server Connection – this is the Azure location you are attempting to migrate to
  • New Database Name – this will default to the name of the database you right clicked on, but can be changed in Azure SQL Database if you have a need to change it
  • Azure SQL Database Settings – these will not be active until you identify a Server Connection
      • Edition of SQL Server
      • Maximum Database size
      • Service Objective
  • Temporary File Name – This is the name and location of the .bacpac file.

What is a .bacpac file?  Since you may not have worked with this before, I thought I would take a few minutes to go over exactly what a .bacpac file is. It is considered a Data Tier Application that can be used for deploying databases from one location to another.  This file will contain both schema, object definitions and data.  There is also a .dacpac file type.  The only difference between the .bacpac and .dacpac is that the .bacpac is the only file type that also contains the data.

This is what the screen will look like.

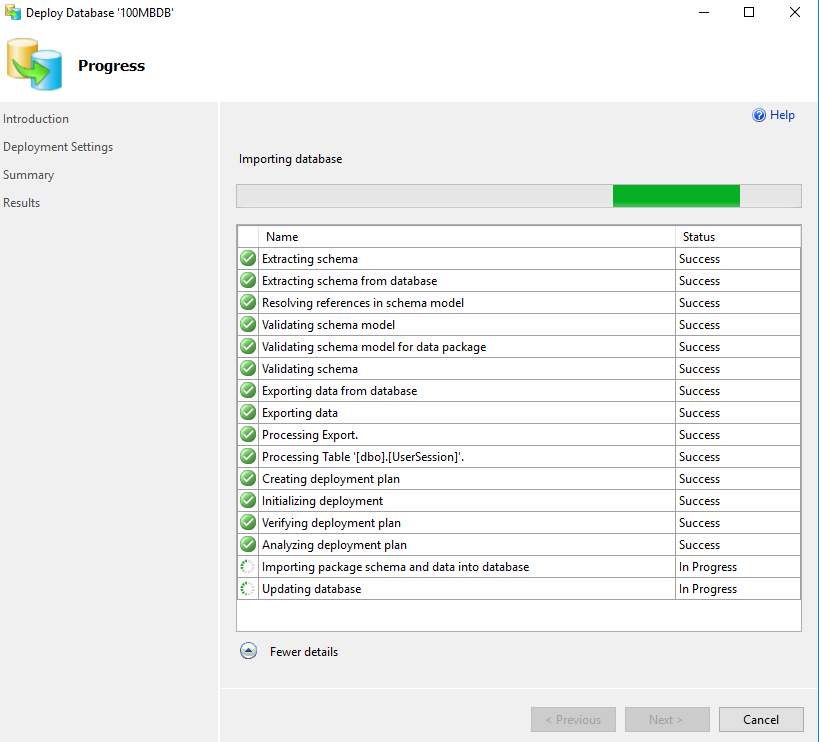
When you click “Next”, you will have an opportunity to review all the settings before clicking “Finish”.  When you do, you will see the progress of the migration, step by step.

As you can see above, there are number of steps.  You can also see that there is a step named “Processing Table”.  This step will show each table as it is processed and migrated to Azure SQL Database.  Once the migration is completed, you will now see the database in both locations, the original SQL Server and in Azure SQL Database.

Data Migration Assistant

This is a relatively easy tool to use.  It really has two purposes.  One to assess an on-prem database to identify what challenges you might encounter when migrating at database to Azure and the other to actually complete the migration.

This is a tool the must be downloaded and installed before using.  To download it you can go here.  Download DMA.  Once downloaded and installed you will find it list as “Microsoft Data Migration Assistant” in the Start menu, not under the SQL Server items.

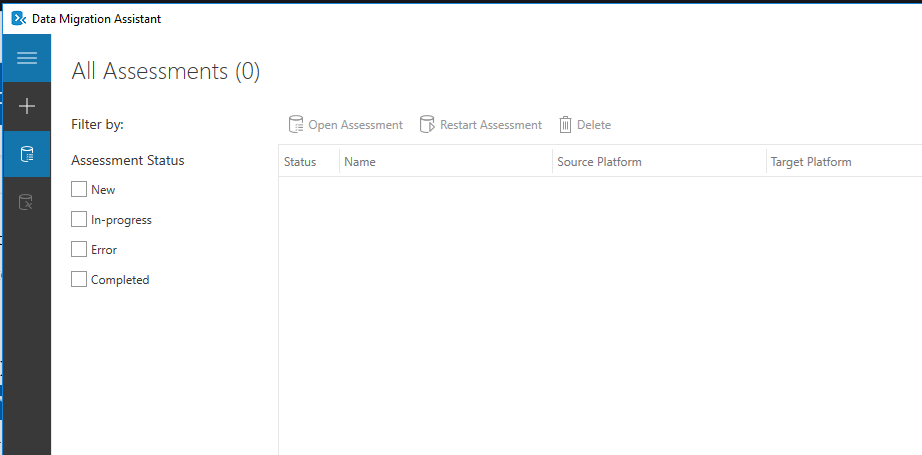
Below you will see the opening screen in the DMA.  As you can see there are two options, completed an assessment or do a migration.  By clicking the “+” on the left side you will have an option to chose what you would like to do.  Notice that there are also options to restart an assessment or open an assessment.  These are exactly what you might think they are.  When you complete an assessment you will be able to save the results or save the configurations of the assessment that you can restart if you like.

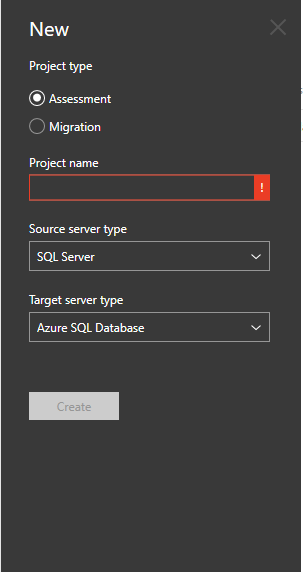
When you click the “+” sign you will then see a few options that you can chose from.  Here you will be able to chose to complete an assessment or a migration.


Both of which will require a project name, a source and target server type.

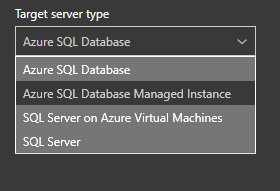
You will have several options for a target as you can see in the image below.  Since this blog post is about the migration of a database, we will focus on that target.

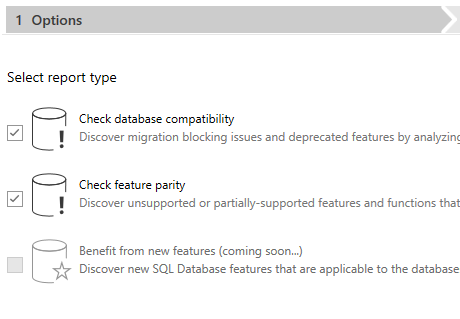
Once you pick you source and target, you will then be able to click the “Create” button.  Once you did, you will see this.  You will see three options, although only two are available at this time.  The two options that are available are Check Database Compatibility and Check Feature Parity.

Once you click “Next” you will then be asked to identify a source.  Since this post is about migrating an on-prem SQL Server database to Azure SQL Database, the source will be a local instance of SQL Server.  You will have to provide an authentication method and then the database(s) you would like to complete the assessment on.  Once you have provided all the information you can click the “Start Assessment” button.
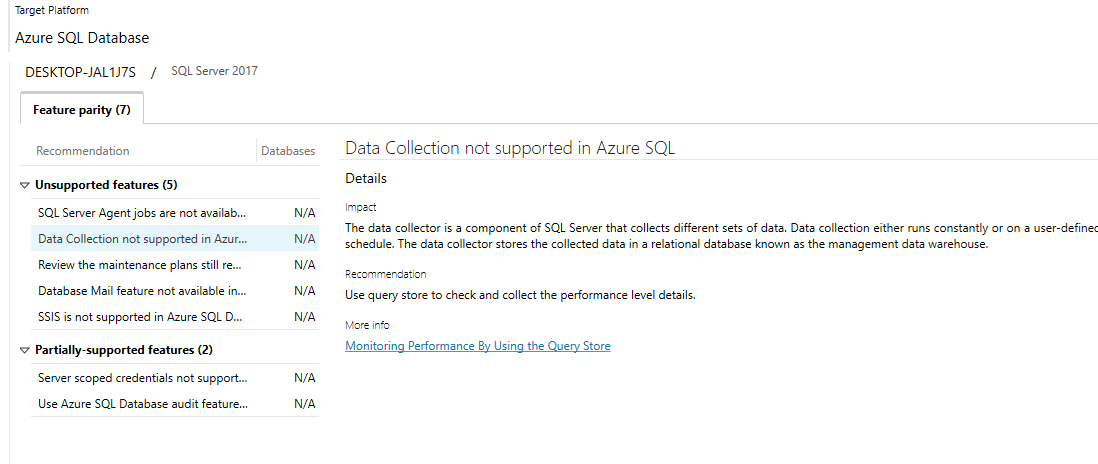
Below is an example of the results of the assessment.  There were a few things that were expected, especially the Agent jobs not being supported in Azure SQL Database.

Fortunately Microsoft has also included links to each of the topics that will allow us to gather more information easily.

Make sure you look at both groups of items, SQL Server feature parity and the Compatibility issues.  In this case not compatibility issues were found.

Now that we have completed an assessment and addressed all the blocking issues, we can now use the same tool to perform the migration.  As expected you will also have to provide a project name, a source and a destination type.  This will also include the connection information for the target.

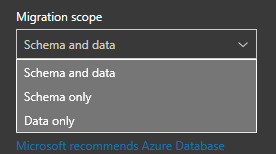
The migration scope has three options.

      • Schema and data
      • Schema only
      • Data only

You just need to decide which is best for what you attempting to accomplish.  In this case, we will pick Schema and Data.

Once you provide all the information, you will be able to click the “Create” button. As part of the migration, there are six steps.  These are list in the image below.

Selecting a source if the obvious starting point for a migration.  Once you do, you will then have an opportunity to pick which database you would like to migrate.

It this is a new database in Azure SQL Database, make sure to click the “Create a new Azure SQL Database…” link.

When you do, make sure you click the Connect button so the list of databases refreshes.

The next step will allow you to identify which objects you would like to migrate.

In this case there are still a few issues that will need to be address, most due to encryption, so I will not migrate those objects.  The next step is to generate the scripts.  Once the scripts are generated, you can save it or copy it.  Note below you the DMA tool will also identify items with assessment issues.
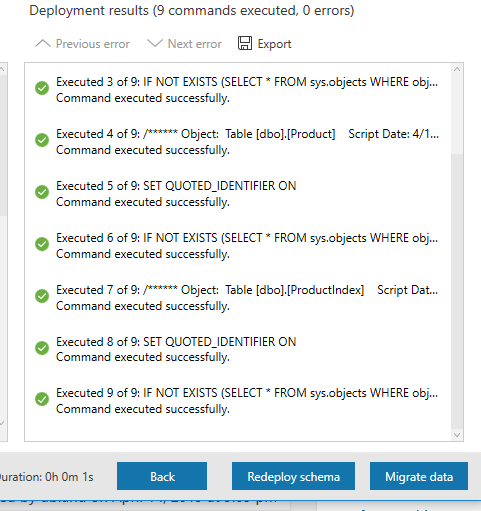
At this point the database has been created in Azure SQL Database and all the objects have been created.  However, we have not reached the point of migrating the data yet.

In order to migrate that data, all we have to do is click the “Migrate Data” button.

We will now have the option to decide which tables we would like to have the data migrated as well.  As you can see below, we can see the tables listed.  This list include the number of rows and whether or not the table is ready to move or not.

Once you have confirmed the information, click the “Start Data Migration” button.  What I like about this part of the tool is that it tells me the progress of each table and the status of each migration of data.

Now were are done. Not only have the objects been migrated, but the data as well.

Both of these migration options take place on your computer, one with SSMS and the other the downloadable Data Migration Assistance.  In my opinion, I think they are both pretty easy to work with.  The third option is done in the Azure portal.  There is a server called Azure Data Migration Service.  There are a number of required steps to utilize this service.

Azure Data Migration Services

As the name implies, this is a service in the Azure Portal.  When looking at all the services, the Azure Database Migration Services can be found either by doing a search or looking in the Databases group.

Once you click the Azure Database Migration Service, you will see what is below.  However, if you already have one of this service type running, you will not have to go through this step again.

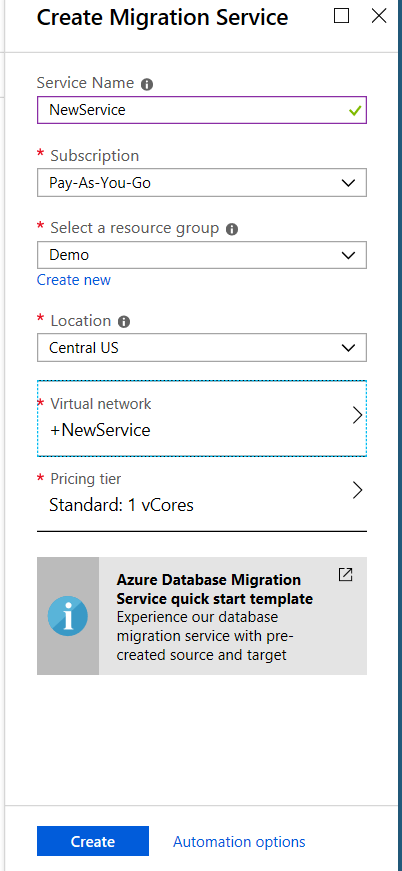
For this method, you will need to provide a service name, a location(region) as well as a Virtual Network.  Yes, you will need to create a virtual network. This will include the creation of a virtual NIC.

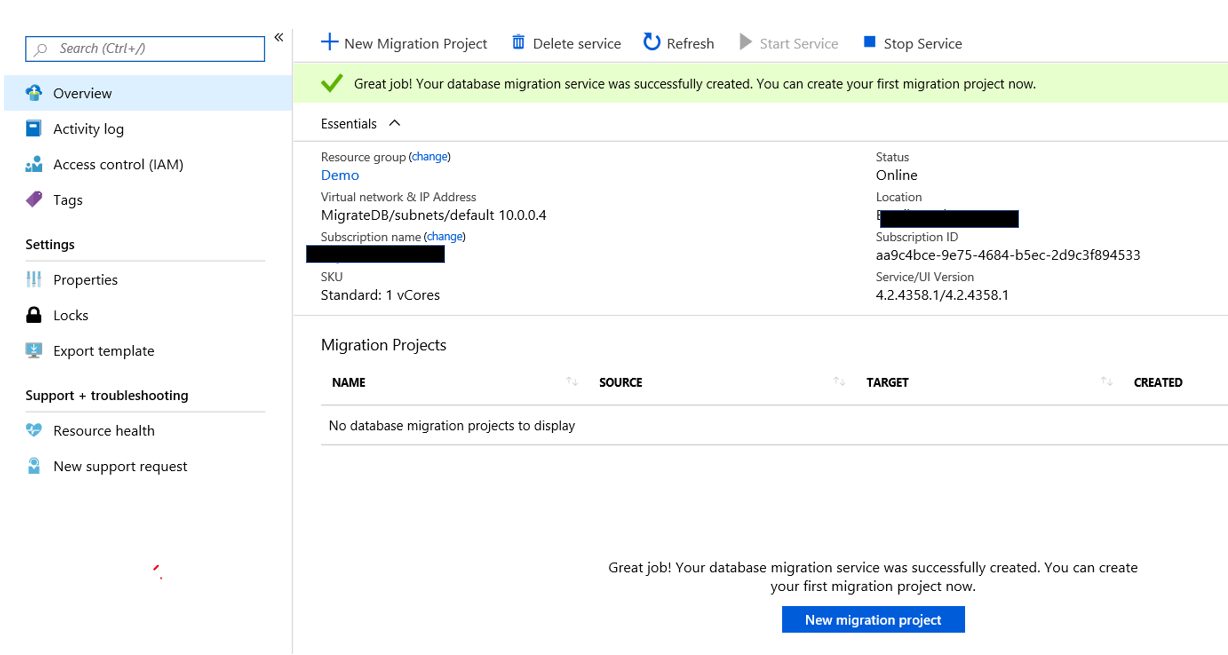
If you already have the service created you can go to the All Resources list in the portal and click that service. Once you do, you will see this.

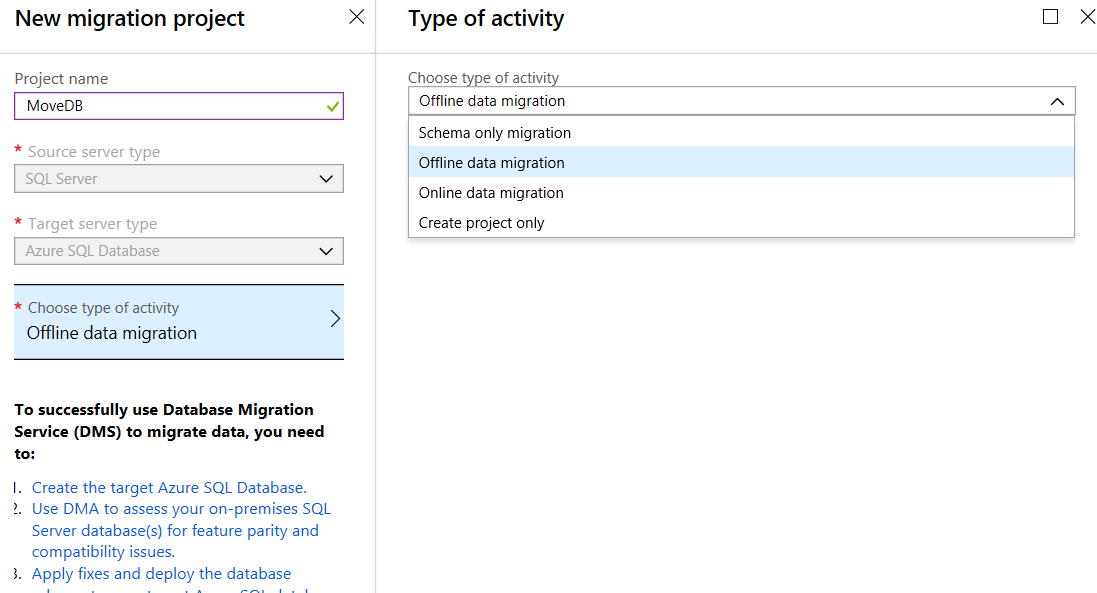
The next step is to click the “New Migration Project” button.  At this point you will pick a data source and a target.

The options for Type of Activity are:

    • Schema Only migration
    • Offline data Migration – this is to be used for source databases that will NOT be changed during the migration.
    • Online data migration – For systems that will be modified during the migration
    • Create project only

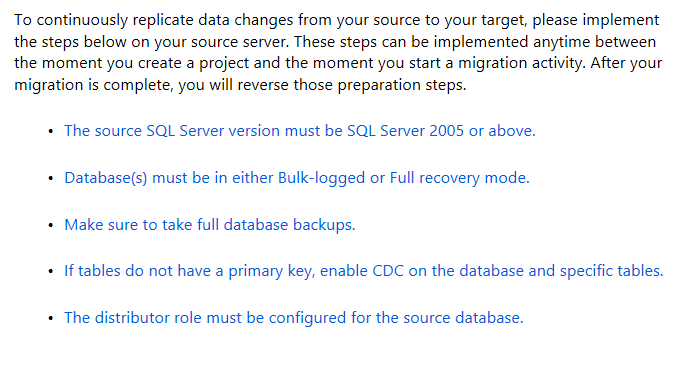
If you chose the Online Data Migration type, Azure with provide you with a list of rules that must be followed in order for the migration to be successful.

Also, if you chose Online Data Migration, it will require a higher level of SKU.  You must have Premium, which I currently do not have.  I received this warning what I tried to use Online Data Migration.

Given this I changed the type of activity to Offline Data Migration.  You will have to complete several steps to be successful in the migration. These steps are fairly basic and expected.  Identify a source, a target, map to target database, configure migration options and a summary.

There are a number of network and security steps that must be completed prior to utilizing this service.  This is a good description of what is required, click here.

As expected the source and the target require the usual information. What is a bit different is the third step, mapping target databases.  Below is a screenshot of the mapping step that is on the above Microsoft site. As you can see below, you simple map the source databases that you would like to migrate to a destination database in your Azure SQL database portal.

The settings step is simple telling the service what tables you would like to migrate.  Below is also from Microsoft’s site.

Finally, once you have provided all the required information and you can then begin the migration.  Once you do, Azure will provide progress status that will look like this, also from Microsoft’s site.

It is always good to have options.  In this case we have three different options.  Two you can run from your computer and one that must be done in the Azure portal.  Personally, I like the options of running the migration through an on-prem computer.  They appear to be less involved and I don’t need to involve other teams, such as the network or security team.

When migrating databases to Azure SQL Database, it is important to complete an assessment on the database first using the Data Migration Assistant.  This will allow you to identify what your obstacles might be.  You can then address them before starting the migration.

Thank for stopping by my blog and I hope you learned something.

Creating an Azure SQL Database

As the industry moves more and more activity to the cloud, I thought it would be a good idea to put together a post on how to create an Azure SQL database.  There are a ton of advantages to using an Azure SQL database.  One of the biggest is that I do not have to purchase a SQL Server license for a single database.  This is my first post on any Azure product.  I am hoping to have more in the future.

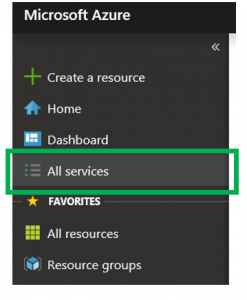
First of all, lets go over what Azure is.  Azure is a collection of many different cloud based technologies that Microsoft offers.  To see the services that are being offered, once in your Azure portal just click the “All Services” option on the left side.

This will bring up many, if not all the services that you can utilize.  Just remember to be careful to not do more than needed on a production server.  It is very easy to take advantage of many of the great features of Azure. If you don’t monitor the cost, you could potentially have a very large bill at the end of the month.

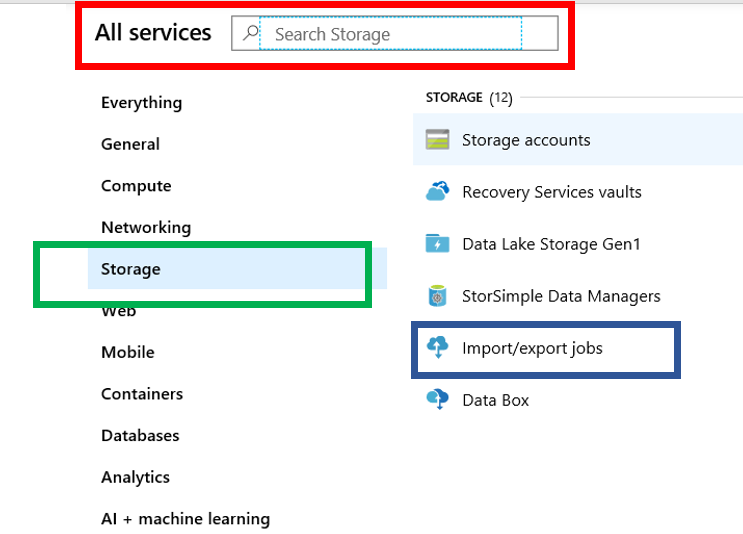
Once you click on the services option you will see something similar to what you see below.

The red rectangle identifies where the SEARCH options can be found in Azure.  The green box is where the groups of services can be found, while the blue box represents the service.  There are many services to choose from.  You just need to identify what you need to pick the appropriate services.

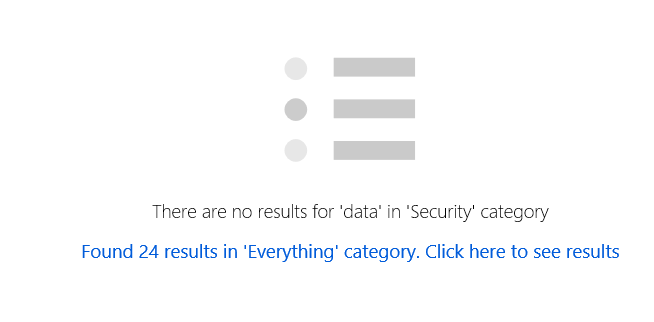
When searching the services you can enter a value into the Search box and Azure will search as you type. If you select a group on the left and then do a search, it will only search that group. However, when you do searching in a group and the query returns no results and there a items in other categories you will see this message.  This is simply telling you that there is nothing in the current category that matches your search criteria, how ever there are other services that do.

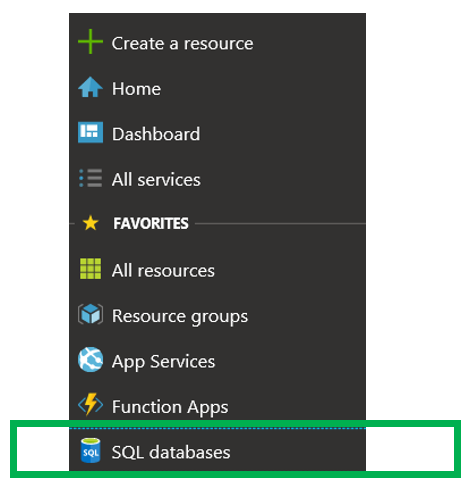
Since this post is about Azure SQL Database, we will focus on that service.  There are several ways to get to the point of creating a database, this is one of them.  The blue box below is the group of services and the green box is the service, in this case, SQL databases.

Microsoft defines “SQL Database” as “Azure SQL Database is a general-purpose relational database-as-a-service (DBaaS) based on the latest stable version of Microsoft SQL Server Database Engine“.  Notice that the definition states that it is based on the latest stable version of SQL Server.  This means no SQL Server upgrades or patches, Microsoft takes care of those.

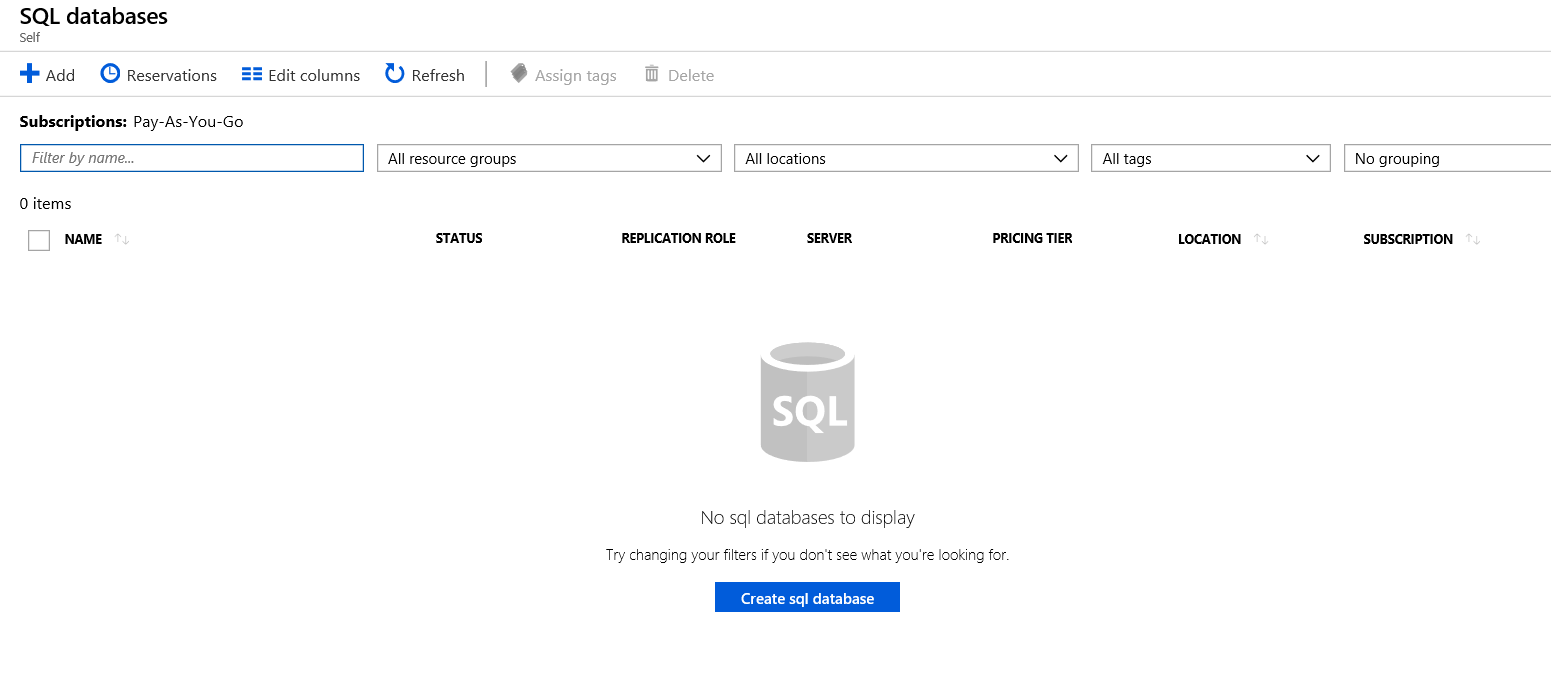
Once you click on “SQL Databases” Azure will take you to this page.  If there already SQL Databases, you will see them listed here.

Before we move on, I would also like to point out that there are several methods to reach this page.  Most notably is by using the menu item on the left.  Then you will need to create the database, you can click the “SQL Databases” option.  This will take you to the part of the portal that will allow you to create a database, as you see in the image above.
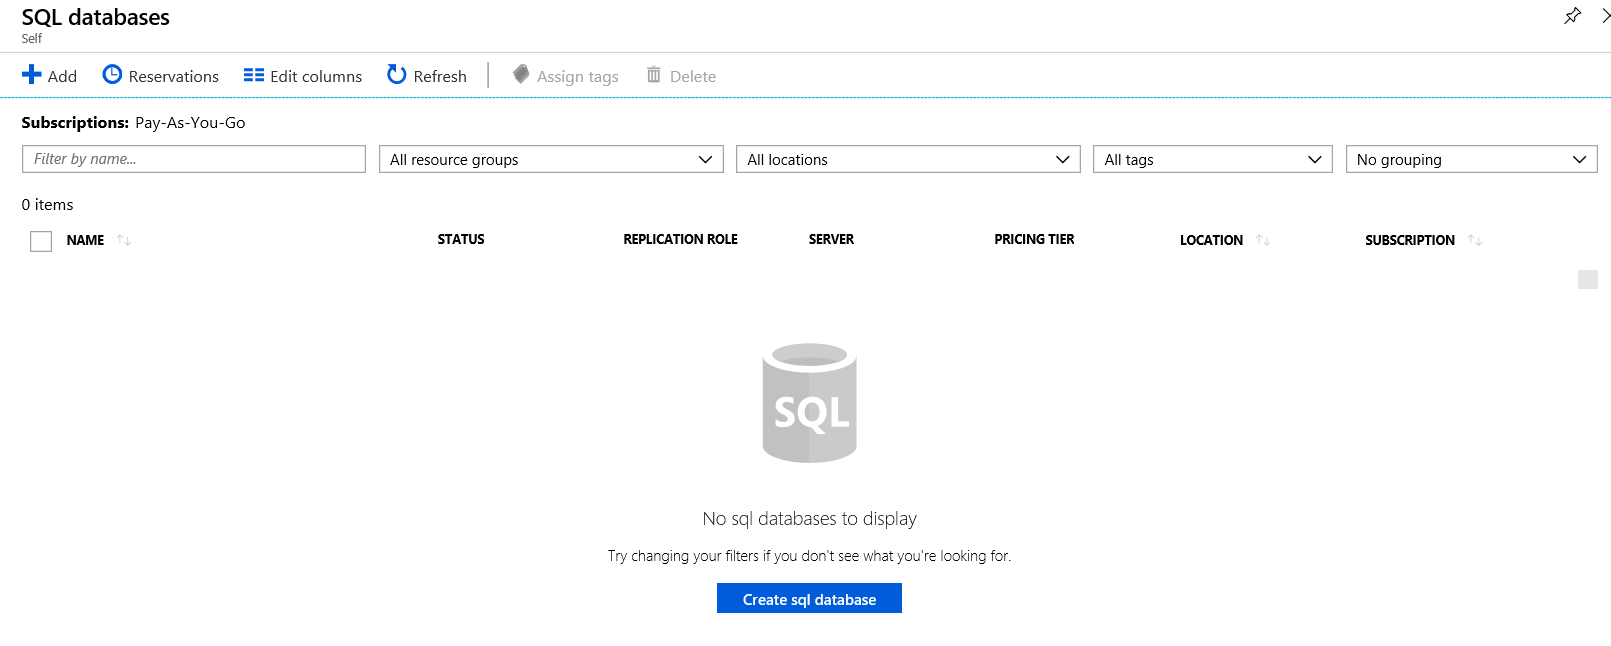
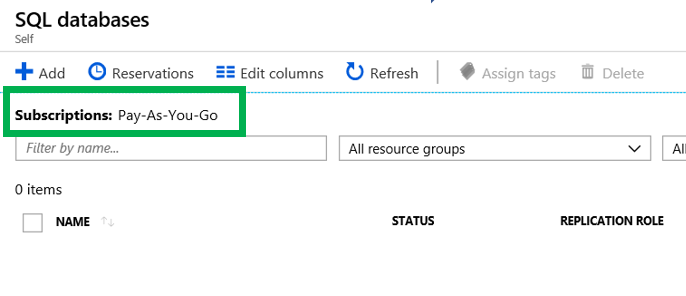
Let’s take a tour of what we are seeing.  Your interface should look like below.

This first thing I would like to point out is the Subscription.  Below you can see that the name of the subscription I am using is Pay-As-You-Go.  This is the default name you will see when you first create the subscription.  You can rename it if you like.  Be cautious when adding items to Azure, if you are not careful, you could end up with an unexpectedly large bill.  Just be aware of the potential cost before creating items in Azure.

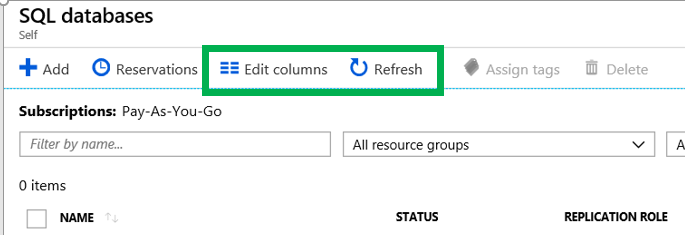
You also have the ability to change the columns that you see in the list.  You simple click “Edit Columns”.  You can also click “Refresh” to see new items if they do not appear.
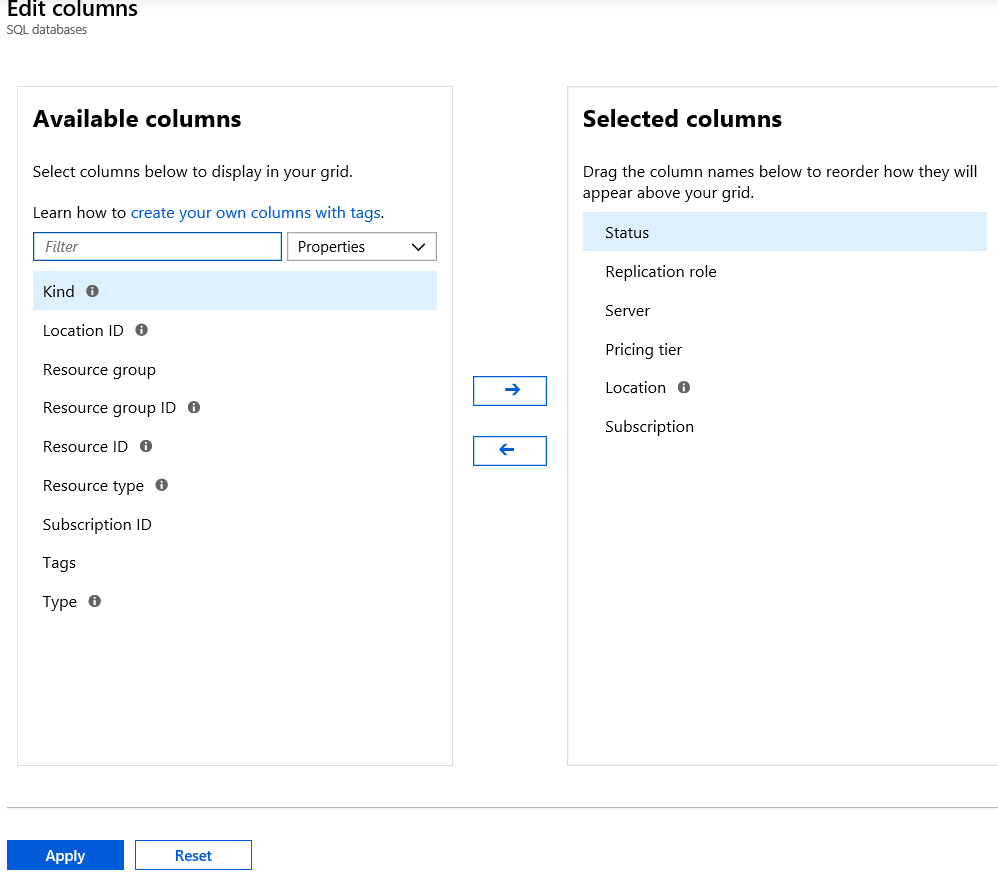
Once you click “Edit Column” you will see the form below.  This is very similar to most products that have the ability to change the columns in a list.  As you can see below you can move columns back and forth.

The list will identify all the SQL databases you currently have in the subscription.  As you can see, I currently do not have any databases.

Regions

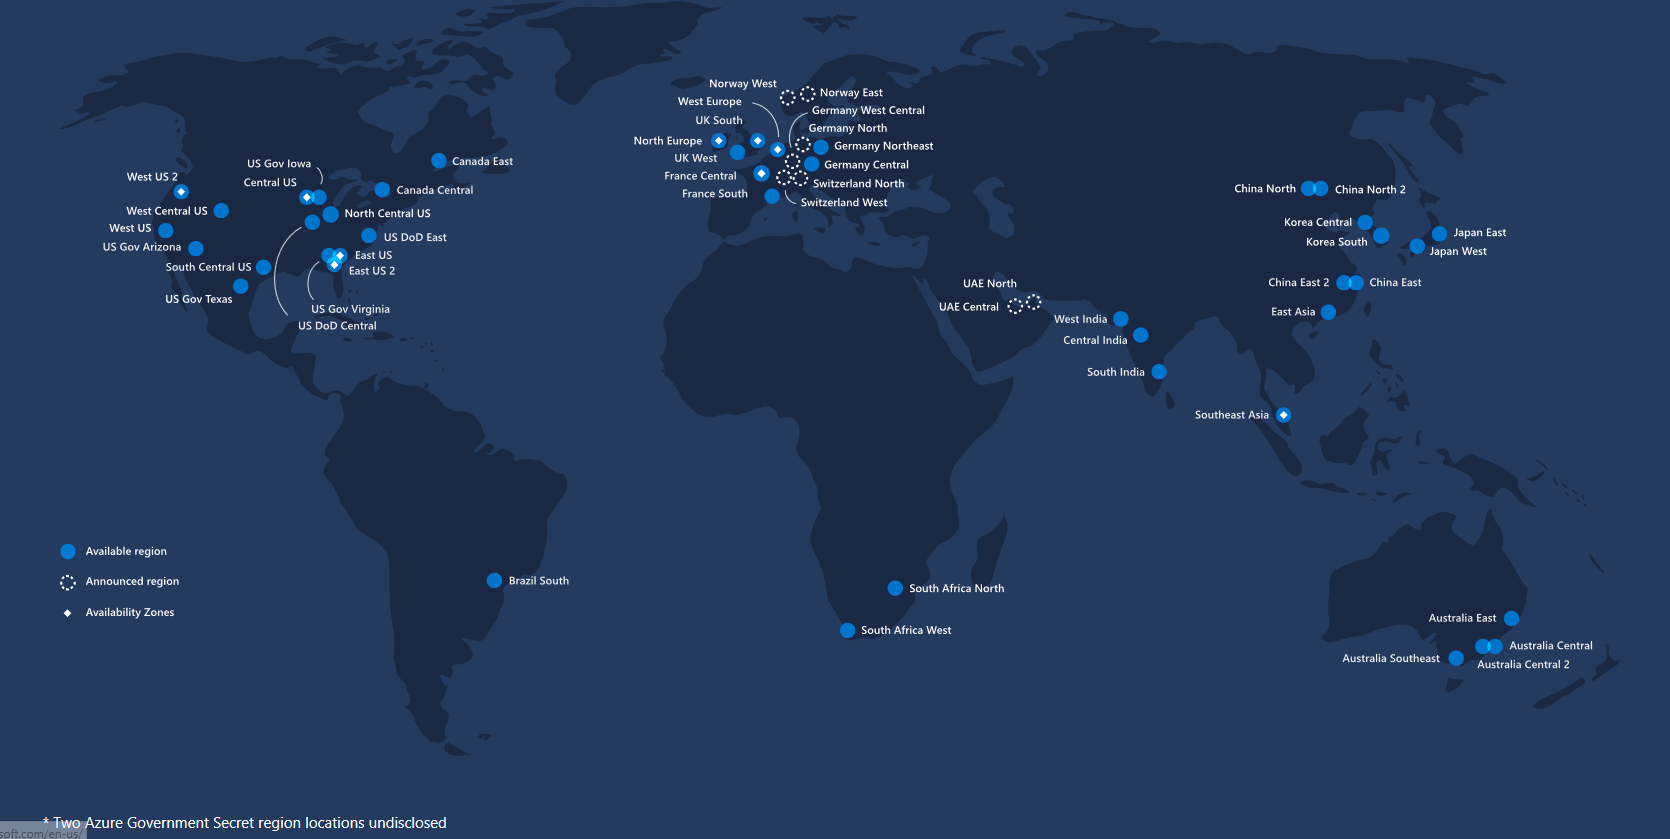
Before going into how to create an Azure SQL Database, I thought I would take a moment to talk about what a Region is.  A region is nothing more than a geographic location of where you want you resources to reside.  It is also important to note that not all services are available in all regions.  Here is the link to Microsoft’s page on Regions.  Ideally you would like to have the resources in the closest region.  As part of the database creation process, you will need to place a few resources in regions.

Here is a map and a link of the current regions:

Creating the Database

Now that we have gone over how to get to the point where we can create a database, let’s create one.

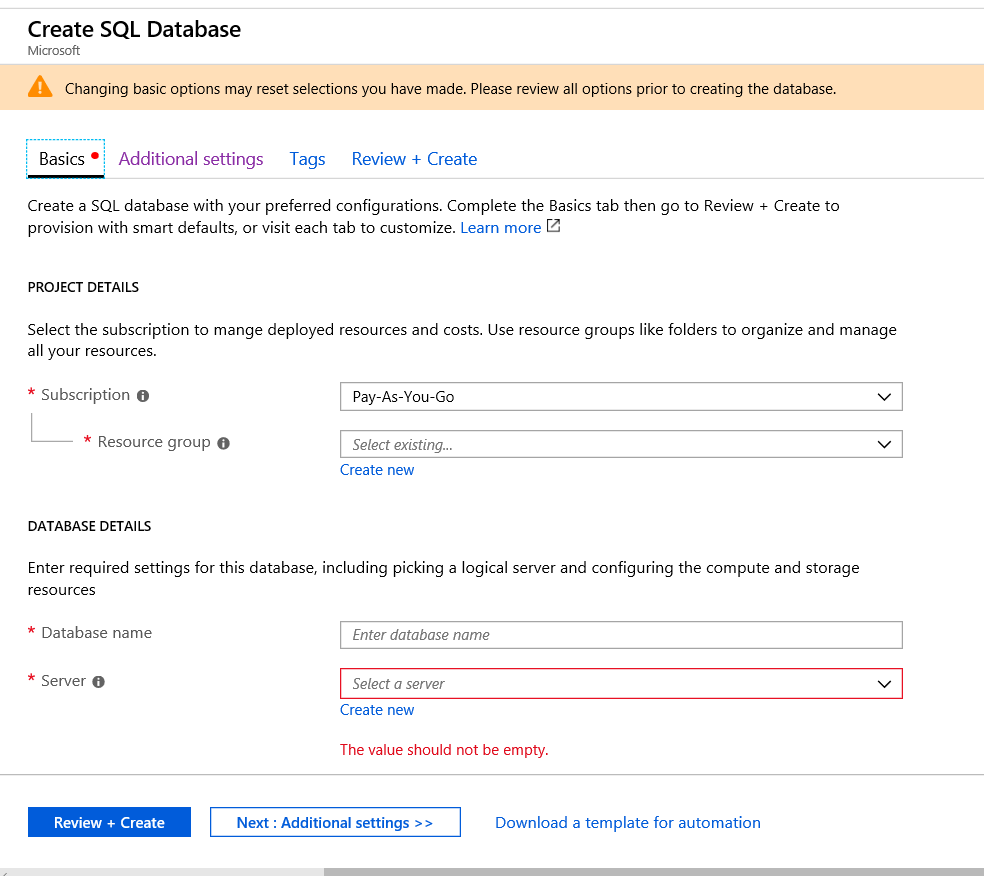
When you first click the “Create Database” button you will see this.

The first bit of information you will need is which subscription you will be adding the database to.  In my case, I just have the one so Azure has defaulted to that one.

The next item is the Resource Group.  Let’s take a moment to get to know exactly what a resource group is.

Microsoft defines as Resource Group as:

“A container that holds related resources for an Azure solution. The resource group includes those resources that you want to manage as a group. You decide how to allocate resources to resource groups based on what makes the most sense for your organization”

Here a few rules around Resource Groups:

  • A resource can only exist in one Resource Group.
  • A resource can be moved to another Resource Group at any time
  • A resource in one group can interact with a resource in another group
  • A Resource Group can contain resources from different regions
  • Ideally, the Resource Group and the resources should be placed in the same region

The link above to Microsoft has the rules listed.

Now that we have gone over regions and Resource Groups, it is time to create the database.  The first thing we need to do it give the database a name.  Just as in an On-Prem SQL Server, there are rules around how you name your database.  What is nice is that Azure will pop up and tell you if you are violating one of the rules.  Just as with an On-Prem instance, the rules are pretty straight forward.

If you violate one of the rules, Azure will tell you. Just as seen below.

Now that we have provided a name for the database, the next step is to assign it to a server.

If you have not created a server yet, you can simply click the “Create New” link.  A server for Azure SQL Database is a logical container for your SQL Databases and provides a centralized point for administration.  Here is a link to Microsoft’s documentation on Server.
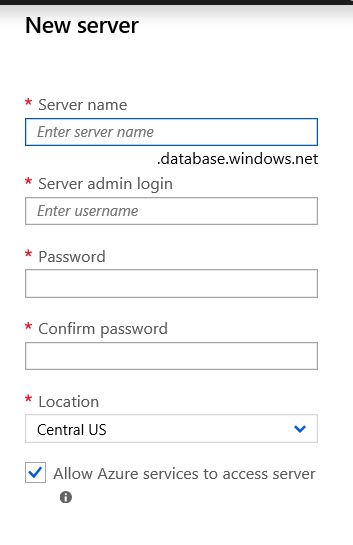
When creating a server, you will also need to create an account that will be used as the administrator account.  You will also need to provide a password and a region.  When providing a name, the name cannot be the same as the database. Notice that under the server name, you will see, “.database.windows.net”.  This will be important information you will need when connecting to your database with SQL Server Management Studio.

Once you have click the “Select” button and filled out all the information, it may look like you are done, but you are not.  We need to provide additional information.  By clicking on the “Additional Setting” item towards the bottom we will see the what else we need to provide.

The first item we need to address is the Data Source.  Here you have three options.

  • Blank
  • Restore from Backup
  • Sample

There is only one option at this point for the sample database, AdventureWorksLT.  If you chose None, this is simply a blank database and you will need to review the Collation to see if it appropriate for your needs.

The next item you will look to look at are the tags.  Tags are not required, but can be useful when grouping your databases.  For example, if you have a system that uses more than one database, you can take them with the name of the system.  Just a note, keep in mind cross database queries are not allowed in Azure SQL Database.

Now that we have provided all the required information it is time to review before creating the database. You will want to pay close attention to the Product Details section.  Notice that it has an estimated cost per month.

The rest of the options are pretty straight forward, however should be carefully be reviewed before creating the database.
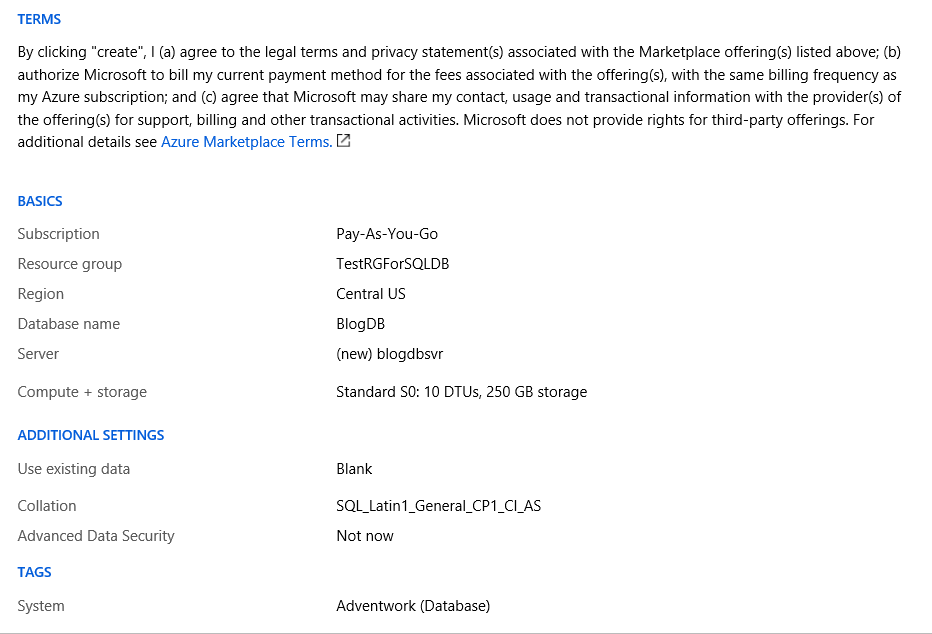
Once you click “Create” you will see this.  If you look in the upper right corner of the image, you will see something that looks kind of like a bell.  This is the notifications and you will see the blue line under it move from the left to the right while the deployment is in progress.

Once the deployment is complete, Azure will tell you as seen below.

Now that we have created the database, we can confirm it by returning to the list we talked about earlier.  Just click the SQL Database menu item on the left and you will be returned here.

Notice that our new database is listed.

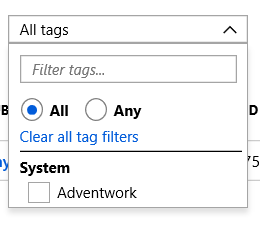
I would also like to point out the Tags. You will see this list along the top.

If you click the drop down arrow you will see this and the tags that was created. By clicking the box next to Adventwork, the list will only show items that have a tag of Adventwork.
Connecting to the Database

Although this post was mostly about how to create an Azure SQL Database, I would also like to go over how to connect to your newly created database. If you click the database name in the list, you will be taken to a page that will list all the important information about your database.  This includes the subscription name, database name, status, location as well as a number of other usefully bits of information.

However, in order to connect there is one thing we need to copy, that is the Server Name.  In my case, blogdbsvr.database.windows.net.  If you move your mouse just to the right of it, you will be able to copy it to the clipboard.

Once on the clipboard, it is time to open SSMS. You will connect just as if you were connecting to an On-Prem SQL Server using SQL Authentication.
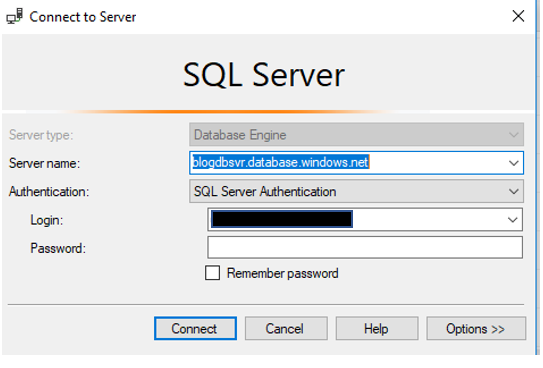
Once you enter a user name and password, you click Connect.  This is where you will begin to see a few differences.  You will be asked to login into your Azure account as well as a few screens about your IP address.
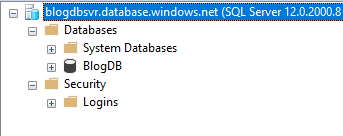
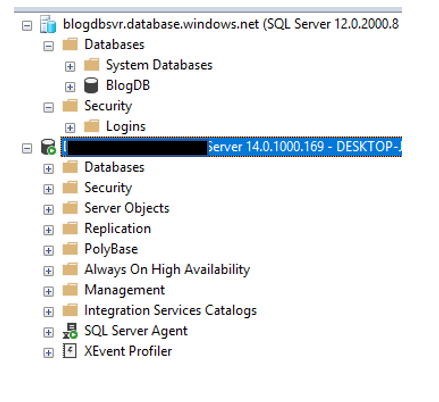
Once connected you will see a few significant differences from an On-Prem instance of SQL Server. Notice that the SQL Server agent is no longer present. As a DBA, this is a huge difference because so much of our on going maintenance is dependent on the Agent.  No worries there, Microsoft has provide a number of ways for us to schedule maintenance jobs.

Below you will see many more differences.

Listing all the differences is outside the purpose of the post, however there is a lot of really good information available.  I may cover some of these differences in future blog posts.  Once you are in SSMS, you can do many of the same things you have done with an on-prem instance.  Including creating objects, writing queries and working with security.  Please keep in mind that there are some differences on how security is set up, however that is for another time.

Thanks for reading the long post on how to create an Azure SQL Database.  This is the longest blog post I have done so far.  Hopefully you found it useful.