Investigative Reports: Global Temp Table Already Exists Error?

We recently received a number of calls(just one really), that when the user tried to execute their query they get an error.  That error says the Global Temp Table Already Exists.  We thought this should not be happening, so we sent our reports in to investigate.  Their story is below.

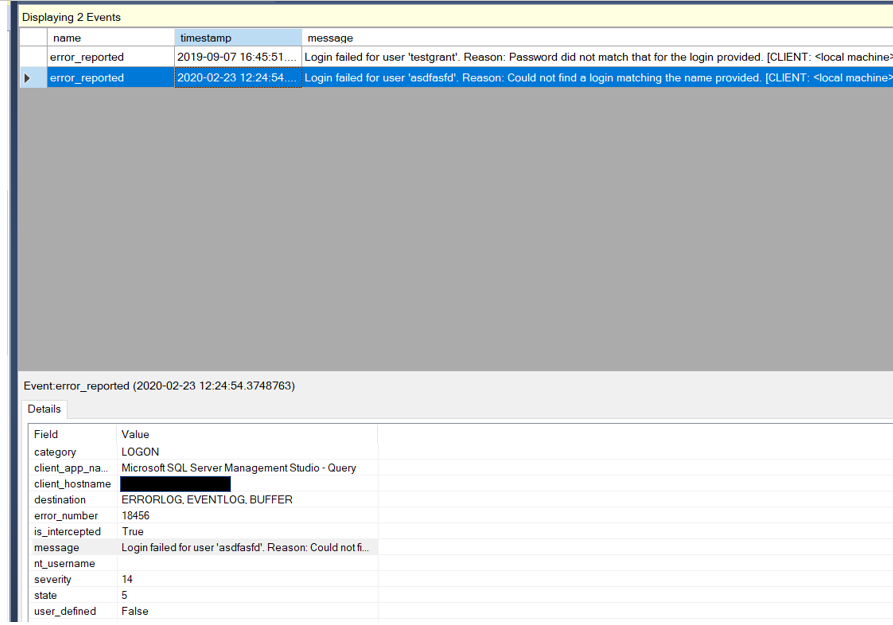
Before we get started, we should take a quick look at the error.

In order to understand the situation, we will need to figure out what a temp table is.  As it’s name implies, it is a table that is temporary that is stored in the TempDB. There are two types in SQL Server, Local and Global.  Phil Factor at Red Gate Simple Talk has some great definitions.

LocalAs defined by Phil Factor at Red Gate Simple Talk – “With Local temporary table (names that begin with #), what goes on under the hood is surprisingly similar to table variables. Local Temporary tables are private to the process that created it. They cannot therefore be used in views and you cannot associate triggers with them.”

GlobalAlso as defined by Phil Factor at Red Gate Simple Talk – “Like Local temporary tables, Global temporary tables (they begin with ##) are automatically dropped when the session that created the table ends: However, because global tables aren’t private to the process that created it, they must persist thereafter until the last Transact-SQL statement that was actively referencing the table at the time when the creating session ended has finished executing and the locks are dropped.”

To find the culprit, we tracked down an old informant named sp_who2.  At first he had no comment, but we knew he had some information that could help us, so we kept after him.  Finally, he grew tired of us and gave us something just to make us go away. He said we needed to talk to his associate sysproccesses.  At first this guy was hard to find, but we located him sitting at a table.  He wasn’t really doing anything, just sitting there. So we approached him and sat down to see if we can get what we are looking for.  He also had no comment and referred us to his lawyer, sys.dm_exec_sessions.  After some searching, we were able to catch up with him at the DMV and he was not in a good mood.  He gave up some information, just not exactly what we are looking for.

After all this, we still didn’t have answers to our most troubling questions.

Who created the object?

What code were they running when the object was created?

What database they using?

When was it created?

We were suspicious because sp_who2, sysprocesses and sys.dm_exec_sessions all gave us similar information, but different enough to make us suspect they were hiding something or protecting who really had the information.

So we decided to get tough.  We had to interrogate the Tempdb.  But we were at a dead end on how to go about doing it.  Then out of the blue we received several useful tips.

Each had a different return address.  They looked really good so we checked them out. The addresses are below.

https://www.c-sharpcorner.com/blogs/monitoring-tempdb-space-usage-on-sqlserver

http://kushagrarakesh.blogspot.com/2018/02/which-sessions-sql-text-cosuming-most.html

https://www.sqlservercentral.com/forums/topic/high-tempdb-usage-where-is-the-culprit

Despite the different addresses all the tips had the same message.  This is what they said. Note: I did remove a bunch of columns that were not needed for what we are looking for.

They said run this.

SELECT R1.session_id
FROM (SELECT session_id
, request_id
, SUM(internal_objects_alloc_page_count) AS Task_request_internal_objects_alloc_page_count
, SUM(internal_objects_dealloc_page_count)AS Task_request_internal_objects_dealloc_page_count
, SUM(user_objects_alloc_page_count) AS Task_request_user_objects_alloc_page_count
, SUM(user_objects_dealloc_page_count)AS Task_request_user_objects_dealloc_page_count
FROM sys.dm_db_task_space_usage
GROUP BY session_id, request_id) R1
INNER JOIN (SELECT session_id
, SUM(internal_objects_alloc_page_count) AS Session_request_internal_objects_alloc_page_count
, SUM(internal_objects_dealloc_page_count)AS Session_request_internal_objects_dealloc_page_count
, SUM(user_objects_alloc_page_count) AS Session_request_user_objects_alloc_page_count
, SUM(user_objects_dealloc_page_count)AS Session_request_user_objects_dealloc_page_count
FROM sys.dm_db_Session_space_usage
GROUP BY session_id) R3
ON R1.session_id = R3.session_id
LEFT OUTER JOIN sys.dm_exec_requests R2
ON R1.session_id = R2.session_id
AND R1.request_id = R2.request_id
OUTER APPLY sys.dm_exec_sql_text(R2.sql_handle) AS RL2
WHERE
Task_request_internal_objects_alloc_page_count > 0 OR
Task_request_internal_objects_dealloc_page_count> 0 OR
Task_request_user_objects_alloc_page_count > 0 OR
Task_request_user_objects_dealloc_page_count > 0 OR
Session_request_internal_objects_alloc_page_count > 0 OR
Session_request_internal_objects_dealloc_page_count > 0 OR
Session_request_user_objects_alloc_page_count > 0 OR
Session_request_user_objects_dealloc_page_count > 0

We thought, what do we have to lose.  So we used the proper amount of caution when running code in production and we ran it.  After we did, we now felt like were were getting somewhere.

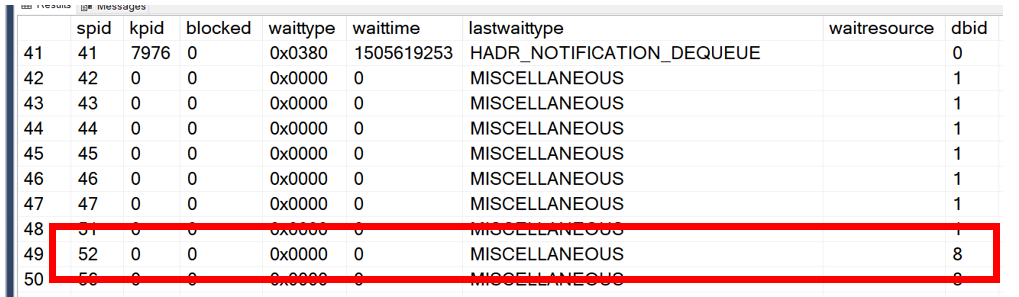
When we ran the above code our results looked similar to what you see below.  The highlighted session_id is the session we are looking for.

Although we have found the SPiD, we still need an answer to a key question.

Who created the object?

To get this we can go back to our old friend, sp_who2.  This time, we will be a bit tougher and lay it all on the table.  We said we have evidence he knows who is running the query, we just need a name.

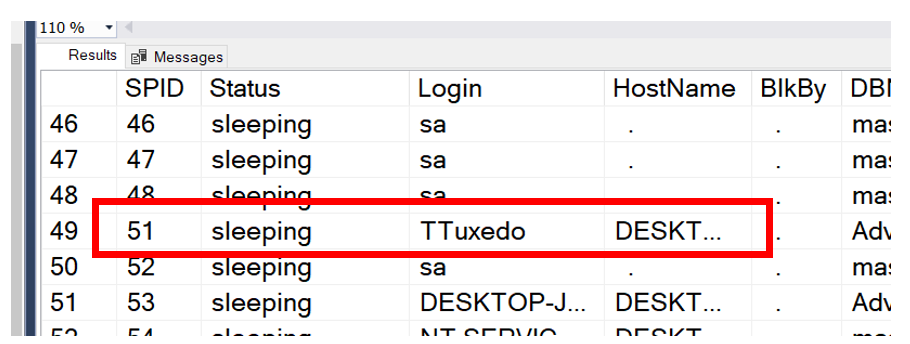
Since we had the SPID, we can use that to find out who is running the query.  With sp_who2, we have not only identified who created the global temporary table, but we have also found out the host the user was using.  What we learned is that we can get the name of who created the table several different ways.  One is sp_who2, the other is to take the code above and add sysprocesses to the query.

SELECT R1.session_id
, p.uid AS ‘UserName’
 FROM (SELECT session_id
, request_id
, SUM(internal_objects_alloc_page_count) AS Task_request_internal_objects_alloc_page_count
, SUM(internal_objects_dealloc_page_count)AS Task_request_internal_objects_dealloc_page_count
, SUM(user_objects_alloc_page_count) AS Task_request_user_objects_alloc_page_count
, SUM(user_objects_dealloc_page_count)AS Task_request_user_objects_dealloc_page_count
FROM sys.dm_db_task_space_usage
GROUP BY session_id, request_id) R1
INNER JOIN (SELECT session_id
, SUM(internal_objects_alloc_page_count) AS Session_request_internal_objects_alloc_page_count
, SUM(internal_objects_dealloc_page_count)AS Session_request_internal_objects_dealloc_page_count
, SUM(user_objects_alloc_page_count) AS Session_request_user_objects_alloc_page_count
, SUM(user_objects_dealloc_page_count)AS Session_request_user_objects_dealloc_page_count
FROM sys.dm_db_Session_space_usage
GROUP BY session_id) R3
ON R1.session_id = R3.session_id
INNER JOIN sysprocesses p
ON r1.session_ID = p.spid
LEFT OUTER JOIN sys.dm_exec_requests R2
ON R1.session_id = R2.session_id
AND R1.request_id = R2.request_id
OUTER APPLY sys.dm_exec_sql_text(R2.sql_handle) AS RL2
WHERE
Task_request_internal_objects_alloc_page_count > 0 OR
Task_request_internal_objects_dealloc_page_count> 0 OR
Task_request_user_objects_alloc_page_count > 0 OR
Task_request_user_objects_dealloc_page_count > 0 OR
Session_request_internal_objects_alloc_page_count > 0 OR
Session_request_internal_objects_dealloc_page_count > 0 OR
Session_request_user_objects_alloc_page_count > 0 OR
Session_request_user_objects_dealloc_page_count > 0

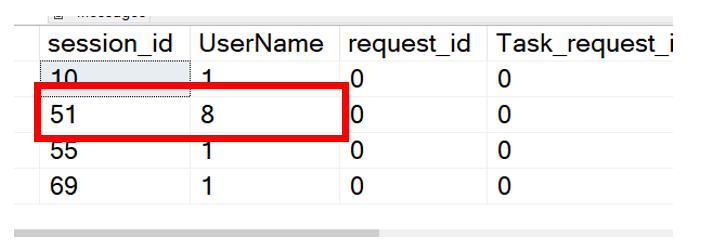
If you look at the code above, the text in red is what we added.  When we run it, finally we are one step closer.  We have the User ID. In this case it is 8.

However, we still need a name.  Seems no one wants to give us a name besides sp_who2.  However, using sp_who2 requires us to add a step to our investigative process.  We are hoping it get all the information in one step.  We had a trick up our sleeves, USER_NAME().  USER_NAME() knows everyone and we are sure he can help us out.  This is great, however sometimes, things just don’t go as planned.  We were still missing.  If we run the query and we are connected to the wrong database we could get no name or even worst, an incorrect name. Below is an example of what you might see if connected to the incorrect database.

To remove the dependency of being in the database the object was created in we need to go back to sysprocesses.  There is a column named sid.  This is the security identifier of the login.  The column looks like the image below.

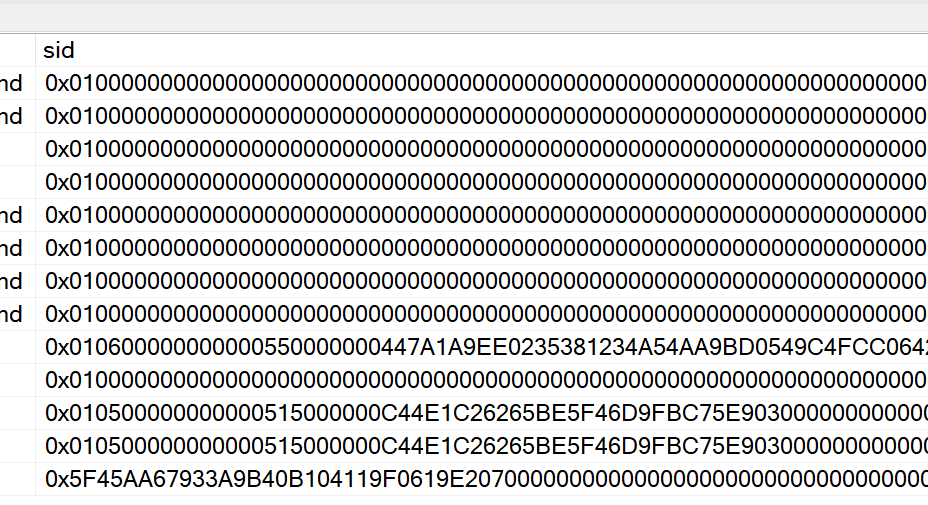
We were asking ourselves, how do we use this information to get the name.  Well, this is where another object comes into play, syslogins.  Syslogins table is where information about the logins is stored, included the SID.  Since we already have sysprocesses in our query, we just need to add syslogins to our query.  What was added is highlighted in red below.

—-The foundation for this code can be found at all of the links below
—-https://www.c-sharpcorner.com/blogs/monitoring-tempdb-space-usage-on-sqlserver

—-http://kushagrarakesh.blogspot.com/2018/02/which-sessions-sql-text-cosuming-most.html

—-https://www.sqlservercentral.com/forums/topic/high-tempdb-usage-where-is-the-culprit

SELECT R1.session_id AS ‘SPiD’
, lg.name AS ‘UserName’
, ib.event_info AS ‘Query’
FROM (SELECT session_id
, request_id
, SUM(internal_objects_alloc_page_count) AS Task_request_internal_objects_alloc_page_count
, SUM(internal_objects_dealloc_page_count)AS Task_request_internal_objects_dealloc_page_count
, SUM(user_objects_alloc_page_count) AS Task_request_user_objects_alloc_page_count
, SUM(user_objects_dealloc_page_count)AS Task_request_user_objects_dealloc_page_count
FROM sys.dm_db_task_space_usage
WHERE session_id > 50
GROUP BY session_id, request_id) R1
INNER JOIN (SELECT session_id
, SUM(internal_objects_alloc_page_count) AS Session_request_internal_objects_alloc_page_count
, SUM(internal_objects_dealloc_page_count)AS Session_request_internal_objects_dealloc_page_count
, SUM(user_objects_alloc_page_count) AS Session_request_user_objects_alloc_page_count
, SUM(user_objects_dealloc_page_count)AS Session_request_user_objects_dealloc_page_count
FROM sys.dm_db_Session_space_usage
GROUP BY session_id) R3
ON R1.session_id = R3.session_id
INNER JOIN sysprocesses pr
ON r1.session_ID = pr.spid
INNER JOIN sysdatabases db
ON pr.dbid = db.dbid
INNER JOIN syslogins lg
ON lg.sid = pr.sid
CROSS APPLY sys.dm_exec_input_buffer(R1.session_id,null) ib
WHERE
Task_request_internal_objects_alloc_page_count > 0 OR
Task_request_internal_objects_dealloc_page_count> 0 OR
Task_request_user_objects_alloc_page_count > 0 OR
Task_request_user_objects_dealloc_page_count > 0 OR
Session_request_internal_objects_alloc_page_count > 0 OR
Session_request_internal_objects_dealloc_page_count > 0 OR
Session_request_user_objects_alloc_page_count > 0 OR
Session_request_user_objects_dealloc_page_count > 0

We are almost there.  We currently know the SPiD and User Name We still need to get the code and we would also like to get the database name as well. To get that we will need to get back to sysprocesses.  When we run it we find the spid column from sysprocesses. This will give us what database ID we need to use. The name of the column is dbid.

However, I really need the name of the database. Sysdatabases is going to be our friend to get the name of the database.  We want to join on the dbid column.  This addition is highlighted with red text below.

—-The foundation for this code can be found at all of the links below
—-https://www.c-sharpcorner.com/blogs/monitoring-tempdb-space-usage-on-sqlserver

—-http://kushagrarakesh.blogspot.com/2018/02/which-sessions-sql-text-cosuming-most.html

—-https://www.sqlservercentral.com/forums/topic/high-tempdb-usage-where-is-the-culprit

SELECT R1.session_id AS ‘SPiD’
, db.name
, lg.name AS ‘UserName’
, ib.event_info AS ‘Query’
FROM (SELECT session_id
, request_id
, SUM(internal_objects_alloc_page_count) AS Task_request_internal_objects_alloc_page_count
, SUM(internal_objects_dealloc_page_count)AS Task_request_internal_objects_dealloc_page_count
, SUM(user_objects_alloc_page_count) AS Task_request_user_objects_alloc_page_count
, SUM(user_objects_dealloc_page_count)AS Task_request_user_objects_dealloc_page_count
FROM sys.dm_db_task_space_usage
WHERE session_id > 50
GROUP BY session_id, request_id) R1
INNER JOIN (SELECT session_id
, SUM(internal_objects_alloc_page_count) AS Session_request_internal_objects_alloc_page_count
, SUM(internal_objects_dealloc_page_count)AS Session_request_internal_objects_dealloc_page_count
, SUM(user_objects_alloc_page_count) AS Session_request_user_objects_alloc_page_count
, SUM(user_objects_dealloc_page_count)AS Session_request_user_objects_dealloc_page_count
FROM sys.dm_db_Session_space_usage
GROUP BY session_id) R3
ON R1.session_id = R3.session_id
INNER JOIN sysprocesses pr
ON r1.session_ID = pr.spid
INNER JOIN sysdatabases db
ON pr.dbid = db.dbid
INNER JOIN syslogins lg
ON lg.sid = pr.sid
CROSS APPLY sys.dm_exec_input_buffer(R1.session_id,null) ib
WHERE
Task_request_internal_objects_alloc_page_count > 0 OR
Task_request_internal_objects_dealloc_page_count> 0 OR
Task_request_user_objects_alloc_page_count > 0 OR
Task_request_user_objects_dealloc_page_count > 0 OR
Session_request_internal_objects_alloc_page_count > 0 OR
Session_request_internal_objects_dealloc_page_count > 0 OR
Session_request_user_objects_alloc_page_count > 0 OR
Session_request_user_objects_dealloc_page_count > 0

We now know who created the temp table and what database they are using.  We feel like we are on a roll in our investigation, however we are not done yet. The last bit of information we need is what query is this person running.  To get this we have a few choices.  We had a number of volunteers offering to assist. One has been around for a while and we have used as in informant many times in the past.  While the other just moved in to the neighborhood a few years ago.

The one that have been around for a while are DBCC INPUTBUFFER.

This is what we ran with INPUTBUFFER.

DBCC INPUTBUFFER(52)

The results are below.

While he did give us what we are looking for, we again have have multiple steps to run through to get what we are looking for.  He also doesn’t work well with others, he doesn’t join like we would like him to.  We were looking for someone that can work well with others so we can only ask the questions one time and in one step.  We recently heard about a new kid on the block that moved in a few years ago, SQL Server 2014 sp2 to be exact.  His name is sys.dm_exec_input_buffer.  He said he has worked with sysprocesses before and they work well together.  So we decided to give him a shot.

—-The foundation for this code can be found at all of the links below
—-https://www.c-sharpcorner.com/blogs/monitoring-tempdb-space-usage-on-sqlserver

—-http://kushagrarakesh.blogspot.com/2018/02/which-sessions-sql-text-cosuming-most.html

—-https://www.sqlservercentral.com/forums/topic/high-tempdb-usage-where-is-the-culprit

SELECT R1.session_id AS ‘SPiD’
, db.name
, lg.name AS ‘UserName’
, ib.event_info AS ‘Query’
FROM (SELECT session_id
, request_id
, SUM(internal_objects_alloc_page_count) AS Task_request_internal_objects_alloc_page_count
, SUM(internal_objects_dealloc_page_count)AS Task_request_internal_objects_dealloc_page_count
, SUM(user_objects_alloc_page_count) AS Task_request_user_objects_alloc_page_count
, SUM(user_objects_dealloc_page_count)AS Task_request_user_objects_dealloc_page_count
FROM sys.dm_db_task_space_usage
WHERE session_id > 50
GROUP BY session_id, request_id) R1
INNER JOIN (SELECT session_id
, SUM(internal_objects_alloc_page_count) AS Session_request_internal_objects_alloc_page_count
, SUM(internal_objects_dealloc_page_count)AS Session_request_internal_objects_dealloc_page_count
, SUM(user_objects_alloc_page_count) AS Session_request_user_objects_alloc_page_count
, SUM(user_objects_dealloc_page_count)AS Session_request_user_objects_dealloc_page_count
FROM sys.dm_db_Session_space_usage
GROUP BY session_id) R3
ON R1.session_id = R3.session_id
INNER JOIN sysprocesses pr
ON r1.session_ID = pr.spid
INNER JOIN sysdatabases db
ON pr.dbid = db.dbid
INNER JOIN syslogins lg
ON lg.sid = pr.sid
CROSS APPLY sys.dm_exec_input_buffer(R1.session_id,null) ib
WHERE
Task_request_internal_objects_alloc_page_count > 0 OR
Task_request_internal_objects_dealloc_page_count> 0 OR
Task_request_user_objects_alloc_page_count > 0 OR
Task_request_user_objects_dealloc_page_count > 0 OR
Session_request_internal_objects_alloc_page_count > 0 OR
Session_request_internal_objects_dealloc_page_count > 0 OR
Session_request_user_objects_alloc_page_count > 0 OR
Session_request_user_objects_dealloc_page_count > 0

We had to modify the code one more time.  The additions are above in red.  We finally have everything we need!

Our goal was to answer some question.

Who created the object?

Answer: TTuxedo

What were they running when the object was created?

Answer: Create table       ##mytable (myname varchar(129)) Insert ##mytable(MyName) Values(‘Dave’)

When was it created?

Answer: Don’t have the answer to this yet.

To find out when the object was created, we have to use another query.  This time we need to go directly to the TempDB using the sysobjects table.  We will need to search on the object name using a wildcard.

SELECT name
             , crdate
FROM tempdb.dbo.sysobjects 
WHERE name LIKE ‘#%’

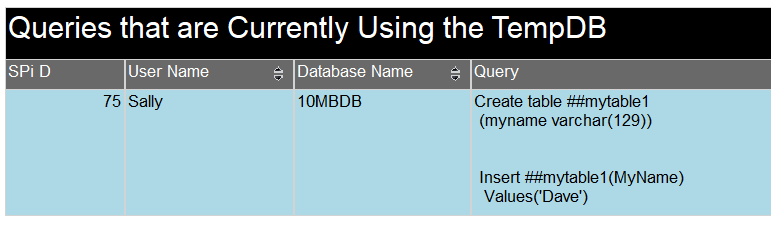
This is what the results will look like.  Now was have the answer to the final question.  While this is a nice to have, it wasn’t one of the original requirements.  With this, we are OK with it being an additional step.

We now have everything we need to conclude our investigation.  If you look below, you will see the database name, User Name and the query that was used to create the object.

Now we will need to determine the next steps.  Do we need to dig deeper?  Do we let the query finish?  Do we terminate the process?   In this case, we dug a bit deeper and found that someone ran someone ran some code that created the temp table and didn’t close the connection.  Because of this, the temp table stuck around much longer than needed creating a situation that led to the error mentioned at the beginning of this post.

So let’s summarize what objects were used to solve this problem.

To Find the Temporary objects

sys.dm_db_task_space_usage

To get the User Name and Database Name

Syslogins and SysDatabases

To get the query

sys.dm_exec_input_buffer

Here is the final block of code.  You can run this in any database.

—-The foundation for this code can be found at all of the links below
—-https://www.c-sharpcorner.com/blogs/monitoring-tempdb-space-usage-on-sqlserver

—-http://kushagrarakesh.blogspot.com/2018/02/which-sessions-sql-text-cosuming-most.html

—-https://www.sqlservercentral.com/forums/topic/high-tempdb-usage-where-is-the-culprit

SELECT R1.session_id AS ‘SPiD’
, db.name
, lg.name AS ‘UserName’
, ib.event_info AS ‘Query’
FROM (SELECT session_id
                            , request_id
                            , SUM(internal_objects_alloc_page_count) AS                  ‘Task_request_internal_objects_alloc_page_count’
, SUM(internal_objects_dealloc_page_count)AS ‘Task_request_internal_objects_dealloc_page_count’
, SUM(user_objects_alloc_page_count) AS ‘Task_request_user_objects_alloc_page_count’
, SUM(user_objects_dealloc_page_count)AS ‘Task_request_user_objects_dealloc_page_count’
FROM sys.dm_db_task_space_usage
WHERE session_id > 50
GROUP BY session_id, request_id) R1
INNER JOIN (SELECT session_id
, SUM(internal_objects_alloc_page_count) AS ‘Session_request_internal_objects_alloc_page_count’
, SUM(internal_objects_dealloc_page_count)AS ‘Session_request_internal_objects_dealloc_page_count’
, SUM(user_objects_alloc_page_count) AS ‘Session_request_user_objects_alloc_page_count’
, SUM(user_objects_dealloc_page_count)AS ‘Session_request_user_objects_dealloc_page_count’
FROM sys.dm_db_Session_space_usage
GROUP BY session_id) R3
ON R1.session_id = R3.session_id
INNER JOIN sysprocesses pr
ON r1.session_ID = pr.spid
INNER JOIN sysdatabases db
ON pr.dbid = db.dbid
INNER JOIN syslogins lg
ON lg.sid = pr.sid
CROSS APPLY sys.dm_exec_input_buffer(R1.session_id,null) ib
WHERE
Task_request_internal_objects_alloc_page_count > 0 OR
Task_request_internal_objects_dealloc_page_count> 0 OR
Task_request_user_objects_alloc_page_count > 0 OR
Task_request_user_objects_dealloc_page_count > 0 OR
Session_request_internal_objects_alloc_page_count > 0 OR
Session_request_internal_objects_dealloc_page_count > 0 OR
Session_request_user_objects_alloc_page_count > 0 OR
Session_request_user_objects_dealloc_page_count > 0

For our final report I used Data Tools to create and SSRS report that can be used in SQL Server Management Studio.  It looks like the image below.  You can also down load the RDL file here: WhoCreatedTempObjects

Our investigative team has found the problem code and solved the issue.   Now back to YouTube.  For this post I wanted to try something a bit different, make a story out of it. Hopefully, you still learned something. That is why I do this, to help others learn.

Thanks for visiting my blog.

Azure Data Studio Connections and SSMS Registered Servers

Azure Data Studio and SQL Server Management Studio share a great deal of functionality, especially if you add the functionality of the ADS extensions.  While they both are great tools, very little information is passed from one tool to the other. For example, when you make a connection to a SQL Server in either tool, it will query the sysdatabases table to get a list of databases.   You will see the same list of databases in both tools.  This is something that looks like the two tools share, but in reality do not.

Now, let’s take a look at something that does get passed from Azure Data Studio to SSMS. To see this you will first need to open the Registered Servers window.  This can be found under the View menu item. It is here that you will find something that is passed from Azure Data Studio to SQL Server Management Studio.


Registered servers in SQL Server Management Studio can be very useful, especially if you need to run the same block of code on multiple servers.  This window does not exist in Azure Data Studio.  When viewing the Registered Servers window in SQL Server Management Studio, you will see at least two groups, Local Server Groups and Azure Data Studio.

Notice in the above image, you see several folders under both Local Server Groups and Azure Data Studio.  The items under Local Server Groups were created using SSMS.  If you right clock on Local Server Groups, you will see a context menu pop up and you can then add another group or register a server.

However, if you right click on Azure Data Studio a context menu will NOT appear.  If you want to add a group here, you will need to do so using Azure Data Studio instead.

To do this in Azure Data Studio, you will need to create a new Server Group.  When in the Connections panel, use the button highlighted below to create a new Server Group.

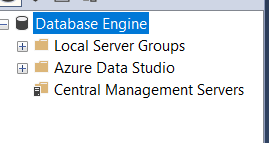
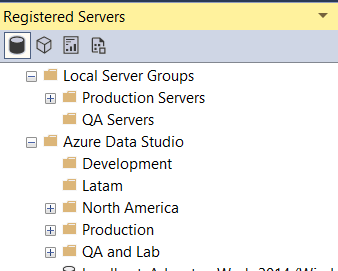
You do not need to restart Azure Data Studio to see the new group in the Connections pane.  However, you will need to restart SQL Server Management Studio to see the new group in the Registered Servers window.

Thanks for visiting my blog!!!

PoorSQL Formatter in SSMS

Formatting T-SQL code is very important.  There are many tools that we can use to help us.  One of my favorites is the PoorSQL Formatter.  There is a website that you can use, www.poorsql.com.  I also did a blog post a while ago on the PoorSQL extension for Azure Data Studio, you can find it here.  Now I have found out that there is also a plug in for SQL Server Management Studio.  This apparently has been around for a while. but I just became aware of it recently. The version of PoorSQL Formatter we are going to talk about in this post will work with SSMS 2014 or newer.

So what is PoorSQL Formatter?  Well, as you probably know, formatting is very important when writing T-SQL code.  While we try to format our code as we write it, sometimes the code we need to review was written by someone else and maybe doesn’t follow formatting standards. This is where PoorSQL Formatter will come in handy.  It will help us take the poorly written code and format it in a manner that is more in line with T-SQL formatting best practices.  The best part, it will do the formatting in seconds.

In order to install this extension, we will need to download it first.  To do so, go to PoorSQL,com.  Once you are there, find the link that says “SSMS/Visual Studio plugin, this will be toward the top of the page.  As in the image below.

Once you download the MSI file, double click it and install it.  Then open SSMS.  When you do, under the Tools menu, you will find two new items.  “Format T-SQL Code” and “T-SQL Formatting Options…”.  Of course the first one is what you will use to format your code.  While the second item is where the rules that the tool will follow when formatting code.

Let’s take a look at the options first. When you click the menu item, a window similar to the image below will appear.

As you can see there are a number of options.  I usually keep the defaults, which is what you see above.  I think they are pretty good default settings.

Once you have opened your poorly formatted code in SSMS, you can now use PoorSQL Formatter to fix some of the issues.  To do this, now click on the first menu item, “Format T-SQL Code”.  Once you click it, it will now format your code based on the preferences you have define.  Again, I think the defaults are pretty good.  Well, they work for me.

The more I use this tool, the more I like it.  I even have choices in what rules for formatted and what development tool I can use.  I can use it in both Azure Data Studio and SQL Server Management Studio.

Thanks for visiting my blog!!

TSQL Formatting – My Thoughts

During my SQL Server classes I am asked many times about how to format T-SQL.  If you do a Google search on How to Format T-SQL, you will get a ton of results.  There are many great posts on this topic. This post will identify some industry standards for formatting and my personal thoughts on formatting.

As you may know, formatting is very important.  If we have a production outage that is caused by a stored procedure, as the DBA you might be asked to review the code in the stored proc.  This is expected, however what might not be expected is poorly formatted code.  This poorly formatted code could lead to a longer outage because now you will need to take more time to read the code to figure out what it is doing.  This is true especially if you did not write the code or you did write the code but don’t remember it because it was a long time ago.

So here are my thoughts……

Capitalize all Keywords

While this in no way is a requirement, I believe that by doing so the code is cleaner and easier to read.  I also think the keywords jump out more when they are in caps.

select *
from production.Product
where ProductID > 350

With keywords in Caps:

SELECT *
FROM production.Product
WHERE ProductID > 350

Alias All Tables

I like to alias all tables, even if the query only uses only one table. The reason for using an alias even with one table is that if that query evolves into a query with more than one table, that initial table already has an alias and is set up for the addition of more tables.

When I use a table alias, I have two simple rules I follow.

          • It needs to be somewhat descriptive – The reason for this is straight forward.  I feel it makes it easier to determine which table all the columns are coming from.
          • All aliases should have the same number of characters – When I write T_SQL code, I find it easier to read if the dots between the alias  and the column name.  If the alias is the same length this is easier to do.

The code below has three table aliases, all different length.  To me it just seems busier and more difficult to read.

Alias All Columns

When there is a table alias, we should be using it for all columns.  When a column exists in both tables in the join, you will get error like below.

Msg 209, Level 16, State 1, Line 2
Ambiguous column name ‘ProductID’.

Using an alias on all columns, you can prevent this error.  You can also make is easier to figure out what table each column comes from.  Using the example below, it can be a bit challenging to figure out which table the ListPrice column comes from.  When looking at the tables involved in the query, it could logically come from two tables, Production.Product and Sales.SalesOrderDetail.  Because of the lack of an alias, this task becomes more difficult.

Have Vertical Lines

I like to vertically line up elements of the statements.  If you look below you will see an example of what my code will typically look like.

By doing this, for me it is easier to identify which SELECT, FROM and WHERE are part of the same statement.  As well as which ON goes with which JOIN.  I also feel that by doing this, the code is cleaner and easier to read.

Place Column Names Vertically

Over years I have had to review code that was written by others, and honestly sometimes myself, that placed the columns horizontally.  Similar to the first image below.  What I have found is that by placing the columns in this manner, it becomes more difficult to review the code.  Especially if there is a function or a CASE statement.

By doing this, it will be easier to add or remove columns from the result set.

Place the Comma before the Column Name

If you can place the comma before, of course you can also place it after the column name.  While some believe placing it after is the way to go, I have found that placing it before the column name works better for me.  While you may develop your own preference, I think the most important thing here is that you have a standard and be consistent following it.

Looking at the example below, you can see that by having the commas at the front it is a bit easier to comment out a column.  The only except would be the first column.  If you comment out the first column, there is still the comma at the front of the second line that will cause an error.

Steps in the FROM and WHERE

When working in the FROM or WHERE clauses I like to format the code in a way that resembles steps.  I like to line up the INNER or OUTER key words in the join, but on the ON keyword.

By doing this, I have found it easier to pair up the ON and the JOINs.

I also like to do something similar in the WHERE clause.  By placing the AND keywords on different lines and off setting them, again similar to stairs, I think it is easier to read what the criteria for the query is.

Derived Tables

Sub-queries are not usually at the top of my list of potential solutions, however derived tables I look at a bit differently.  Because of this, I have used them from time to time in production code.  Just like another code, they should be formatted in a way that allows it to be easily read.

Kathi Kellenberger defines a derived table in her post at Apress.com in this way:

“Derived tables are subqueries that are used in the FROM clause instead of named tables”

When writing the code for a derived table, I still try to follow all the same rules, especially since it is still a SELECT statement.

CASE Statement

When using a CASE statement, I like to line up the WHEN keywords as well as the CASE and END.  As seen below.  I feel this just makes it easier to see your options in the CASE.

Indent

I think indenting is very important for any well formatted T-SQL code.  This can easily be done by using the TAB key.  There is a setting in both SSMS and Azure Data Studio that will define the number of spaces the cursor will move each time you press TAB.  The default is 4.  I find this to be the ideal number.  I have seen code that has used 2 and for me, 4 makes it easier to see the indent.  Therefore, in my opinion the code is easier to read.

In SQL Server Management Studio, you can set the number of spaces in the Options, which can be found under that Tools menu.

While in Azure Data Studio, this same setting can be found in the Preferences, which can be found under the File menu.

UNION\UNION ALL

With these two statements, I would usually follow all the formatting guidelines for a SELECT statement.  I do like to place a line before and after the UNION or UNION ALL.  I feel this makes it easier to identify the two statements.

SELECT Name
             , City
             , State
             , ‘Customer’ AS ‘Source’
FROM Customers

UNION

SELECT Name
             , City
             , State
             , ‘Employees’
FROM Employees

Comments

Comments are critical to any well written code.  T-SQL must be self-documented. Comments is how this can be accomplished.

There are two methods you can use to comment your code.  The first is by using two dashes.  This will comment out any code that is to the right of the two dashes.  In the image below, there are two examples of comments using the dashes.

The second method is to use a set of characters, /* and */.  Any text between these will be commented out.  As you can see below.

When I really want a comment to pop out, I like to use the * to define a start and end of the comment.  I like to do this more so when the code or procedure is very long.  I think this is a great way to break a larger block of code into more readable sections.

/*****************************************************

Insert your comment code here.

*****************************************************/

If you are creating a stored procedure, it should include a “flower box”.  This is a part of the code that provides critical information about the stored procedure.

I like to flower box to include the following information

          • Procedure Name
          • Date created
          • Who created it
          • Purpose
          • List of Parameters
          • Sample code
          • Historical modifications

Below is an example:

Calling a Stored Procedure

Calling a stored procedure is usually a relatively simple piece of code to write.  Especially if there are not any parameters involved.

If no parameters are involved, this code will just be a single line.

EXEC StoredProcName

However, if there are parameters involved, you have a few options to consider.  Parameters can be called either by name or by position.  My preference here is to call by name.

When calling by position, this is how the code would look.  By looking at it, you can probably assume that the 34 is the customerID and the dates are the start and end dates for the range. I have found that assuming something gets me “unexpected results” sometimes, so I don’t like to assume.

EXEC GetSalesByCustAndDate 34, ’02/01/2020′, ’02/29/2020′

I find that calling the parameters by name works better for me.  I also like to place each parameter on a separate line with the @ lined up.  While this in no way a requirement, it just works for me.

EXEC GetSalesByCustAndDate
                 @CustID = 34,
                 @StartDate = ’02/01/2020′
                 @EndDate =  ’02/29/2020′

Tools to help format

PoorSQL Formatter – This is an extension for Azure Data Studio.  I really like this extension and it is very easy to use.  In order to utilize this, you will need Azure Data Studio and the extension is self.  When you use this extension, there are a number of settings in Azure Data Studio that you can define the rules for PoorSQL Formatter to follow. Here is a link to my blog post in the topic.

In addition to being an extension for ADS, there is also a website that you can use.  Like the extension, you can define some of the rules it will follow when formatting code.  Here is the link.

I think it is important to mentions, both the extension and the web site have a great price…..they are FREE!!!

Redgate SQL Prompt – This tool is very nice for formatting.  It allows the developer to utilize pre-defined styles or you can create your own.  SQL Prompt will be installed right into SQL Server Management Studio.  After the installation is complete, you will see a new menu item, SQL Prompt. When open, you will see a number of menu items that allow you to access the functionality.

This is a great tool!!!  While there is a cost with this tool, it is definitely worth it.

SQL Prompt can be downloaded here, https://www.red-gate.com.

Code Beautifier – This is a nice online tool. Here is the link to this tool, https://codebeautify.org/sqlformatter.  This tool is also available as an extension in Visual Studio Code.

As with many of the online formatters, there are options.  In this case, you can Beautify your code as in the image below.

Or you can “minify” your code as in the image below.

Additional Websites for formatting – these are just a few sites I found on line.  Please review them carefully and use at your own risk.

http://www.dpriver.com/pp/sqlformat.htm

https://sqlformat.org/

While following industry standards is important, it is also important just to have a standard any standard.  Hopefully, the standard you follow will have it’s roots in what considered best practice..

These are in no way an all-inclusive list.  There are other guidelines as well.  These are just the basic ones I have followed for a number of years. I in no way comes up with these, these are the guidelines that I have learned over the years from many different sources. Again, these are just my thoughts and have worked for me for quite a few years.

Thanks for visiting my blog!!!

Backup History and Information

How long a database takes to backup is something that over the years I have been asked to get.  These requests come for different reasons, sometimes it could be to find out how much it has increased over time, sometimes it could be to see if the backup job is interfering with other jobs and sometime it isn’t about duration at all, it is more about showing the backups were completed.  Over the years I have had several auditors ask for backup history.

In order to get this information, we need to pull data from two tables in the MSDB database, backupset and backupmediafamily.

Backupset

Below is how Microsoft describes that Backupset table.  This table is in the MSDB database.

“Contains a row for each backup set. A backup set contains the backup from a single, successful backup operation.”

Since most audits usually are for a date range, the start date of the backup is how we will limit the rows returned to only the ones we need.

This table also has a column named Type.  This is where you can identify the type of backup.  Usually audits, at least the ones I have been involved in, usually only care about Full and Differential backups.  Because of this we will use this column to limit the rows returned to just that two back up types.  You can adjust as needed for your environment.

According to Microsoft’s documentation, these are the backup types you might find in this table.  This can be found here.


Backupmediafamily

This table has many columns, however for our purposes we will only use one, physical_device_name.  This column will store the destination of the backup.

I like to include this column because if we need to do a restore, this will help us find the proper back up.  In addition, it could also help us determine if a third part tool is being used to back up the database.

In the physical_device_name column you will usually see something like this:

C:\Program Files\Microsoft SQL Server\MSSQL14.MSSQLSERVER\MSSQL\Backup\100MBDB_backup_2020_02_01_061030_4137875.trn

As you can see the above path not only identifies the destination folder, it also has the file name.

Sometimes, you will see something like below:

{FCE8C7A1-C810-4F29-A612-2D39308039E3}4

Most of the time, although not all, this is because the database if being backed up by a third-party tool such as COMMVAULT.

Here is the code that pulls the data from the two tables mentioned above. If you look at the join, you will see that the two tables are joined on the media_set_id column in both tables.

SELECT s.database_name
, m.physical_device_name ‘DestinationLocation’
, CAST(DATEDIFF(SECOND, s.backup_start_date, s.backup_finish_date) AS VARCHAR(4))
+ ‘ ‘ + ‘Seconds’ AS ‘Duration’
, s.backup_start_date
, CASE WHEN ROW_NUMBER() OVER(PARTITION BY s.database_name ORDER BY s.backup_start_date ASC) = 1
THEN 0
ELSE
DATEDIFF(DAY,LAG(s.backup_start_date, 1,0)
OVER(ORDER BY DAY(s.backup_start_date)), s.backup_start_date)
END ‘DaysSinceLastBackup’
, CASE s.[type]
WHEN ‘D’ THEN ‘Full’
WHEN ‘I’ THEN ‘Differential’
WHEN ‘L’ THEN ‘Transaction Log’
END ‘BackupType’
FROM msdb.dbo.backupset s
INNER JOIN msdb.dbo.backupmediafamily m
ON s.media_set_id = m.media_set_id
WHERE s.backup_start_date >= ’04/01/2020′
AND s.backup_start_date <= ’06/30/2020′
AND s.type IN (‘D’, ‘I’)
ORDER BY s.database_name, s.backup_start_date

The above code will return a result set similar to below.  Notice the results include, Database Name, Destination, duration, start time, Days since last backup and Backup Type.

This is much of the information that I have had to gather for various reasons over the years.

Notice the column DaysSinceLastBackup.  This uses the LAG function to calculate the number of days between the current row back up start time and the previous row start time. This can be used to help identify if there are any missed backups.  We have used this as the foundation of an alert that will email us if a backup is missing.

Over the years I have found this code to be very useful.  While this focuses mostly on full and differential backups, it can easily be modified to return other backups times as well.  However, keep in mind the impact that might have on the DaysSinceLastBackup.  If you also return transaction log backups, this number might not be as useful as you might like it to be.

Unlike a DMV, the data in these tables will persist after a reboot.

Thanks for visiting my blog!!!


What is the Data Type Precedence order and how is it used for Implicit Converts?

There are many data types that can be used in SQL Server.  Picking the proper data type is essential, however it is also important to know when SQL Server will automatically complete a type conversion.  When SQL Server automatically converts data types, it will use the Data Type Precedence to determine what will be the target data type for the conversion.

When does SQL Server need to automatically convert data types?  There are a number of places, however you will commonly see this when joining on columns that are not the same data type or in the WHERE clause when comparing two values that are not the same data type.

This image below is a screenshot of the list that was taken from the following Microsoft document, Click Here.

Let’s take a few minutes to go over where data types are used in SQL Server and how to gather information about the data types.  As expected you can use them when creating tables and defining columns.  Each column will have a data type assigned to it.  If you look at the image below you can see the various data types on the Production.Product table in the AdventureWorks2014 sample database.

Another way to get the data types for a particular table is to run one of the following queries.  Of course you will need to change the parameter at the end to the name of the table you are looking for.  Below are two examples. One using an information_schema view, while the other is using the sys.columns table.

SELECT TABLE_CATALOG
, TABLE_SCHEMA
, TABLE_NAME
, ORDINAL_POSITION
, DATA_TYPE
FROM INFORMATION_SCHEMA.COLUMNS
WHERE table_name = ‘salesorderheader’

SELECT name
, Type_name(user_type_id) AS ‘DataType’
, max_length
, precision
, scale, is_nullable
FROM sys.columns
WHERE object_id = OBJECT_ID(‘production.product’)

You will also see data types used with declaring variables and stored procedure parameters.  We declaring a variable, can you not only provide a data type but can also assign the variable a value on the same line.

DECLARE @amount INT = 20

Just an FYI, you can still use the SET keyword to assign the variable a value, as in the code below.

DECLARE @amount INT

SET @amount = 20

Now that the variable is declared and assigned a value, it can now be used.  The type conversions will happen in a few places in the TSQL.  Most commonly it will be seen in the WHERE clause when the datatype in the column is different than the data type of the variable. Using the query below as an example, the variable has been incorrectly declared as a Varchar data type, while the SalesOrderID column is an INT database.  This difference is what is forcing a type conversion when doing the comparison.

DECLARE @SorderID VARCHAR(20)

SET @SorderID = ‘43659’

SELECT *
FROM [Sales].[SalesOrderHeader]
WHERE [SalesOrderID] = @SorderID

How Do I know an Auto Type Conversion took place?  Well there are a couple of different methods.  The first method is to use an Execution Plan. Before running your query, click the button in the red box below.

When looking at an Execution plan you will see a warning sign on the operator if there is an issue.  You can see this below on the operator to the far left, it is a yellow triangle.  This can be a warning for a few things, implicit convert is just one of them.

To find out if this is indeed an implicit convert warning float your mouse over it.  When you do, you will see a popup similar to below.  This clearly shows that a convert took place.

This not only tells you that the convert happened, it also identifies the consequence of the convert.  In this case, if the Cardinality Estimate is affected in a negative manner, the query optimizer may pick a less than ideal plan.  This could lead to a performance problem.

Another approach you can use to find out if an implicit convert happened is to use the sql_variant_property function.  This function accepts two arguments, an expression and a property.  The expression is what you think it might be, this is what we would like to evaluate for the datatype.  While the property has multiple options, we are going to focus solely on using the BaseType property.  We will use this to determine the data type of an expression.  Click here for find more information about the sql_variant_property.

If you look at the code below, you will see that there are two variables being declared and then in turn being passed into the first argument of the sql_variant_property function.  Notice that the two variables are different types, one TinyInt while the other is varchar.

DECLARE @one TINYINT
DECLARE @two VARCHAR(20)

SET @one = 1
SET @two = ‘2’

SELECT SQL_VARIANT_PROPERTY(@one + @two,‘basetype’) AS ‘ResultOfExpression’
, SQL_VARIANT_PROPERTY(@one,’basetype’) AS ‘DataTypeOf @one’
, SQL_VARIANT_PROPERTY(@two,’basetype’) AS ‘DataTypeOf @two’

When you run the above query you will get the results below.  Notice that the second two column return the same data type as the one specified when each of the variables were declared.  As for the first column, I am taking a TINYINT data type and adding it to a varchar datatype.  Because the data types are different, SQL Server will automatically convert the result to the variable data types that are higher up the precedent level.  In this case the resulting value will be a TINYINT.  SQL Server converted the ‘2’ to an tinyint data type from a varchar data type.

One additional tool you can use to capture implicit converts is Extended Events.  If are not familiar with Extended Events this is just a bit outside the level of this post.  However, I will cover a few basics.  Extended Events is a tool that can be used to capture information about what is happening on your server. Here is a link of a session I did at the SQL Saturday event in Dallas in 2018.  This will give you a high level overview of how to create a session.  Click Here.  Also, Grant Fritchey has a number of great blog posts on Extended Events.  They can be found here.

If you are familiar with Extended Events, the event you will want to use is the plan_affecting_convert event.

Here is the description of this event:

“Occurs when a type convert issue affects the plan. The expression value indicates the conversion that can cause inaccurate Cardinality Estimation or prevent from using a seek based plan in the query plan choice. If performance is affected, rewriting the query could help.”

Below is an example of what the data will look like.  We are able to collect the time as well as the query.  While these additional items are not in the below image, you can also collect the host, database name and login name.

Now that we have covered what implicit converts are, you might be wondering how can I prevent the auto conversions?  This is more of an matter of design than anything else.  Below are a few suggestions that will help prevent type conversions.

      • Declare data types appropriately for variables when writing TSQL code
      • User proper data types when designing parameters for stored procedures
      • Chose proper data types for table columns

In summary, there are a number of tools that we can use to identify when implicit converts.  Once you know when they are happening you can now begin to assess if it is causing a performance issue or not.  If so, you can begin to work on a solution.

Thanks for visiting my blog!!!

How Can you Provide Feedback for Azure Data Studio

Azure Data Studio has a number of great features.  When including the extensions, it has even more functionality.  Azure Data Studio allows for the creation of extensions to add or build on to the native functionality of ADS.  The question my come up in your mind, “How do I provide Feedback?”.

Feedback is very important to the Azure Data Studio team.  While I personally do not know any member of the team, if have attended sessions presented by them and they are very open to community members providing feedback.  All in an effort to continuously improvethe tool!  Just another reason why the SQL Server community is a great one to be a part of.

If we look at ADS, there is the application itself and the extensions.  The extensions come from a number of different places.  Companies like Microsoft and RedGate are just a few.  A large number of the extensions are provided by the community. Providing feedback for the extensions can be done a number of different ways.  Most will let you report issues on their GitHub site.  Microsoft has built into ADS a place to provide feedback.  This can be found in the lower right corner of Azure Data Studio.  The smile face!!

If you have the latest version of Azure Data Studio, as of March 10, 2020, the smiley face is now a different icon. See below.

If you do not see the Smiley face, right click on the Status bar and you will see this menu.  Click the “Tweet Feedback” item.


Simply click it Smiley Face and you will see the form below.

As you can see there are a few pretty obvious items.  Starting with the faces, smiley and frown.  These can not only be used to help express your feelings about something, it can also dictate the number of charaters you can use.  A smiley face allows for 237 characters, while a frown face allows for 259 characters.  This will allow you to Tweet your thoughts.

However, if you don’t want to use Twitter, you have a few other options. The image below shows the two options, “Submit a bug” or “Request a missing feature”.

These will take you to different places.  Starting with “Request a missing feature”.  You will be taken to the GitHub location for Azure Data Studio.  You can then complete the following form.

If this is your first time submitting an item, you will see a few links to the right of the above form.  This is something you should read.  This gives you the guidelines for submitting an issue as well the Code of Conduct.

It is important to read both of these so you know what the rules and expectations are.

When you click “Submit a Bug” a new form will open up.  It will look like the image below.

With the first drop down box you will see three options.

      • Bug Report
      • Feature Request
      • Performance Issue

While the next drop down box, Select Source has a few options as well.  These options include the following:

      • Azure Data Studio
      • An Extension
      • I dont know

Sometimes you simply may not know what the source is.  This is where the “I don’t know” option comes into play.  When you chose ‘An Extension” an additional drop down box will appear.  This new box will list out all the extensions you have installed.

Then give the issue a title and any steps needed to reproduce the issue.  It is important to provide as much details as possible so the development team will have enough information to address the issue at hand.

Now that you have entered all the important information you are ready to click: Preview in GitHub.  When you do this, ADS gives you a pretty good description of what the issue is and how we need to proceed.


When you click OK, you will be asked to login to GitHub.  It is here you will need to paste what is on your clipboard or enter new comments.

Now you are ready to submit.  Hopefully your suggestion will now be used to improve the Azure Data Studio end user experience.

Thanks for visiting my blog!!


ADS: TSQL Checker

Azure Data Studio has quite a few extensions that are very useful.  Over the past six to eight months I have completed a number of posts on quite a few of these extensions.  So far one of my favorite extension is the PoorSQL Formatter.  It provides great assistance in the formatting of Transaction SQL code. What it doesn’t do, is help identify code that is not in line with best practices.  This is where the TSQL Checker comes into play.

This extension was developed by Daniel Janick. Daniel is a Microsoft MVP from the Austin, TX area.  He can be found at @SQLSME on Twitter.

You might be wondering exactly what does this extension check.  According to the extension documentation this is what it checks:

“TSQL checks for hints, select * from options”

Of course “SELECT *” is a very well known problem in query design.  Hints and options can also create significant performance issues as well.   What exactly is a hint?  According to Microsoft’s documentation a hint is something that will over ride the execution plan that the query optimizer might select for a query. Here is a link to Microsoft’s documentation on hints.  Hints will act on the four DML statements, SELECT, INSERT, UPDATE and DELETE.  Hints should only be used as a last resort and only by experienced developers or DBAs.

While this extension is still in preview mode, it can still be very useful.  To install it you will click the “Install” button, green button below.  This will appear when you are looking at the documentation of the extension.  When you do, you will be asked to open the GitHub sight for this extension.

When you click open, you will be taken to the GitHub site for this extension.  You will want to download the tsqlchecker-0.0.1.vsix file.  It is highlighted below.  When saving it, save it in a location where it will not be overwritten.

To install this extension, simply go to the File menu and then go to “Install extension from Vsix file”.  While some extensions require a restart of Azure Data Studio, this extension does not.

The purpose of this extension is to help you identify code that is not inline with best practices.  In order to do so, the extension needs to mark the offending code in some manner.  The extension will do this one of three ways.

    1.  Highlighting the code with a box:
    2.  Highlighting the code in yellow:
    3. Highlighting the code in red:

Let’s take a look at some of the code that the TSQL Checker will flag.

Note: This code was take from the Microsoft documentation.  This really isn’t a post on what these things do, just how TSQL Checker flags them.  Refer to the Microsoft documentation for more information on these.

SELECT *

MAXDOP

FORCESEEK

FORCESCAN

LOOP JOIN

MERGE JOIN

OPTIMIZE FOR

HASH JOIN

For all of these warnings, the developer has also added a popup that will provide additional information.  When you float the cursor over the warning you will see somethings similar as you is in the image below.

I really like this extension.  It reminds us of code that is less than ideal and should be reviewed.  Remember, few if any of these hints are recommended for production use.  If you run into a situation that you think these are part of the solution, just do your homework first.  Research and see if there is a better way to address the problem.

Thanks for visiting my blog!!!


ADS: DB Snapshot Creator

Like many Azure Data Studio extensions, DB Snapshot Creator is designed to bring functionality into ADS that is not present by default.  This extension was developed by Sean Price. As the name suggests, this extension can be used to easily create database snapshots.  Before going too deep into this extension, let’s take a quick moment to go over what a snapshot is.

First of all don’t think of it as a backup.  Think of it as a read-only copy of the database.  As pages are modified for the first time in the source database, SQL Server will move the original unmodified pages to the snapshot.  This process will allow users to see that snapshot that is a mirror of the database when the snapshot was created. You might be asking, why should I use a snapshot?  There are a number of reasons, but the biggest in my mind is the ability to use the snapshot for reporting purposes.

What if an 8-K page is modified twice?  SQL Server will only copy the page to the snapshot the first time it is modified.  After that, the page will not be copied again.

In Microsoft’s documentation, found here, right at the beginning of the document MS makes one very important point.

“Database snapshots are unrelated to snapshot backups, snapshot isolation of transactions, or snapshot replication.”

To find if there are any snapshots you can use the code below.  This code will not only tell you if snapshots exist, it will also return what database it is associated with and when it was created.

SELECT    a.name AS ‘Snapshot Name’
                , a.create_date AS ‘Snapshot Create Date’
                , b.name AS ‘Source Database’
                , b.create_date AS ‘Database Create Date’
FROM sys.databases a
     INNER JOIN sys.databases b
ON a.source_database_id = b.database_id

This is what the results will look like.

Microsoft has some good documentation on Snapshots.  Go here to read it.

How to Create the Snapshot in SSMS

This is pretty easy to do.  Many times if you want to do something with a database you can right click on the database and easily perform the desired task. This could be completing a backup, shrink the database and restore the database.  One task that is not present is Create Snapshot.  Given this, you will need to use TSQL to create the snapshot.  Note the file extension, it is not MDF or NDF.

CREATE DATABASE [AdventureWorks2014_Snapshot_02_27_2020_01] ON
(NAME = [AdventureWorks2014_Data],
FILENAME = ‘C:\Program Files\Microsoft SQL Server\MSSQL14.MSSQLSERVER\MSSQL\DATA\AdventureWorks2014_Snapshot_02_27_2020_01.ss’)
AS SNAPSHOT OF [AdventureWorks2014];
Below is a screenshot of the files in the file system.  As you can see, the file for the snapshot has a different extension and there is not a corresponding .ldf file.

How to Create the Snapshot in Azure Data Studio

The option to use TSQL is always present, even in Azure Data Studio.  And just as in SSMS, when you right click on the database, Create Snapshot is not an option.  This is where the DB Snapshot Creator extension can help.  Something to keep in mind as we go over this extension, it is still in preview mode.  Neither the documentation in Azure Data Studio nor the GitHub site have a great deal of documentation on this.  However, there is an FAQ that answers three questions.  These questions are below and were taken directly from the extension documentation.

To install the extension you will first need to download the .vsix file.  When viewing the extension the in the Extension Marketplace, you can click the green Install button. This will take you to the Github where you can download the file.

Make sure the place this file in a location where it will not be deleted.  Once downloaded, you can go to the File menu and to “Install Extension from VSIX package”.

Then simply find the file and it will install.  Now when you right click on a database you will see a new menu item to create the snapshot.

By default, when you click the above menu item Azure Data Studio will write the code to create the extension, but not actually create it.  The CREATE DATABASE statement earlier in this post was created by this extension.  This code is also below.

CREATE DATABASE [AdventureWorks2014_Snapshot_02_27_2020_01] ON
(NAME = [AdventureWorks2014_Data],
FILENAME ‘C:\Program Files\Microsoft SQL Server\MSSQL14.MSSQLSERVER\MSSQL\DATA\AdventureWorks2014_Snapshot_02_27_2020_01.ss’)
AS SNAPSHOT OF [AdventureWorks2014];

However, if you would like to skip the step of having the code written, you can go to preferences and uncheck the box below.

While in SSMS, the snapshots are located in a folder as seen below.

In Azure Data Studio, the snapshots are located at the same level as the rest of the databases.


This extension makes the creation of a database snapshot very easy!  And like all other extensions, it has a great price. FREE!!

Thanks for visiting my blog!!